
File Upload Service in .NET 9
Introduction
File uploads are a common feature in most modern applications. Whether you’re uploading images, documents, or other media, it’s important to have a clean and scalable solution for managing file storage. In this article, we will build a simple file upload service for a .NET Web API using .NET 9 (though this approach will work for .NET 5 and later).
Overview
In this tutorial, we will cover:
- Creating an API to handle file uploads.
- Saving files to a local server directory and returning the file URL to the frontend.
- Building a generic file upload service that can later be extended to support cloud storage solutions like AWS S3 or Azure Blob Storage.
High-Level Flow
- The frontend sends a file along with the payload to the API.
- The API saves the file to a specified folder on the server.
- The backend returns the file URL to the frontend, which stores it in the database.
- The system should be designed in a way that switching to cloud storage services later would be easy and require minimal changes.
Here’s a visual representation of the flow:
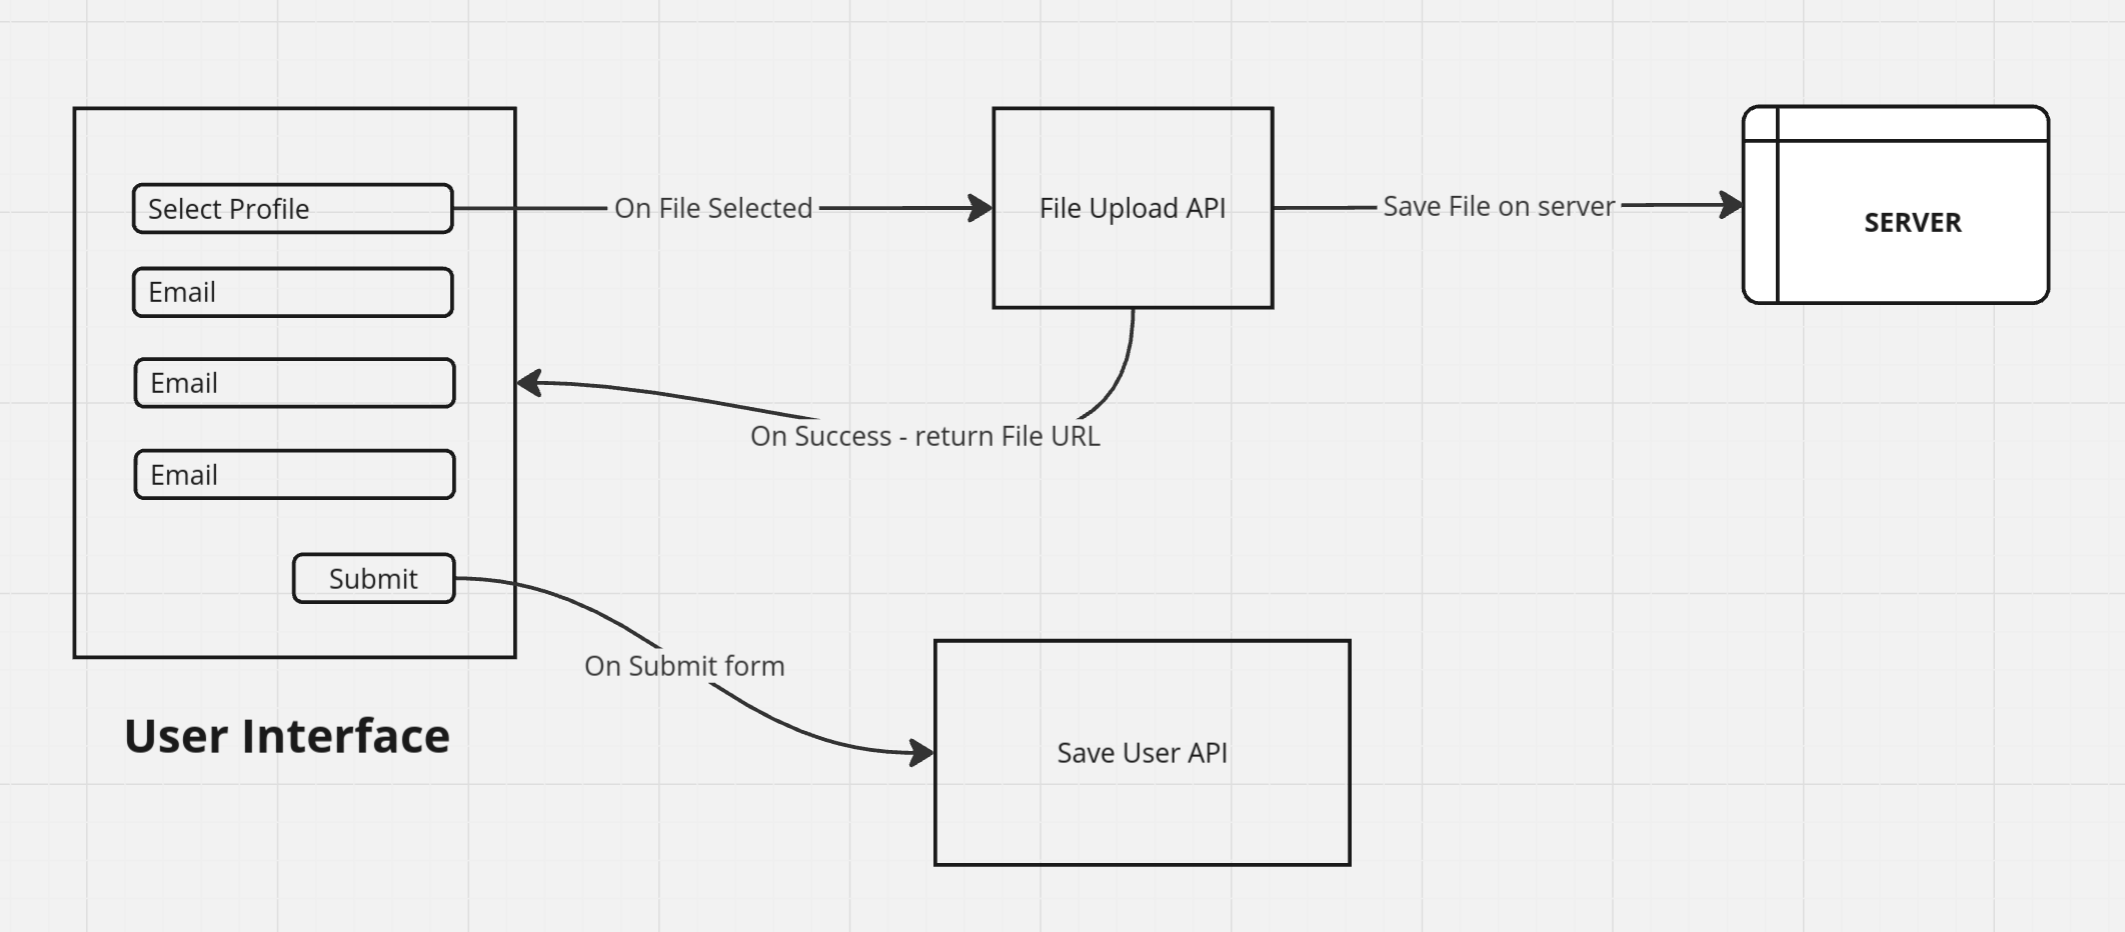
By keeping the file upload logic separate in its own service, we can easily replace it with a cloud-based solution, like AWS S3 or Azure Blob Storage, with minimal changes to the API. Let’s dive into the implementation!
File Upload service
Define Models (DTOs or ViewModels)
We need to create some models (DTOs) to handle the file upload and deletion process. These models will be used in the API methods to communicate with the client.
FileUploadRequest Model
// later you can add more fields - I like to send here an enum value sometimes based on which module this image belongs to so I can create a subfolder later.
public record(IFormFile File);
FileUploadResponse Model
// add or remove fields based on what you need.
public record(string FileUrl);
DeleteFileRequest Model
public record(string FileName);Define the IFileUploadService Interface
Next, we’ll create an interface that defines the file upload and delete methods.
public interface IFileUploadService {
  Task<FileUploadResponse> UploadFileAsync(FileUploadRequest requestModel);
  Task<bool> DeleteFileAsync(DeleteFileRequest requestModel);
}
Implement the FileUploadService
Now we will implement the FileUploadService class that implements the IFileUploadService interface. This class will handle both the file upload and deletion logic.
Upload File Method
This method will handle the file upload process. It will save the file to a folder on the server (inside the wwwroot/uploads directory) and return the file’s URL.
public class FileUploadService : IFileUploadService
{
    public async Task<FileUploadResponse> UploadFileAsync(FileUploadRequest request)
    {
        string folderPath = Path.Combine(_env.WebRootPath, "uploads");

        // create the directory if it does not exist
        if (!Directory.Exists(folderPath))
        {
            Directory.CreateDirectory(folderPath);
        }

        // extract the file extension for some specific purpose - like validation
        string extension = Path.GetExtension(request.File.FileName);

        // You can add validation here to allow only specific files using the extension extracted -
        if (!IsValidImageFile(extension))
        {
            return new FileUploadResponse(string.Empty);
        }

        string fileNameWithoutExtension = Path.GetFileNameWithoutExtension(request.File.FileName);

        // I am concatenating a new guid to the end of the filename so that if file with same name is uploaded twice that is handled correctly
        string fileName = $"{fileNameWithoutExtension}_{Guid.NewGuid()}{extension}";
        string filePath = Path.Combine(folderPath, fileName);

        await using var stream = new FileStream(filePath, FileMode.Create);
        await request.File.CopyToAsync(stream);

        return new FileUploadResponse($"/uploads/{fileName}");
    }
}
Lets break it down a little bit to understand what is happening:
First, we are getting the folder path which is a combination of _env.WebRootPath and “uploads” string. The WebRootPath gets the path of the wwwroot folder inside the project then we are creating another folder inside wwwroot folder called “uploads”.
Note: If the wwwroot folder does not exist in your project make sure to create it manually. Otherwise it will throw error when calling _env.WebRootPath.
Second, we are checking if the Directory exists or not which is “path_to_your_project/wwwroot/uploads”. If the path does not exist it will create the path.
Third, we are extracting the extension so that we can validate different types of files that we want to allow. Along with that we are validating if the file that is being uploaded is an image or not.
Forth, we are generating a new name for our file, which is a combination of the File Name itself and we attach a new Guid at end of the file name. Why? you might ask - If you upload multiple files which have the same name it will crate a problem so by adding Guid to end of the name makes sure each filename is unique.
Finally, we are copying file to the wwwroot/uploads folder using FileStream and return the result i.e: path of the file.
Delete File Method
This method will handle deleting a file from the server.
public bool DeleteFile(DeleteFileRequest request)
{
    string folderPath = Path.Combine(_env.WebRootPath, "uploads");
    var filePath = Path.Combine(folderPath, request.FileName);

    if (!File.Exists(filePath))
    {
        return false;
    }

    try
    {
        File.Delete(filePath);
        return true;
    }
    catch (IOException ex)
    {
        // handle exception - Logging, etc
        return false;
    }
}
The delete function is very simple and straightforward we are again getting the “wwwroot/uploads” folder. Then, we are creating a full path combining file name with the folder path. And then we are checking if the file exists or not. If the file exists we are simply deleting the file.
For exception handling you can implement a global exception middleware which is much better way to handle errors, but for the sake of this demo I have used try catch here.
Configure the File Upload Service
Now, let’s configure the FileUploadService in the dependency injection container. We will also ensure the application is set up to serve static files (which includes the uploaded files) by configuring UseStaticFiles and UseDefaultFiles middleware in the Program.cs file.
// add in services section
builder.Services.AddScoped<IFileUploadService, FileUploadService>();

// add in middleware section before app.Run()
app.UseStaticFiles();
app.UseDefaultFiles();
Create the File Upload Controller
Finally, lets create the controller with two endpoints and call the functions that we just created.
[ApiController]
[Route("api/files")]
public class FileUploadController : ControllerBase
{
private readonly IFileUploadService _fileUploadService;
public FileUploadController(IFileUploadService fileUploadService)
{
_fileUploadService = fileUploadService;
}
[HttpPost]
public async Task<IActionResult> UploadFile(IFormFile file)
{
var result = await _fileUploadService.UploadFileAsync(new FileUploadRequest(file));
return Ok(result);
}
[HttpDelete]
public IActionResult DeleteFile(string fileName)
{
var result = _fileUploadService.DeleteFile(new DeleteFileRequest(fileName));
return Ok(result);
}
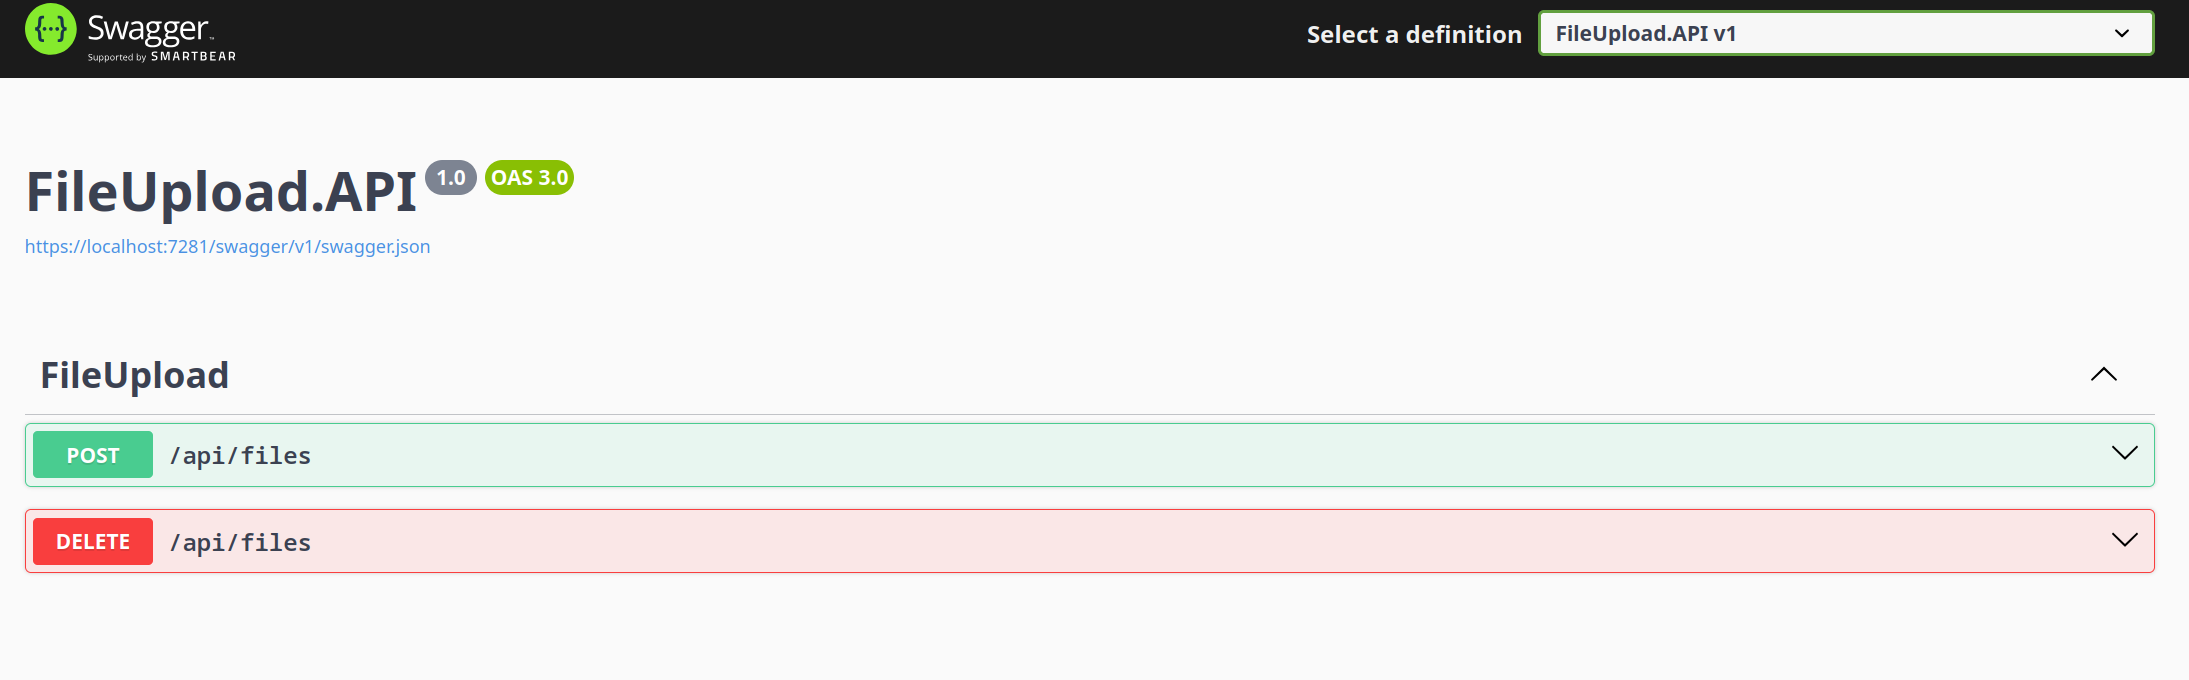
}Test the API
Now, if you have configured swagger in you api project you should be able to see the api as below:
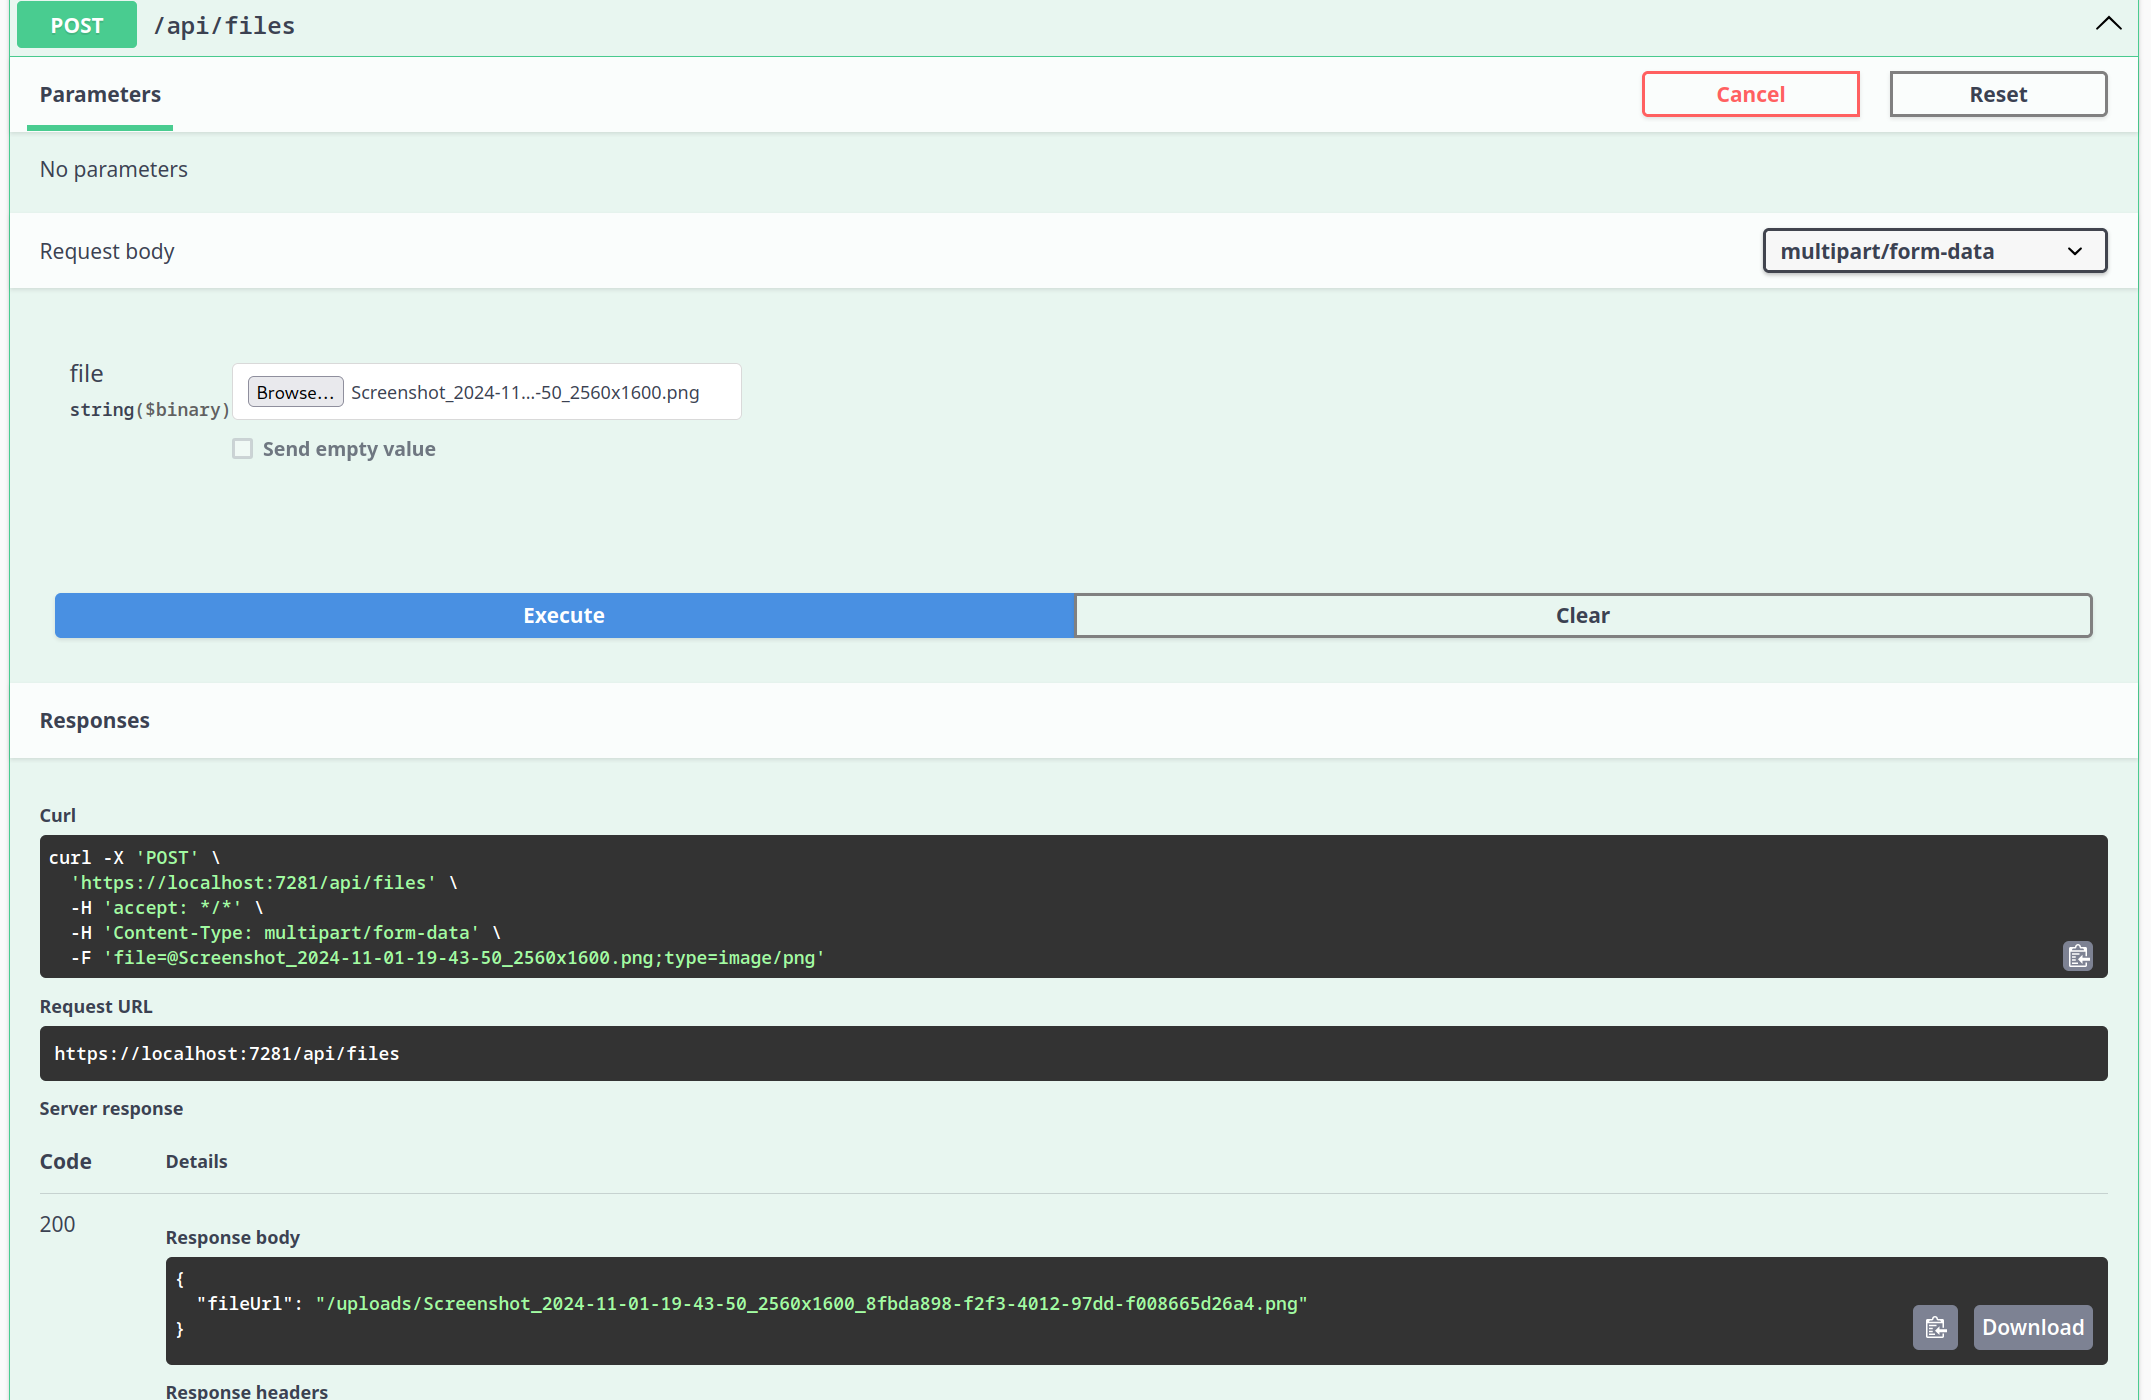
When you upload a file, you should see the below result:
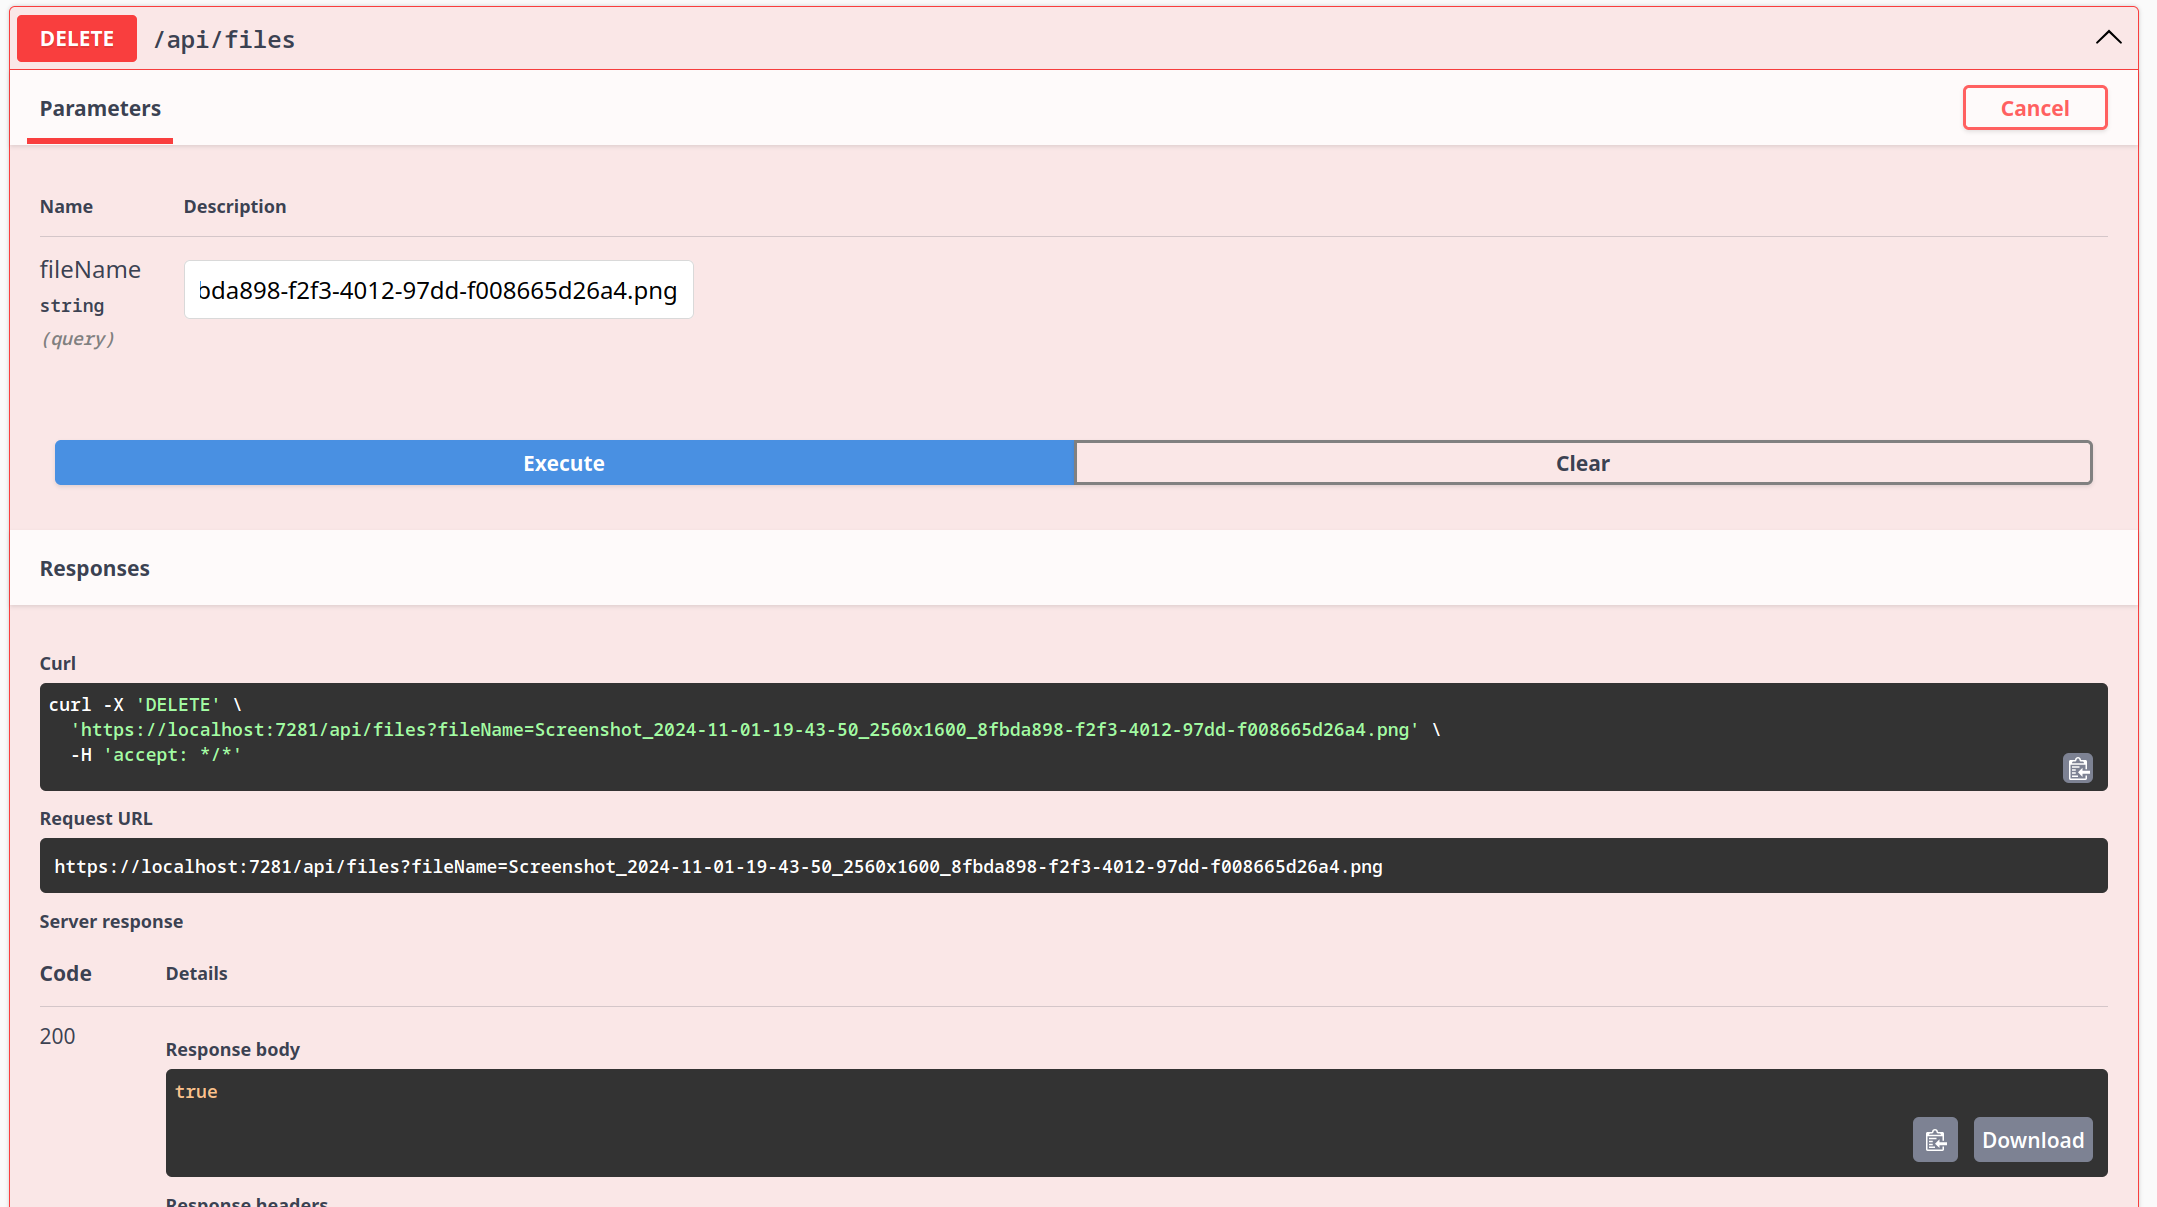
And, on deleting you should see the below result:
In the above controller we have added two endpoints for uploading and deleting a file.
Scaling for Larger Projects: Moving to Cloud-Based File Storage
In larger projects, especially those that require scalability and reliability, relying on local server storage for files may not be the best option. Cloud-based file storage services like AWS S3 or Azure Blob Storage are specifically designed to handle large volumes of data and provide a high level of durability, security, and performance.
How the Process Would Work with Cloud Storage
When moving to cloud-based file storage, the process of handling file uploads changes slightly:
Frontend Direct Upload to Cloud Storage
- Instead of uploading files directly to the backend API, the frontend will send files directly to a cloud service like AWS S3 or Azure Blob Storage.
- The backend provides a pre-signed URL or upload URL to the frontend. This URL allows the frontend to upload files securely without needing the backend to handle the file directly.
- In AWS S3, for example, this is a URL generated using temporary credentials that allow the frontend to upload a file to a specific S3 bucket.
- Similarly, in Azure Blob Storage, the backend would generate a SAS (Shared Access Signature) token that grants the frontend temporary access to a specific container in Azure Blob Storage.
File Upload
- The frontend uses the provided pre-signed URL or SAS token to upload the file directly to the cloud storage.
- This approach removes the burden of handling file streams and file size limits on the server side, and allows for faster uploads due to the direct connection to the cloud storage.
Based on your configuration you can either save the file url in database or you can create a function for generate Pre-Signed URL everytime frontend tries to access the image and after some time that URL will automatically expire.
This was just an overview of moving things to cloud. As, it depends on which cloud service one chooses. If you want to learn more make sure to check out the documentation for AWS S3 Bucket and Azure Blob.
Finally!
If you have read the article till here, thank you. Let me know in the comments if this needs enhancements or if this was helpful to you.
You can find the demo code here: https://github.com/sajadshafi/FileUpload.NET.