
Implementing Firebase auth in React, Typescript, Vite
Introduction
ReactJS is a popular and widely used JavaScript library that allows developers to build user interfaces for web applications. Most of the times we would like our application to be secure, which in this article will be achieved using firebase auth.
Firebase Auth is a user authentication service that allows developers to easily add authentication to their applications. When combined with React js, it becomes simple to manage authentication in an efficient and effective manner to protect an application. In this guide, we’ll look at how to utilize Firebase Auth with React js to implement these functionalities.
Typescript
I will be using typescript for the purpose of this article as it is a strongly typed language and will save a lot of time debugging our application.
Instruction for Javascript developer
In this article you might see typescript Interfaces or types example: LoginFormValuesand UserFormValues. If you are using Javascript just remove :LoginFormValues and :UserFormValues or any other type that we might use in future.
Below is the example with Typescript (with types and interfaces) and Javascript (without types and interfaces)
With types for Typescript
const SignIn = async ({ email, password }: LoginFormValues) => {
  const result = await signInWithEmailAndPassword(
    firebaseAuth,
    email,
    password
  );
  return result;
};
Without types for Javascript
const SignIn = async ({ email, password }) => {
  const result = await signInWithEmailAndPassword(
    firebaseAuth,
    email,
    password
  );
  return result;
};
Setting up the firebase
To setup the firebase visit the Firebase website and login using your regular google account. If you are already logged in the you can click on Go the console option.
From console click on Add Project, then enter the project name and click continue.
Now on Google Analytics if you want to turn google analytics off you can do that by clicking the toggle button. For now I will turn it off, and then click Create Project.  It will take a minute or two to create the application.
Now we will be redirected to the dashboard page.
It will take a minute or two to create the application.
Now we will be redirected to the dashboard page. 
Next we will leave the firebase there and we will start creating our React app.
Setting up the react app
To create a react application I will be using vite js as it gives a fast development experience. You can also use npx create-react-app to follow this article.
Also, for the package manager I will be using pnpm but you can use npm as well the steps will be same for both of them.
Run the following command to create a react-vite with typescript template:
#// for pnpm users
pnpm create vite react-vite-template --template react-ts

#// for npm version 6 users
npm  create  vite@latest  react-vite-template  --template  react-ts

#// for npm version 7 users
npm  create  vite@latest  react-vite-template  --  --template  react-ts

# yarn users
yarn  create  vite  react-vite-template  --template  react-ts
Note: If you don’t want to user typescript just remove the -ts at the end of the react-ts.
Now, run the command as cd react-vite-template in the terminal/command prompt then run pnpm install or npm install. Once, all the dependencies are installed, run the command pnpm run dev or pnpm dev or npm dev to see if the first step is successfull.
Firebase - React setup
Lets now configure react app and consume firebase.
Go to firebase console and click on the web icon which is highlighted below in the image: ![]()
On the register app page write the app-name.
Now on the Add Firebase SDK there are some instructions:
Install firebase in your react project using the command pnpm install firebase or npm install firebase.
in the firebase console you will see the configuration settings as: 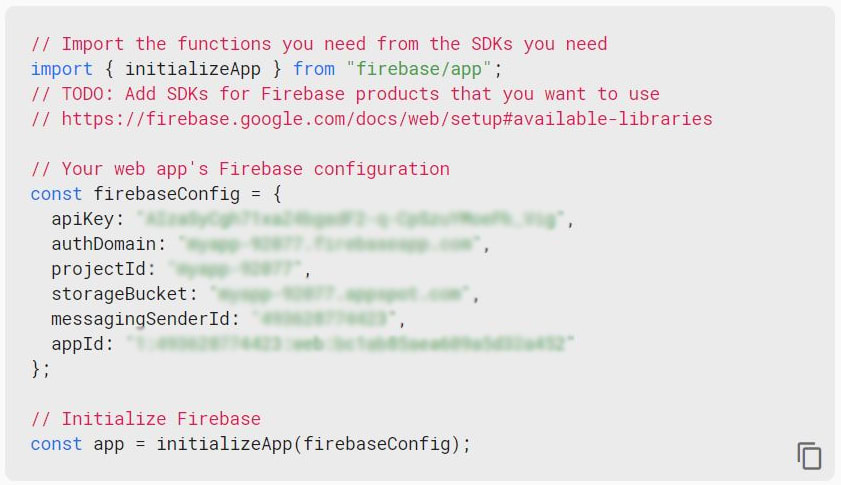
In the react app create a file .env in the main folder of the vite project next to src folder to store some configurations from firebase.
#firebase configurations in .env file
VITE_FIREBASE_APIKEY=your_api_key
VITE_FIREBASE_AUTH_DOMAIN=your-auth-domain
VITE_FIREBASE_PROJECT_ID=your-project_id
VITE_FIREBASE_STORAGE_BUCKET=your_storage_bucket
VITE_FIREBASE_MESSAGE_SENDER_ID=your-message-sender-id
VITE_FIREBASE_APP_ID=your-firebase-id
VITE_FIREBASE_MEASUREMENT_ID=your-measurement-id
Note: If you are not using Vite js then write as below:
#firebase configurations in .env file without vitejs
REACT_APP_FIREBASE_APIKEY=your_api_key
REACT_APP_FIREBASE_AUTH_DOMAIN=your-auth-domain
REACT_APP_FIREBASE_PROJECT_ID=your-project_id
REACT_APP_FIREBASE_STORAGE_BUCKET=your_storage_bucket
REACT_APP_FIREBASE_MESSAGE_SENDER_ID=your-message-sender-id
REACT_APP_FIREBASE_APP_ID=your-firebase-id
REACT_APP_FIREBASE_MEASUREMENT_ID=your-measurement-id
Change these values according to your firebase configuration, and click Continue to Dashboard.
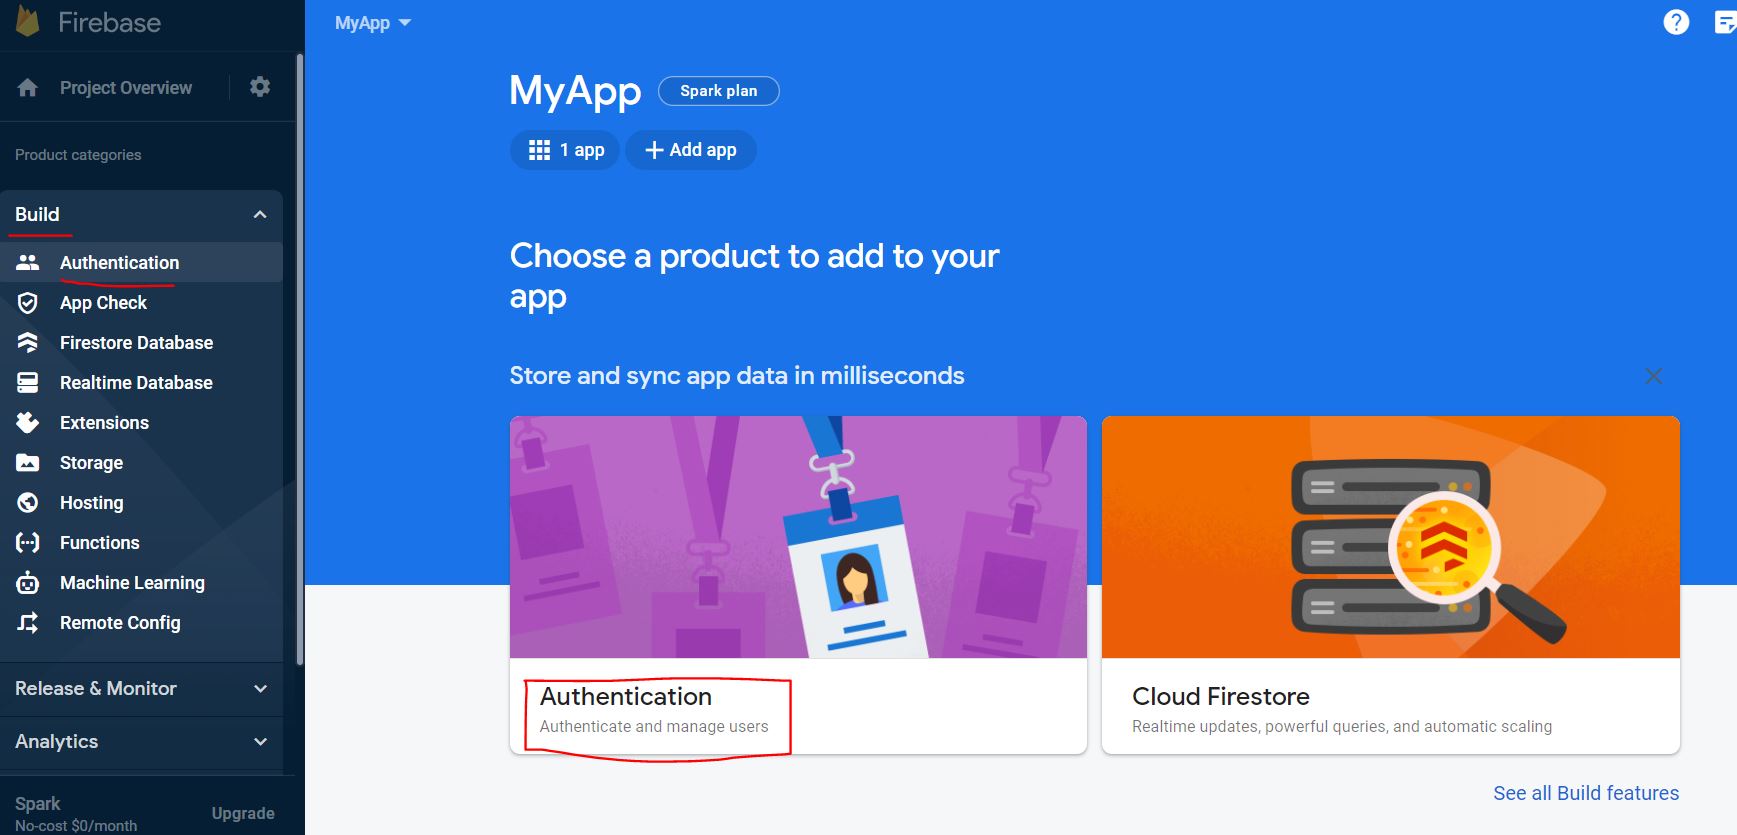
In the Firebase click on Authentication card or on the left panel click on Build and then Authentication:
 Then click on
 Get started.
Now the authentication page will appear on which click Sign-in methods and click Email/Password and enable Email/Password. 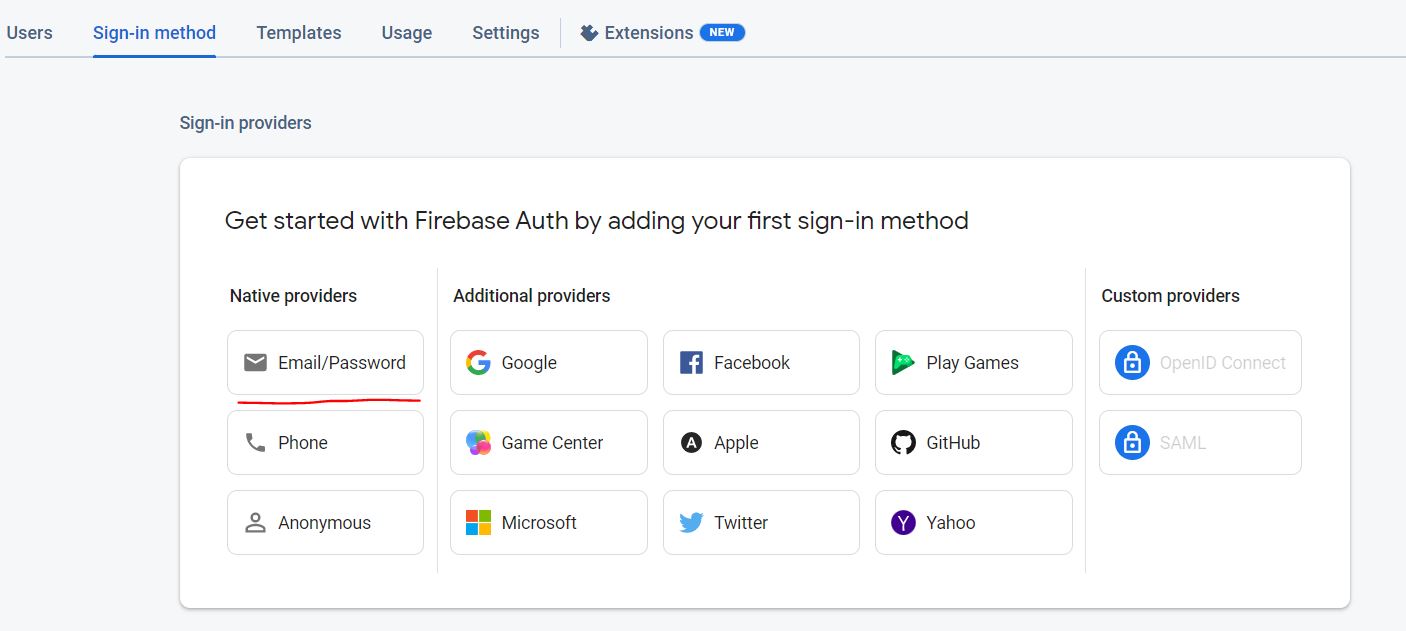
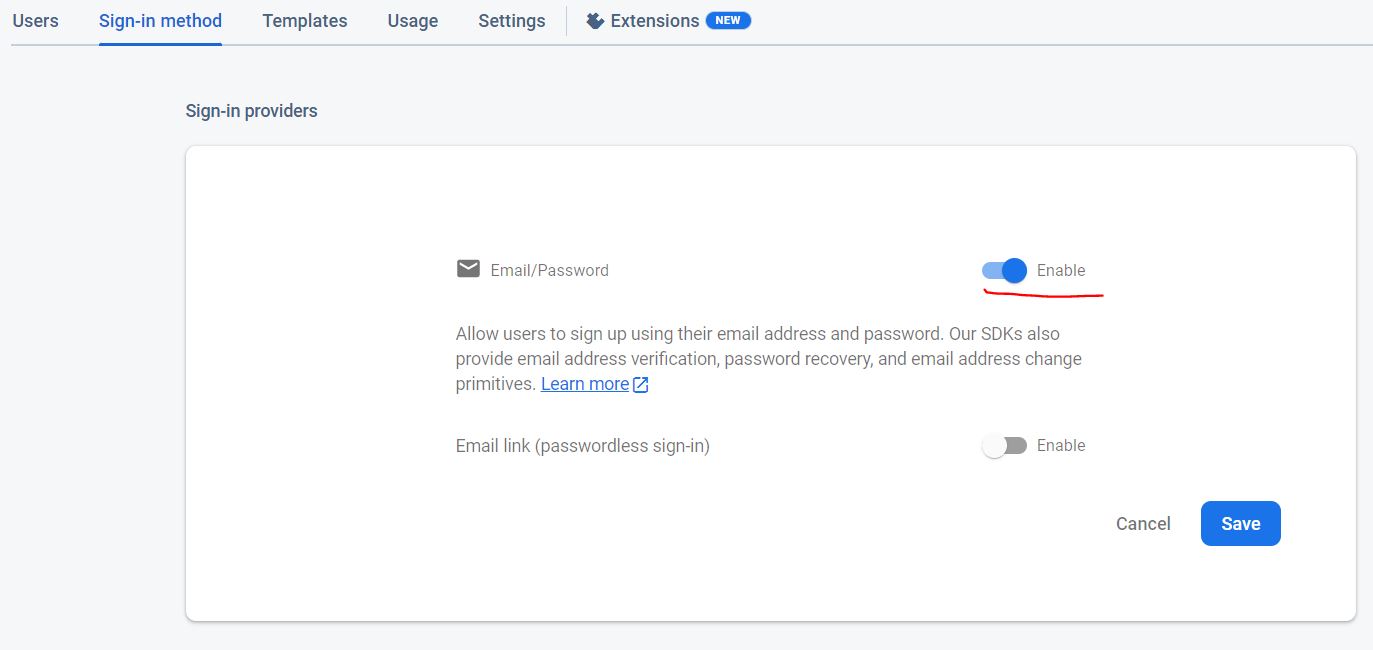 You can also enable Email link(passwordless sign-in) but for this tutorial purpose we will keep that disabled.
React and firebase integration
In you react app create a folder inside src folder and name it firebase or whatever you like. Inside the firebase folder create a file BaseConfig.ts if you use typescript or BaseConfig.js for Javascript.
import { initializeApp } from 'firebase/app';
import { getAuth } from 'firebase/auth';

const app = initializeApp({
  apiKey: import.meta.env.VITE_FIREBASE_APIKEY,
  authDomain: import.meta.env.VITE_FIREBASE_AUTH_DOMAIN,
  projectId: import.meta.env.VITE_FIREBASE_PROJECT_ID,
  storageBucket: import.meta.env.VITE_FIREBASE_STORAGE_BUCKET,
  messagingSenderId: import.meta.env.VITE_FIREBASE_MESSAGE_SENDER_ID,
  appId: import.meta.env.VITE_FIREBASE_APP_ID,
  measurementId: import.meta.env.VITE_FIREBASE_MEASUREMENT_ID,
});

export const firebaseAuth = getAuth(app);
export default app;
Note: For people who are not using vitejs change import.meta.env with process.env
In the firebase folder create AuthService file and start creating your functions:
//imports
import {
  createUserWithEmailAndPassword,
  signInWithEmailAndPassword,
  signOut,
  setPersistence,
  browserLocalPersistence,
} from 'firebase/auth';
import { firebaseAuth } from './BaseConfig';
Sign in and Sign up functions
//required if you want to keep logged in after user exits the browser or closes tab
setPersistence(firebaseAuth, browserLocalPersistence);

//Sign in functionality
export const SignIn = async ({ email, password }: LoginFormValues) => {
  const result = await signInWithEmailAndPassword(
    firebaseAuth,
    email,
    password
  );
  return result;
};

//Sign up functionality
export const SignUp = async ({ email, password }: UserFormValues) => {
  const result = await createUserWithEmailAndPassword(
    firebaseAuth,
    email,
    password
  );
  return result;
};

//Sign out functionality
export const SignOut = async () => {
  await signOut(firebaseAuth);
};
In the above functions you might have seen LoginFormValuesand UserFormValues these are the interfaces that I have created and imported and are required only if you are using typescript. If you are using Javascript just remove :LoginFormValues and :UserFormValues or any other type that we might use in future.
Interfaces (Skip if you use Javascript)
Creating the interfaces you have seen above. Create a folder interfaces inside src. In that interfaces folder create a file interfaces.ts:
export interface LoginFormValues {
  email: string;
  password: string;
}

export interface UserFormValues {
  email: string;
  password: string;
  displayName: string;
}
Setup Auth Context
For the purpose of this article I will use context for maintaining authorization functionalities, but you can use it in your way without context or use redux or custom hook.
Create a folder inside src and name it store, then create a file inside it and name it auth-context.ts or AuthContext.ts (.js - for Javascript devs), I prefer the later. Create a context: Note: import the firebaseAuth we created above in React and firebase integration section.
import { firebaseAuth } from '../../firebase/BaseConfig';
import { createContext } from 'react';

export const AuthContext = createContext<IAuth>({
  user: firebaseAuth.currentUser,
  loading: false,
  SignIn: () => {},
  SignUp: () => {},
  SignOut: () => {},
});
As you can see I have used an Interface IAuth for Auth context here. Note: Javascript user can remove the <IAuth> from createContext and skip the below IAuth interface.
In this context user is set to firebaseAuth.currentUser as the firebase provides this if the user is currently login if not then this will be null.
import { User } from 'firebase/auth'; //type User import

//IAuth context
export interface IAuth {
  user: User | null; //type User comes from firebase
  loading: boolean;
  SignIn: (creds: LoginFormValues) => void;
  SignUp: (creds: UserFormValues) => void;
  SignOut: () => void;
}
Note: LoginFormValues and UserFormValues are already created in above interface section.
Next, in the AuthContext file lets create a ContextProvider after creating the AuthContext:
import React from 'react';
import { useNavigate } from 'react-router-dom';

const AuthProvider = ({ children }: { children: React.ReactNode }) => {
  const [currentUser, setCurrentUser] = useState<User | null>(null);
  const [isLoading, setIsLoading] = useState<boolean>(false);
  const [isAuthLoading, setIsAuthLoading] = useState<boolean>(true);
  const navigate = useNavigate();

  //Sign up
  const SignUp = (creds: UserFormValues) => {
    //implement sign up here - which is implemented below
  };

  //Sign in
  const SignIn = async (creds: LoginFormValues, onSuccess: () => void) => {
    //implement sign in here - which is implemented below
  };

  //Sign out
  const SignOut = async () => {
    //implement sign out here - which is implemented below
  };
  //create Auth Values
  const authValues: IAuth = {
    user: currentUser,
    loading: isLoading,
    SignIn,
    SignUp,
    SignOut,
  };

  useEffect(() => {
    //onAuthStateChanged check if the user is still logged in or not
    const unsubscribe = onAuthStateChanged(firebaseAuth, user => {
      setCurrentUser(user);
      setIsAuthLoading(false);
    });
    return unsubscribe;
  }, []);

  //If loading for the first time when visiting the page
  if (isAuthLoading) return <PageLoading />;

  return (
    <AuthContext.Provider value={authValues}>{children}</AuthContext.Provider>
  );
};

export default AuthProvider;
Sign up implementation
//import SignUn from AuthService that we created above
import  {SignUp}  from '../../firebase/services/AuthServices';
//Sign up
const SignUp = (creds:  UserFormValues) => {
	setIsLoading(true);
	TAuth.SignUp(creds)
	.then(async userCredential  => {
		const { user } = userCredential; //object destructuring
		if (user) setCurrentUser(user);
		//redirect the user on the targeted route
		navigate('/dashboard', { replace:  true });
		else { //do something if user is empty like an alert }
		setIsLoading(false);
	})
	.catch(error  => {
		//check for error
		if (error.code  ===  'auth/email-already-in-use') {
			//show an alert or console
		} else if (error.code  ===  'auth/too-many-requests') {
			//do something like an alert
		}
		// you can check for more error like email not valid or something
		setIsLoading(false);
	});
}
Sign in implementation
//import SignIn from AuthService that we created above
import  {SignIn}  from '../../firebase/services/AuthServices';
//Sign in
const  SignIn = async (creds:  LoginFormValues,  onSuccess: () =>  void) => {
	setIsLoading(true);
	TAuth.SignIn(creds)
	.then(userCredential  => {
		const { user } =  userCredential;
		if  (user) {
		setCurrentUser(user);
		//redirect user to targeted route
		navigate('/dashboard', { replace:  true });
		}
		else { //do something }

		setIsLoading(false);
	})
	.catch(error  => {
		if  (error.code  ===  'auth/wrong-password') {
			//show error
		} else  if  (error.code  ===  'auth/too-many-requests') {
			//show error
		}
		setIsLoading(false);
	});
}
Sign out implementation
//import SignOut from AuthService that we created above
import { SignOut } from '../../firebase/services/AuthServices';
const SignOut = async () => {
  setIsLoading(true);
  try {
    await SignOut();
    setCurrentUser(null);
    navigate('/signin', { replace: true });
  } catch (error) {
    setIsLoading(false);
    //show error alert
  }
};
Consume AuthContext
Now wrap your App components in AuthProvider component as:
import AuthProvider from './store/auth-context/AuthContext';
<AuthProvider>
  <App />
</AuthProvider>;
Create a login page and register components, and consume the context from those components. A context is consumed using the useContext hook provided by react.
//import useContext from react and AuthContext from our AuthContext.ts
const auth = useContext(AuthContext);

//or you can destructure the auth as
const { SignIn, isLoading } = useContext(AuthContext);
In the Login component you might only need to use SignIn and in Register component you might need to add SignUp.
Bonus section
You can simplify the useContext as well just by creating a small custom hook that consumes the AuthContext and returns it. To do that edit the AuthContext.ts file and add the following code.
export const useAuth = () => useContext(AuthContext);Now, you can simply call useAuth hook and use the auth functionality
//import useAuth
const { SignIn, isLoading } = useAuth();
Finally, you can call SignIn function on login form submission.
Conclusion
This is only a simple introduction, but you can take it to the next level by visiting Firebase and React to learn more. You may need to integrate OAuth, Email Verification, OTP Verification, profile updating, and other features. Everything is documented in the firebase documentation.