
.Net 8 new Identity Auth - Setting up, Customizing the auth and seeding data
Introduction
With the .NET 8 release we got an update in the identity authentication as well. The setup got simple, with just one line of code your authentication is set up. But it comes with some minor problems that the .net community has been discussing and maybe in the new .NET 9 we might see those problems fixed. Now lets setup the authentication in a new webapi project and see how easy it is.
Setting up the project
Create a new .net webapi project for this I will use .NET’s command line tool but you can go ahead and create a new project using visual studio. To create a project you must have the .NET SDK installed if you are on linux but if you are on windows with visual studio the .NET SDK comes pre-installed with it and if you don’t have visual studio you can also download the .NET SDK and use the command line tool as the commands will be same for .net cli. Head over to the project folder and lets create one.
First, We will create a solution file (if you are in visual studio it will be generated automatically when you create a new project):
dotnet new sln -n DemoSecond, Create a dotnet webapi project using the below command:
dotnet new webapi -o Demo.APIBy default it will use minimal APIs but if you want to add controllers you can just add a parameter --use-controllers
dotnet new webapi -o Demo.API --use-controllersJust by using controllers doesn’t mean your project can only have controllers now and won’t be able to add minimal APIs, you can use both in the same project.
Once the project is created we need to add reference of the Demo.API project in the solution file using the below command.
dotnet sln add Demo.APIOpen up the project using the vscode or visual studio or your favrite IDE.
Now, we need to add nuget package references. In visual studio you right click on your project Demo.API and click on Manage Nuget Packages, there you can search for the relevant nuget package and install, and with dotnet cli we can use the command dotnet add package.
Microsoft.EntityFrameworkCoreMicrosoft.EntityFrameworkCore.DesignMicrosoft.AspNetCore.Identity.EntityFrameworkCore
We will need the above packages and the last package depends on the database you are using. If you are using MsSQL Server you need the below package:
And if you are using InMemory database, PostgreSQL, MySQL or any other database system then you will need relevant package for those. Usually, the Package name is something like Microsoft.EntityFrameworkCore.[database name] where database name is the relevant database you are using, but make sure you check on the nuget.org first.
The next thing is to add a DbContext class.
public class DemoDbContext : IdentityDbContext<IdentityUser, IdentityRole, string>
{
  public DemoDbContext(DbContextOptions<DemoDbContext> options) : base(options)
  {
  }
}
In the above code we are Inheriting the class IdentityDbContext while providing it with User_table which is IdentityUser, IdentityRole and string which will be the type of ID for these two tables. IdentityUser, IdentityRole tables are already in the package we installed earlier Identity.EntityFrameworkCore, so we don’t need to create them.
Customizing IdentityUser
If you want to customize the IdentityUser entity maybe add a Name, Address, or any other field or maybe you want to change the data type of the Id column to set it as GUID, UUID, int, etc. You can do that by inheriting IdentityUser and pass the datatype as generic parameter, as below:
public class ApplicationUser : IdentityUser<Guid> // use any data type in place of Guid or remove <Guid> if you want to keep it as default which is `string`
{
    public string? Name { get; set; }
    public string CreatedBy { get; set; }
    public string ModifiedBy { get; set; }
    public DateTime CreatedOn { get; set; }
    public DateTime ModifiedOn { get; set; }
    // or maybe for softdelete
    public bool IsDeleted { get; set; }
}
You can do the same with customizing Role entity as well:
public class ApplicationRole : IdentityRole<Guid>
{
    public Guid CreatedBy { get; set; }
    public Guid ModifiedBy { get; set; }
    public DateTime CreatedOn { get; set; }
    public DateTime ModifiedOn { get; set; }
        // or maybe for softdelete
    public bool IsDeleted { get; set; }
}
Note: Use any data type in place of Guid, or remove <Guid> if you want to keep it as default which is string
Then your context class will change based on the datatype you passed for above:
public class DemoDbContext : IdentityDbContext<ApplicationUser, ApplicationRole, string>
{
  public DemoDbContext(DbContextOptions<DemoDbContext> options) : base(options)
  {
  }
}
Or with a different type for Id column:
public class DemoDbContext : IdentityDbContext<ApplicationUser, ApplicationRole, Guid>
{
  public DemoDbContext(DbContextOptions<DemoDbContext> options) : base(options)
  {
  }
}
In the above code I am passing the 3rd generic parameter as Guid into the IdentityDbContext you can pass the dataType which you set for the User or Role class.
Seeding data
When we run the project you want to have a user that will manager the website maybe an admin or sometimes SuperAdmin but you don’t want to register him using APIs but rather you want to generate him at the database creation time. For that we use seeding. In the context class we override a protected function OnModelCreating and inside that we can seed the data as you can see in below code I am adding a new User and new Role which will be created at database creation time.
public class AuthDemoContext : IdentityDbContext<ApplicationUser, ApplicationRole, Guid>
{
  public AuthDemoContext(DbContextOptions<AuthDemoContext> options) : base(options)
  {
  }

  protected override void OnModelCreating(ModelBuilder builder)
  {
    Guid userId = Guid.NewGuid();
    Guid roleId = Guid.NewGuid();

    PasswordHasher<ApplicationUser> hasher = new();

    ApplicationUser adminUser = new()
    {
        Id = userId,
        Name = "Admin",
        UserName = "admin",
        NormalizedUserName = "ADMIN",
        Email = "admin@yopmail.com",
        NormalizedEmail = "ADMIN@YOPMAIL.COM",
        EmailConfirmed = true,
        PhoneNumber = "0980980980",
        PhoneNumberConfirmed = true,
        CreatedBy = userId,
        CreatedOn = DateTime.Now,
        SecurityStamp = Guid.NewGuid().ToString(),
    };

    adminUser.PasswordHash = hasher.HashPassword(adminUser, "Admin@123");

    ApplicationRole adminRole = new()
    {
        Id = roleId,
        Name = "admin",
        NormalizedName = "ADMIN",
        CreatedBy = userId,
        CreatedOn = DateTime.Now,
    };

    IdentityUserRole<Guid> adminUserRole = new()
    {
        RoleId = roleId,
        UserId = userId
    };

    builder.Entity<ApplicationUser>()
    .HasData(adminUser);

    builder.Entity<ApplicationRole>()
    .HasData(adminRole);

    builder.Entity<IdentityUserRole<Guid>>()
    .HasData(adminUserRole);

    base.OnModelCreating(builder);
  }
}
And when we run the migration which comes in a next section, it will create a role SuperAdmin and a user with that role in the database.
Then, we will add a ConnectionStrings section in the appsettings.json:
"ConnectionStrings": {
  "DefaultConnection": "Server=server_name_or_ip;User ID=user_name;Password=password;Database=database_name;TrustServerCertificate=true;"
}
After adding the connection string in appsettings json, we now need to add dbContext to services. Open up the program.cs file and add the context and database to the services using the below code snippet:
builder.Services.AddDbContext<DemoDbContext>(options =>
    options.UseSqlServer(builder.Configuration.GetConnectionString("DefaultConnection")));
“DefaultConnection” is the name of the connection string added into appsetting.json.
Then, we will add IdentityAuth into the program.cs as well after the above code add another service:
builder.Services.AddIdentityCore<ApplicationUser>()
    .AddRoles<ApplicationRole>()
    .AddEntityFrameworkStores<AuthDemoContext>()
    .AddApiEndpoints();
Migrations
Next, we will run the migrations that will create the database and add the necessary tables. To run migrations in .net cli we will need dotnet-ef tool and for visual studio no installed is needed. If you are using the .NET cli use the below command to install dotnet-ef workload
dotnet tool install --global dotnet-efThis tool will be installed globally so you won’t need to install it for each project seperately.
To create a migration you can launch the Package Manager Console in visual studio or continue in terminal:
For visual studio run the below two command:
# run the add migration command
Add-Migration "InitialCreate"

# then update database
Update-Database
for terminal run the below commands:
# run the add migration command
dotnet ef migrations add "InitialCreate"

# then update database
dotnet ef database update
These commands will create your database and create the tables inside that database.
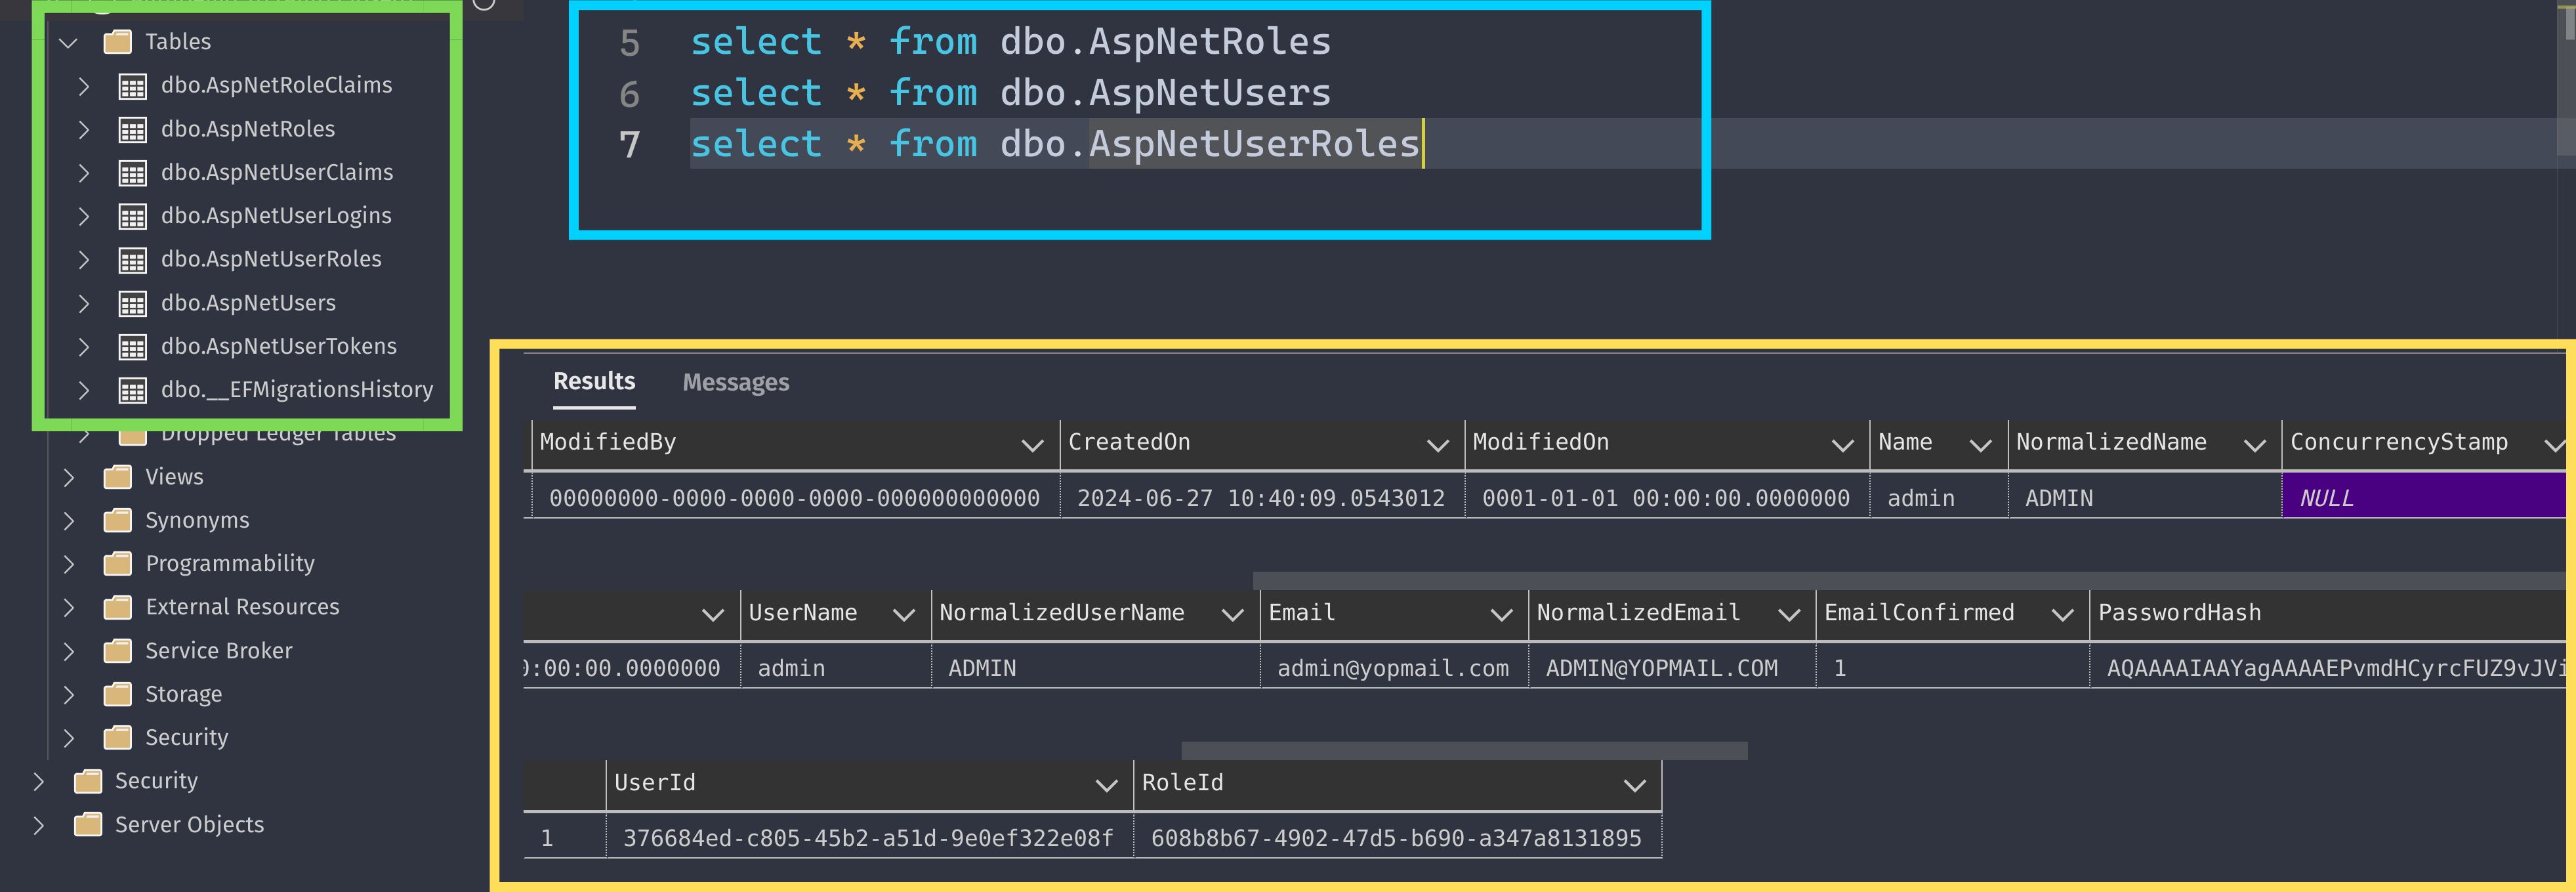
In the above image we can see, in the green box we have the generated tables, in the blue box I ran some queries and in the yellow box we have the result of the data we seeded while added migration.
We now need to add couple of Authentication services in program.cs after above services:
builder.Services.AddAuthentication().AddBearerToken(IdentityConstants.BearerScheme);

builder.Services.AddAuthorization();
builder.Services.AddAuthorizationBuilder();
Once, all the services are done we will add the API endpoints now. After the app.UseHttpsRedirection(); in the middleware pipeline we need to add 3 more things:
app.UseAuthentication();
app.UseAuthorization();
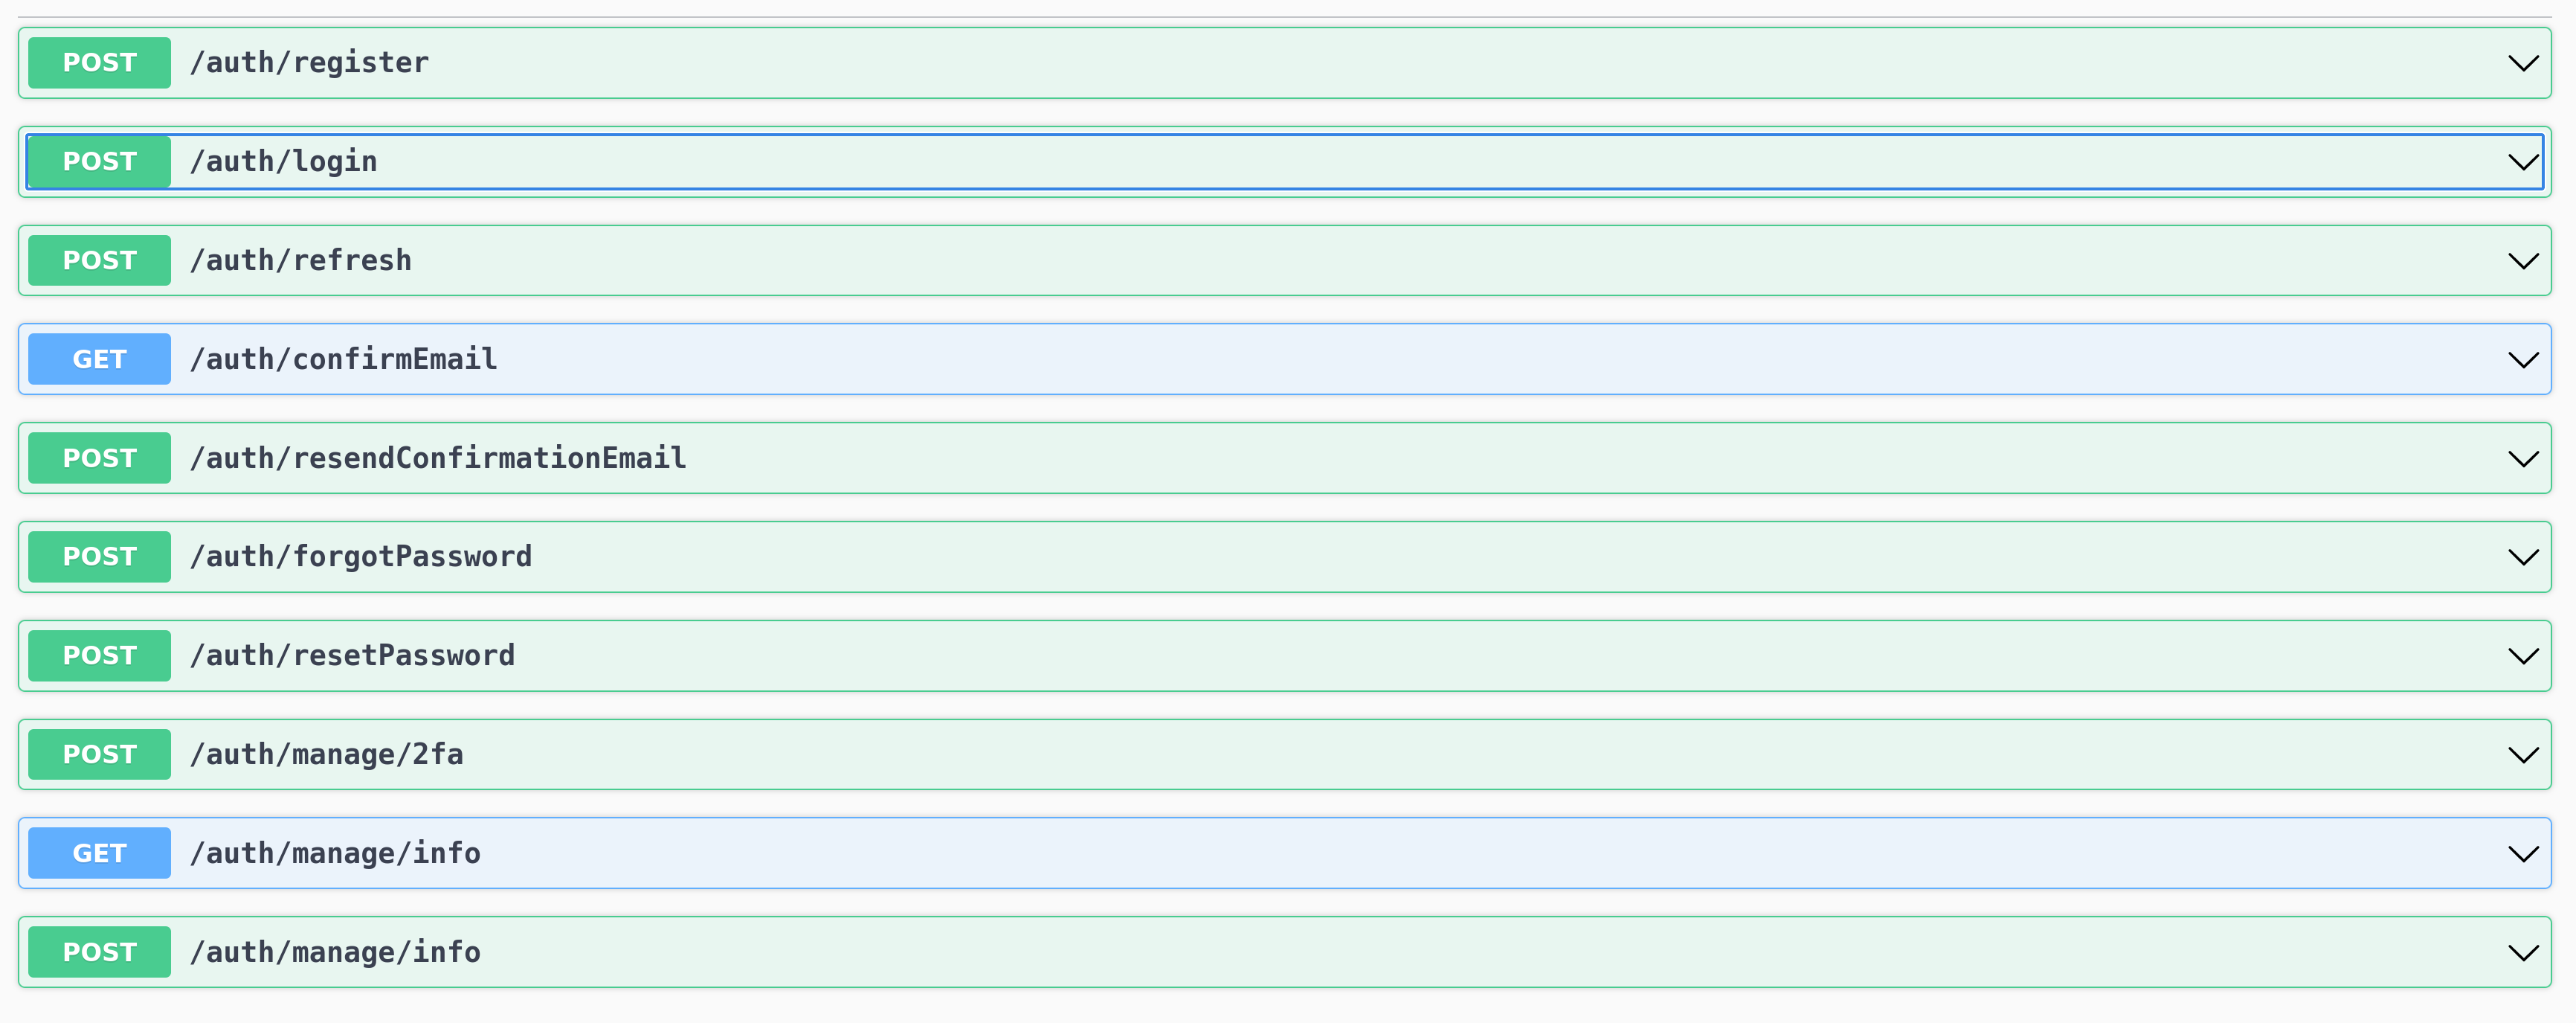
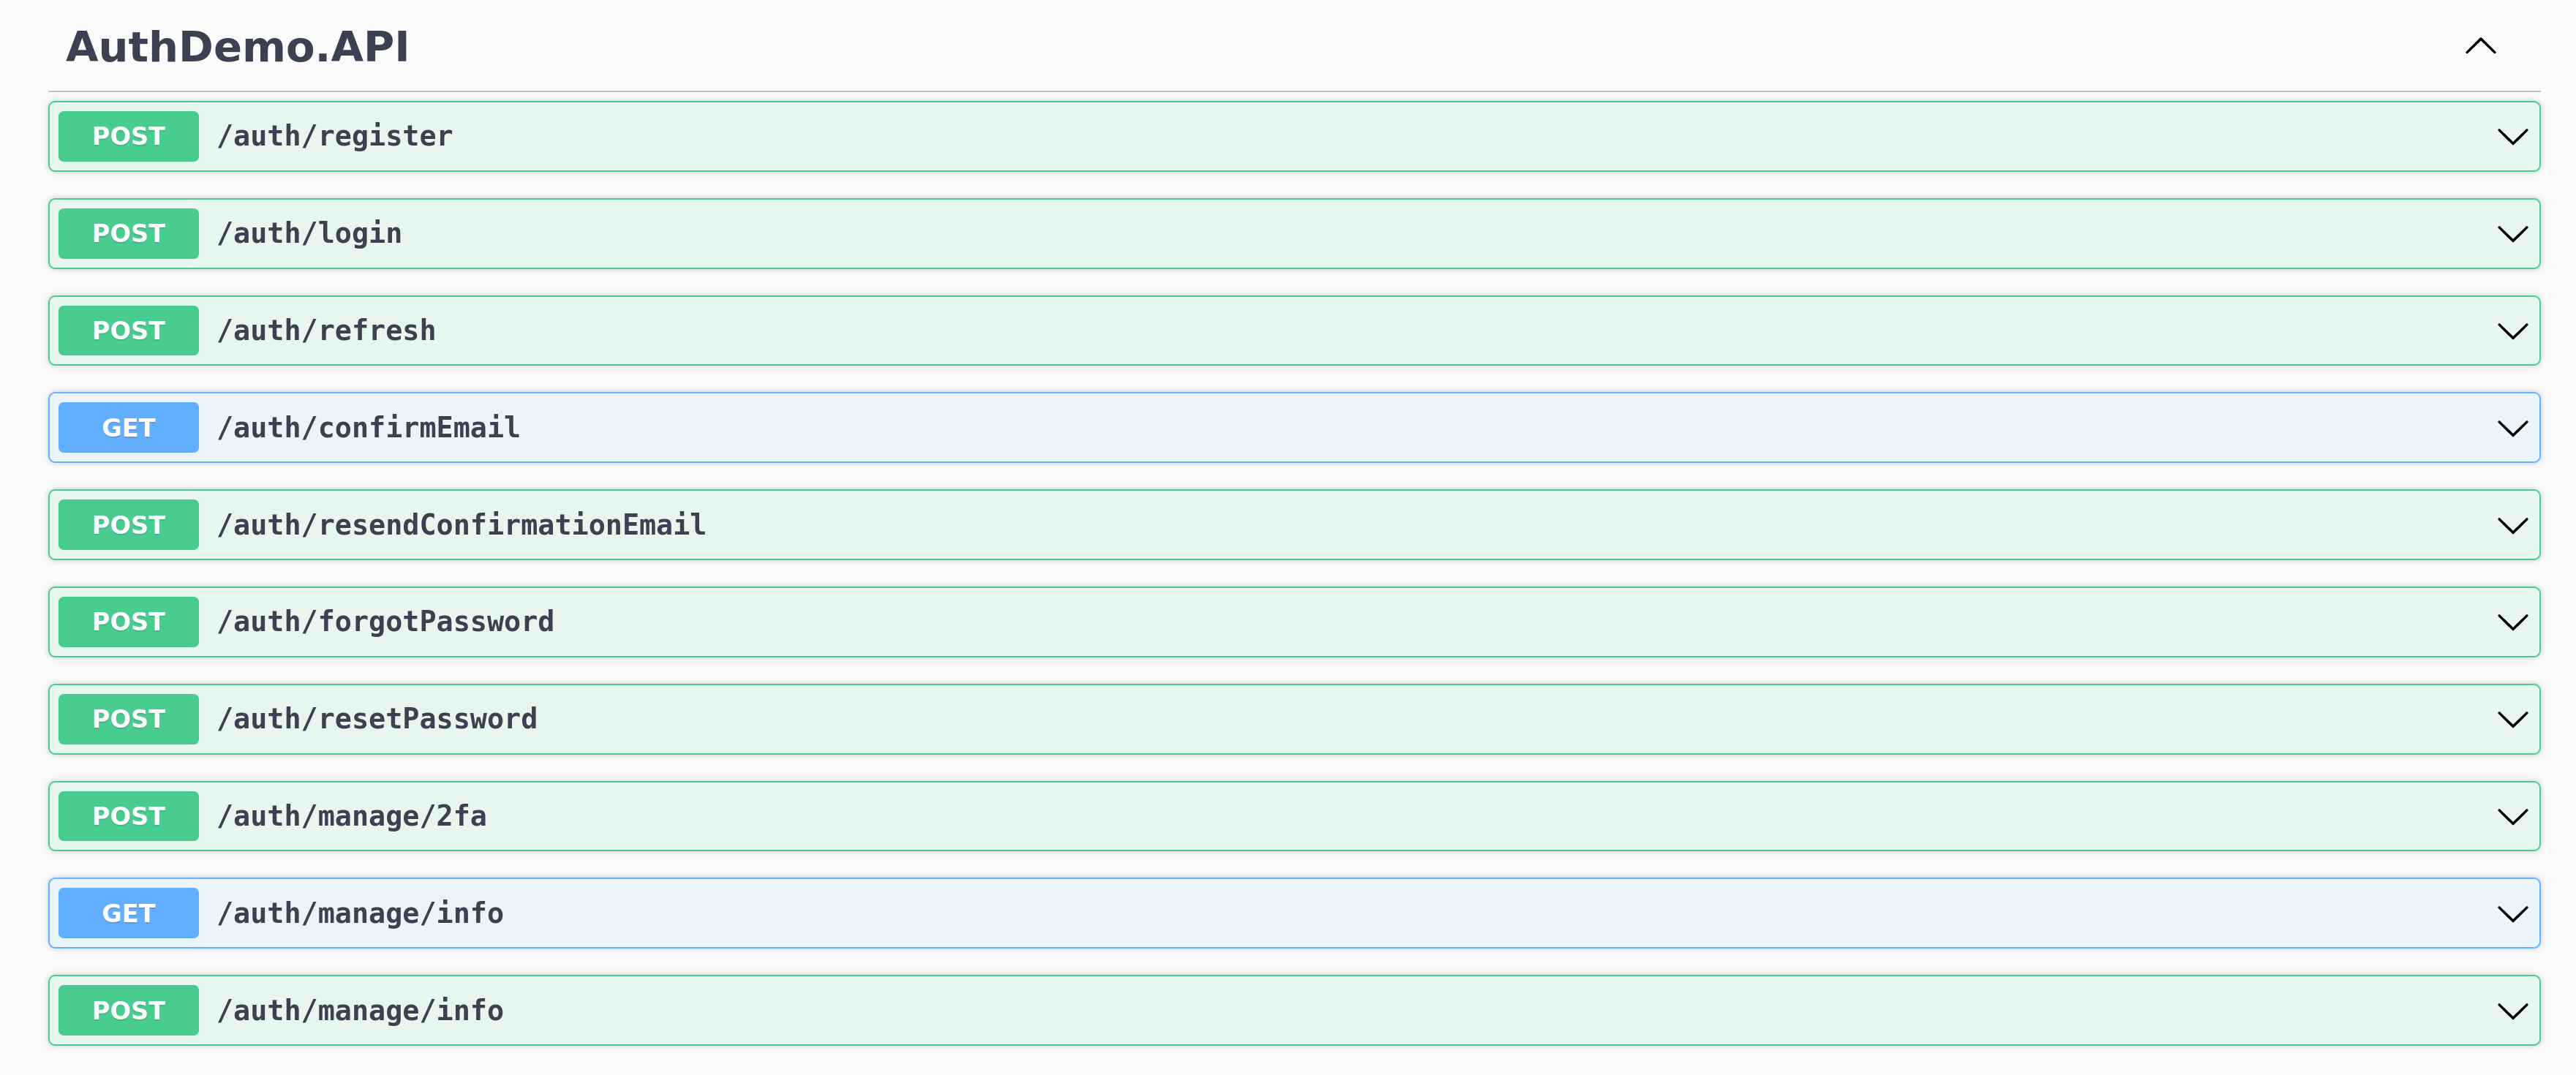
app.MapGroup("auth").MapIdentityApi<ApplicationUser>();And with that our APIs are set. Just launch the project using the dotnet run command and and open up the url (localhost:[port]/swagger) in browser if it is not launched automatically, you will get the swagger as below:
 .
.
Well, you can see now our routes are added.
IMPORTANT NOTE:
The payload for the login api is as below:
{
  "email": "string",
  "password": "string",
  "twoFactorCode": "string",
  "twoFactorRecoveryCode": "string"
}
But if you try to login using email and password - (I will remove the twoFactorCode and twoFactorRecoveryCode as they are not required) it will return 401 - unauthorized.
{
  "email": "admin@yopmail.com",
  "password": "Admin@123"
}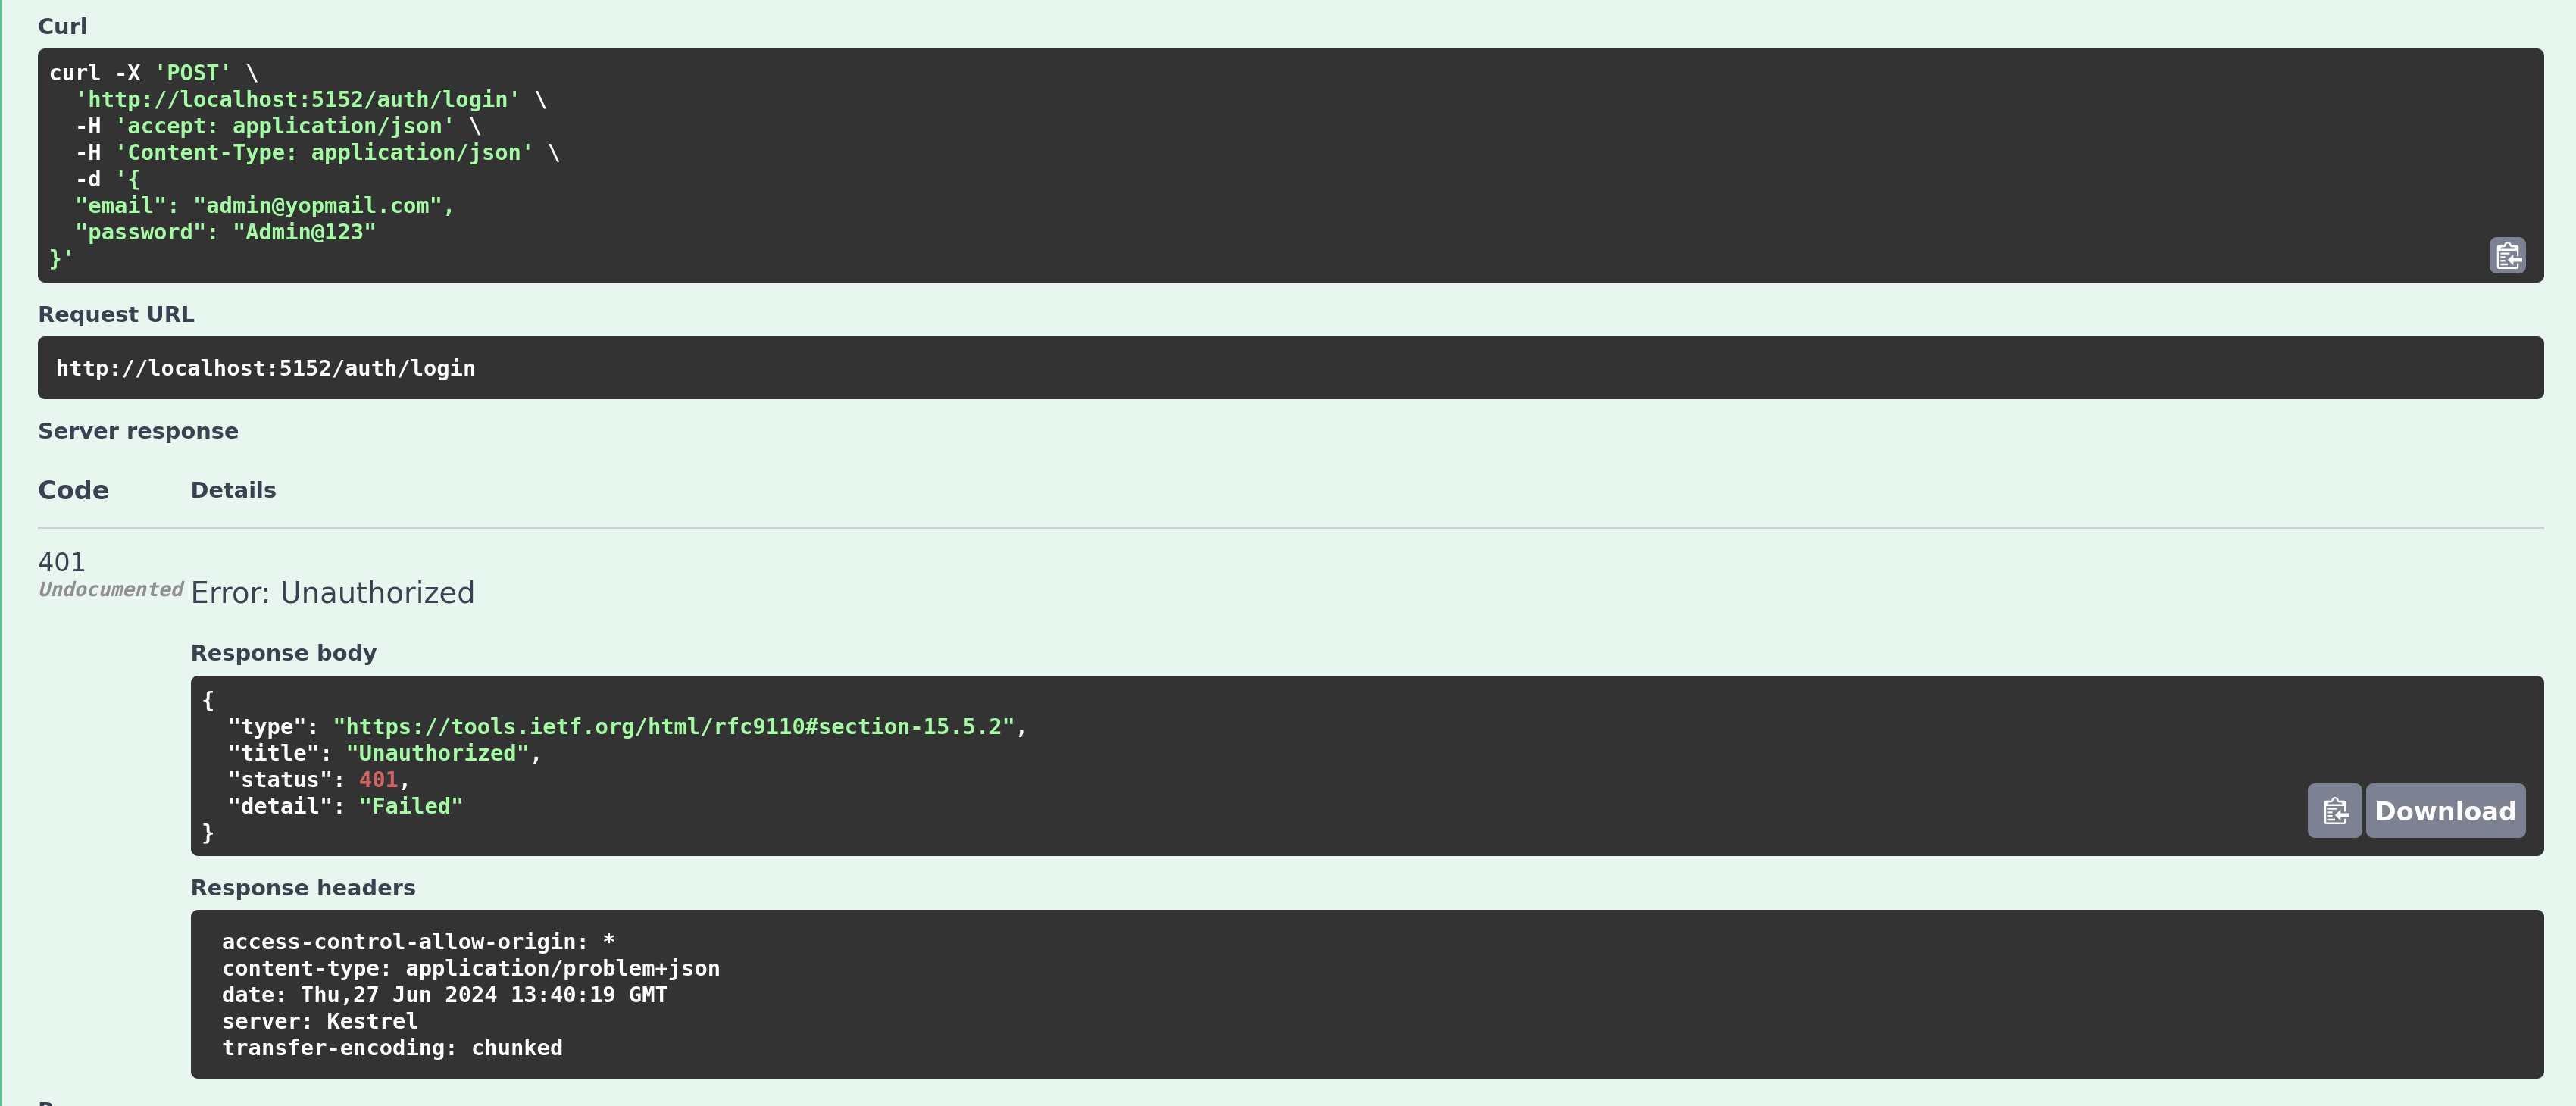
What the login API does is it actually logs in using the UserName rather than email, even though it asks for email but it uses that email against the userName column.
When we register a user from the generated /auth/register we can see its payload has only two values:
{
"email": "string",
"password": "string"
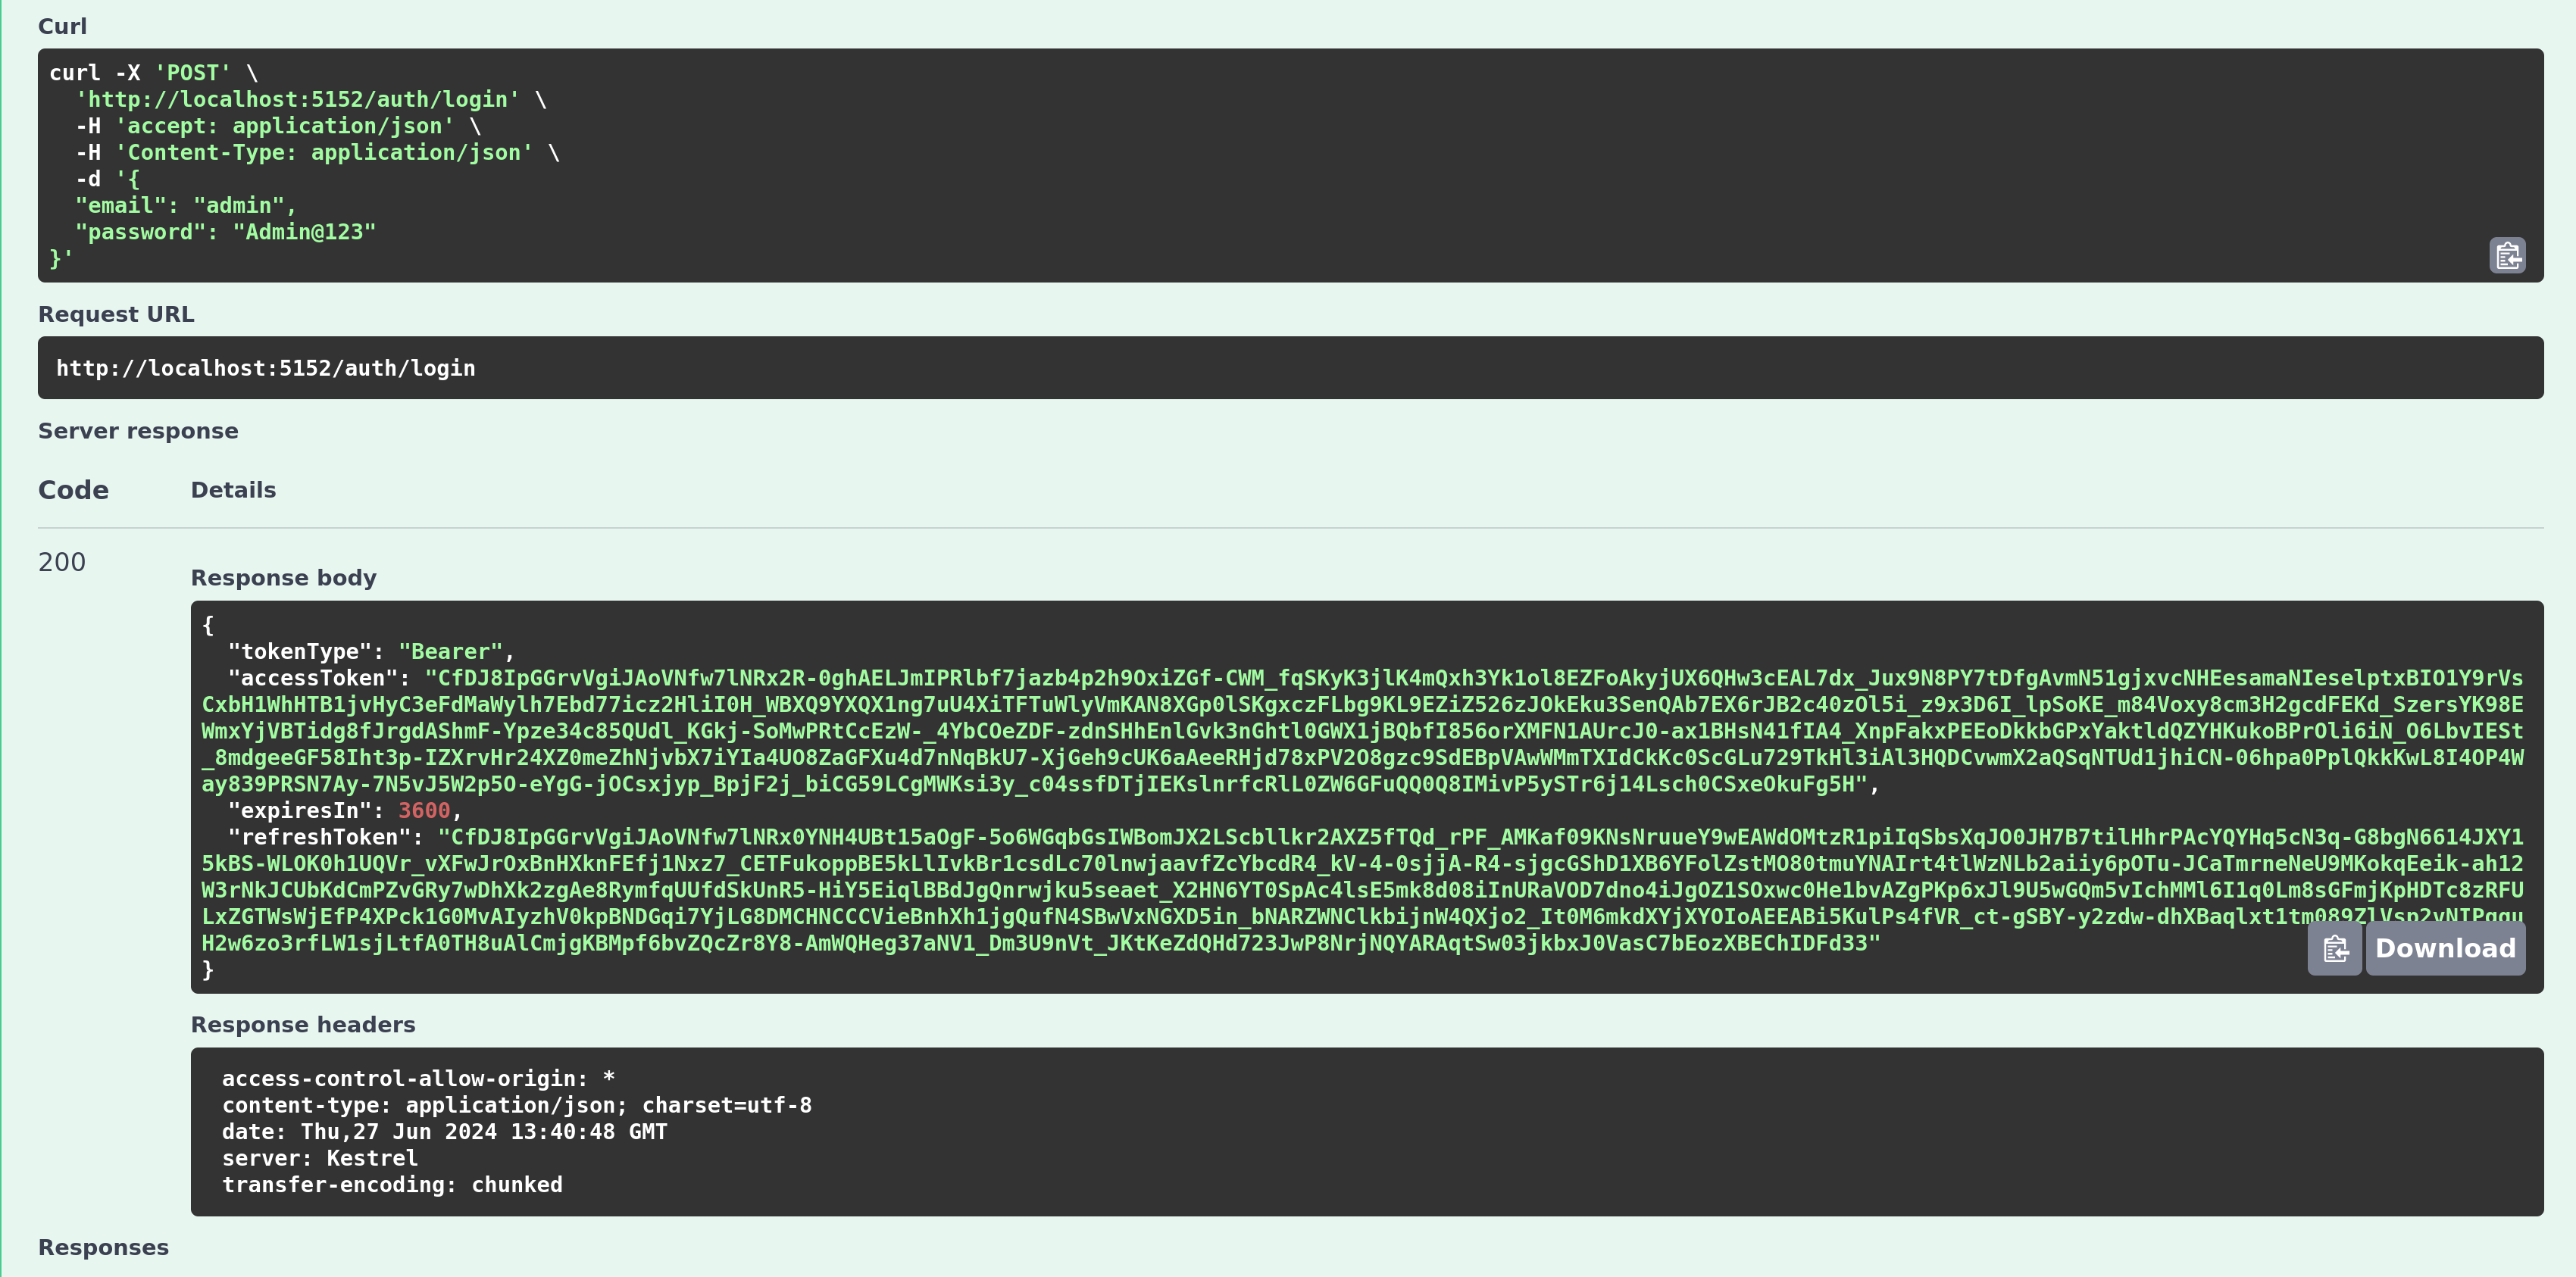
}When we enter the values, the identity creates a new user with the provided email and password but it also saves the email in the UserName column of the table. When we seeded the a user we set its userName as admin, and if you try to login using the below payload it will work:
{
  "email": "admin",
  "password": "Admin@123"
}
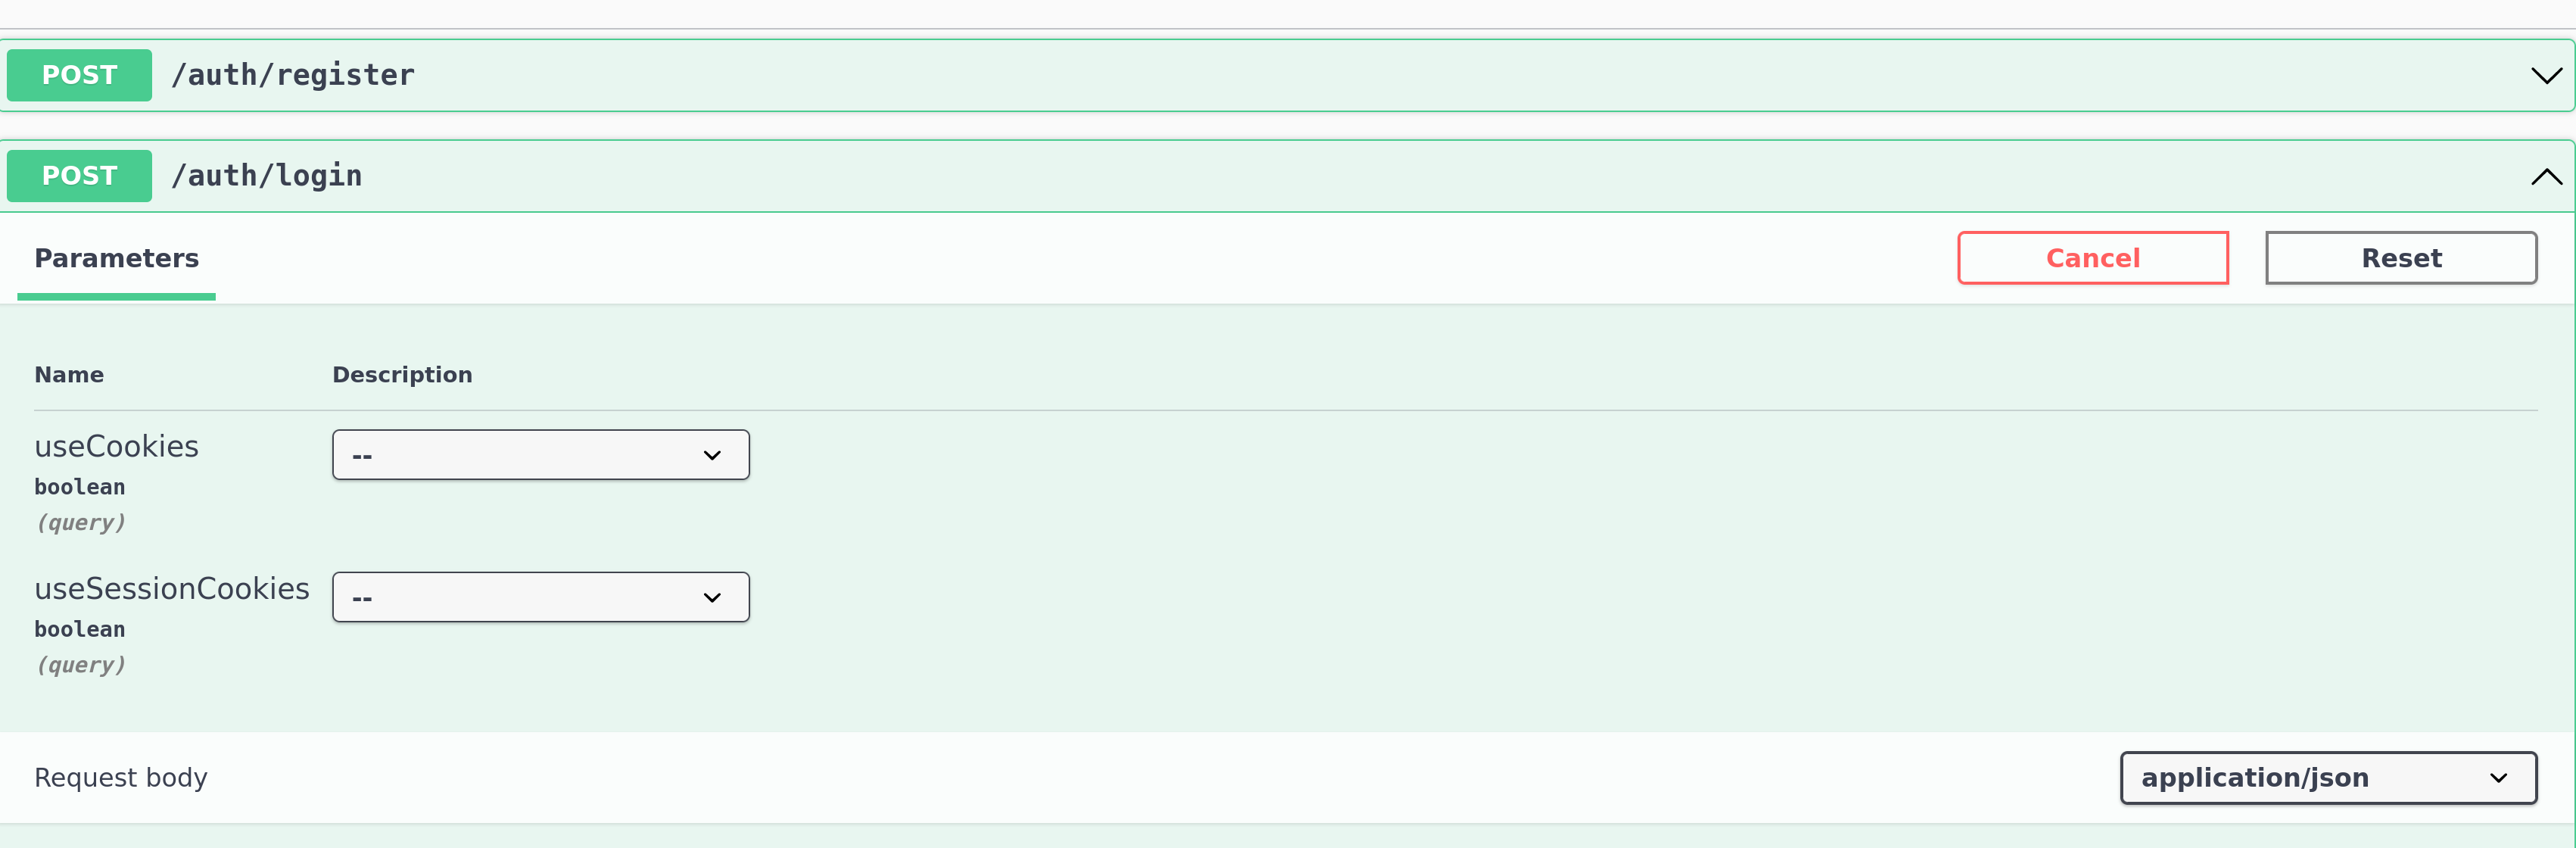
When logging in there are two more options useCookies and useSessionCookies. Make sure to keep them either false or just keep them default for bearer token auth. Or maybe you want cookie auth in that case set it to true.
Customization
At first customization was the only part in my mind for this article but I though it would be helpful to write the whole process of setting up this new auth. As for the customization, developers look mostly for two things in this new system of authentication, “How to hide some unnecessary routes” and “How to add role to register route”.
1. Hiding unnecessary routes
After searching web for couple of days about how to disable some of these routes I came across with this article How to disable ASP.NET Core Identity auto generated routes? written by Darko Subić which does it in just few steps. Basically he overrides the actual code and creates his own implementation which is cool, but I wanted a simple way. So I came up with the middleware solution and I don’t know if it is the best solution but it works without any issue. Let’s see how to implement.
First, create a static class RouteConfig which will contain a property HiddenRoutes.
public static class RouteConfig
{
    public static List<string> HiddenRoutes { get; private set; } = ["/auth/register", "/auth/resendConfirmationEmail", "/auth/manage/info"];
}
It depends on how you like to configure these kinds of things. One way will be adding hidden routes into the appsettings.json file and adding a services.Configure but lets keep it simple for now. Add the routes that you want to disable into the HiddenRoutes list.
Create a middleware DisableRouteMiddleware or you can call it whatever you want:
public class RouteProtectionMiddleware
{
    private readonly RequestDelegate _next;
    public RouteProtectionMiddleware(RequestDelegate next)
    {
        _next = next;
    }

    public async Task InvokeAsync(HttpContext context)
    {
        string? path = context.Request.Path;

        if (path != null && RouteConfig.HiddenRoutes.Contains(path))
        {
            context.Response.StatusCode = StatusCodes.Status404NotFound;
            return;
        }

        await _next(context);
    }
}
Now add this middleware into the middleware pipeline in program.cs file after the var app = builder.Build().
app.UseMiddleware<DisableRouteMiddleware>();That is it.
When running the application you will see the below screen:
You can see the routes I have disabled are still in there inside the swagger but what happens if you call the register api that I just disabled.
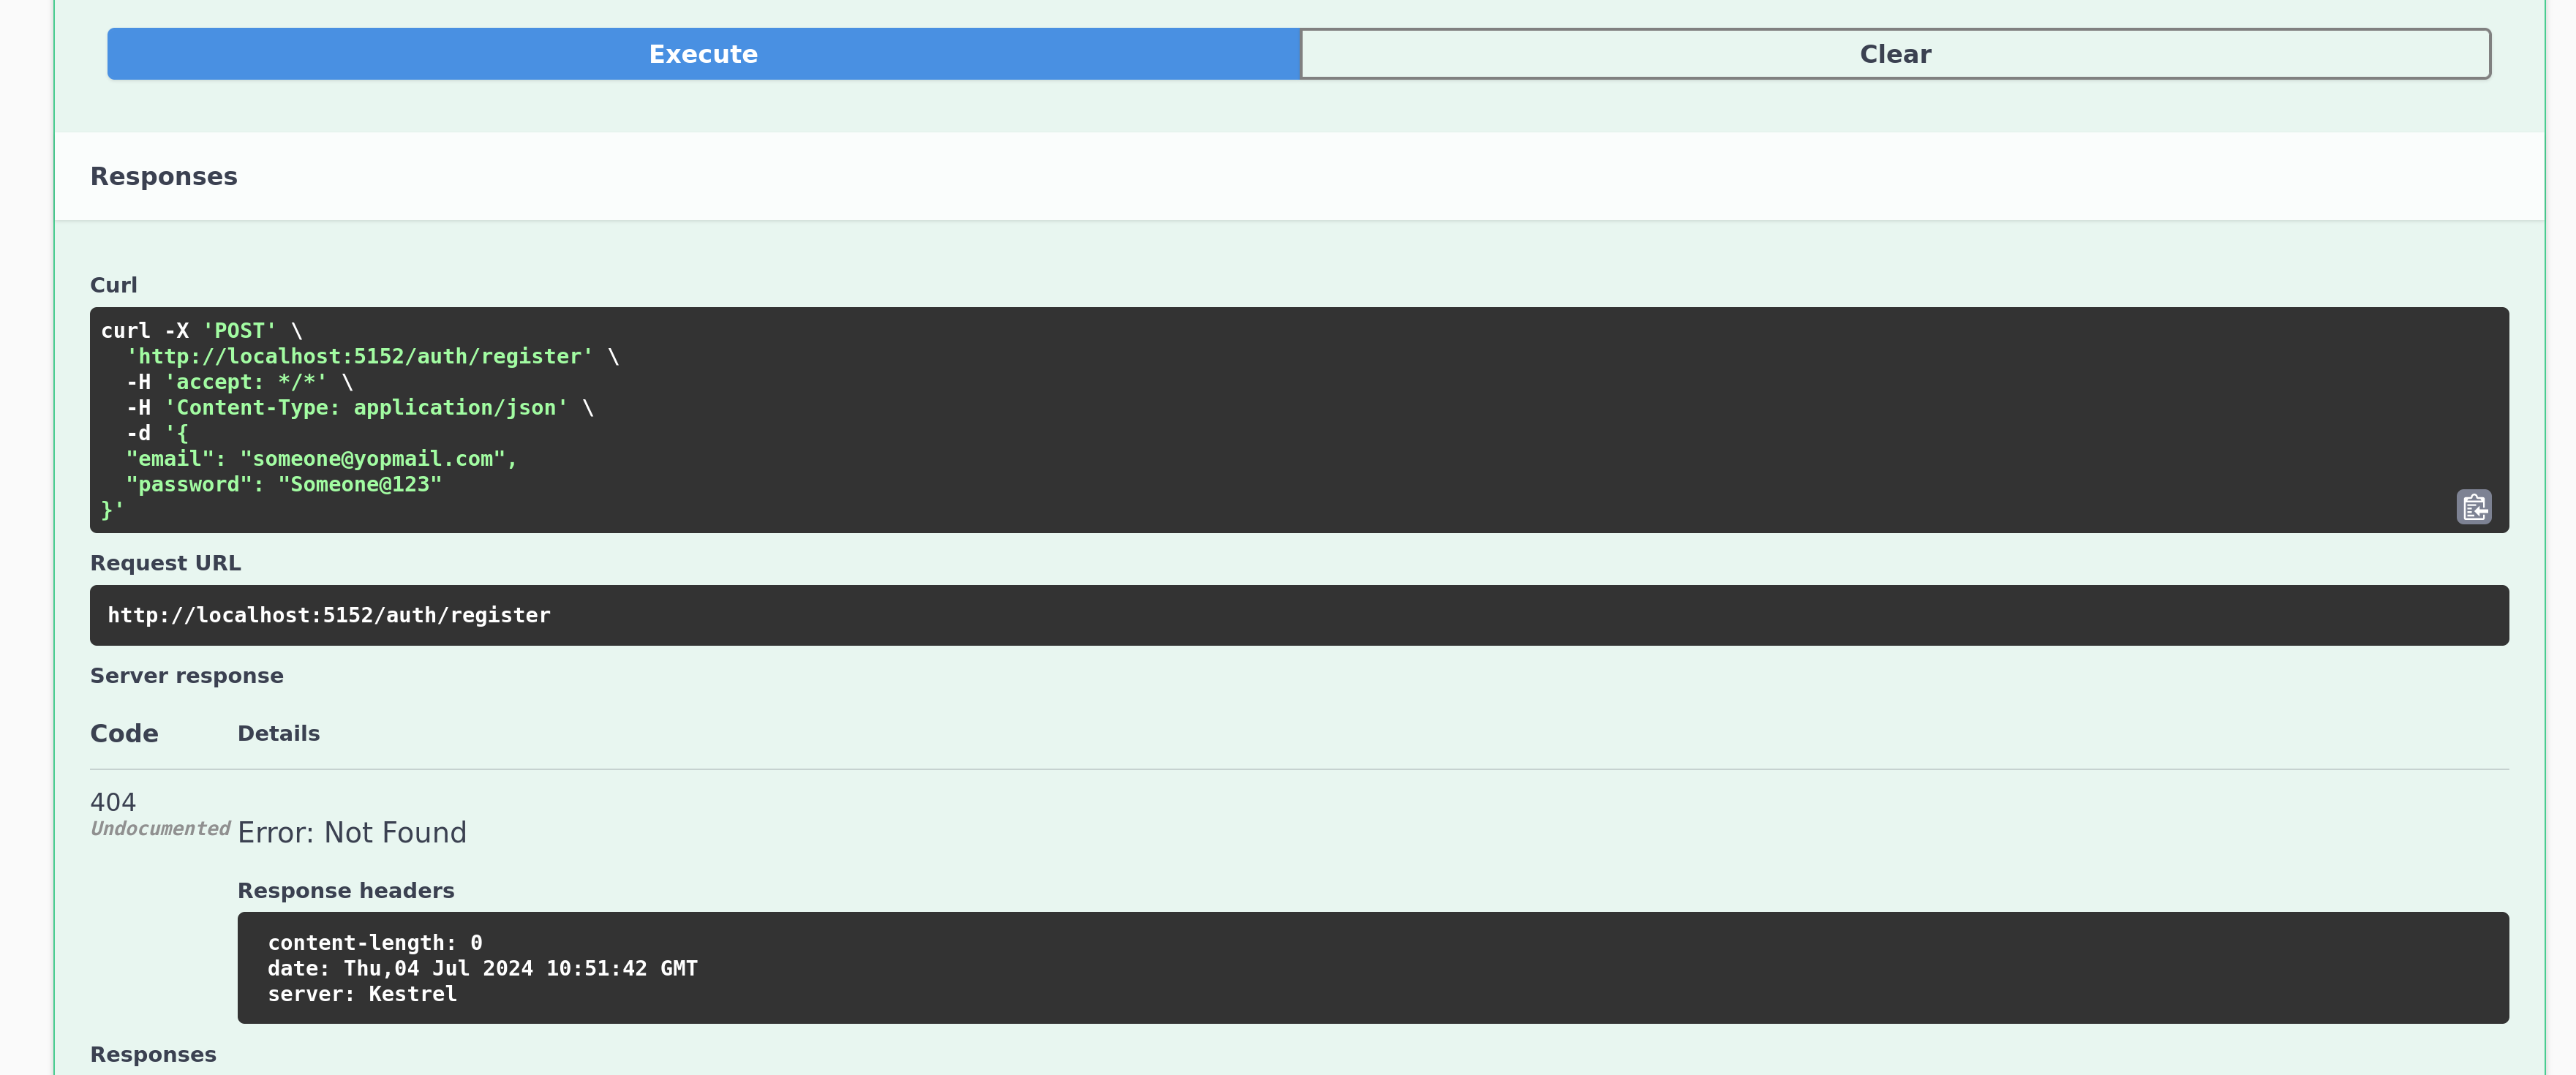
We can see in the above image the api throws a 404 - NotFound which simply says that the api doesn’t exist. But how do we hide these api from swagger, for that we will need to create a DocumentFilter for swagger. Create a folder inside your project called filters then inside create a file called SwaggerDocumentFilter.cs which inherits an interface IDocumentFilter that comes from Swashbuckle.AspNetCore.SwaggerGen and write the below code.
public class SwaggerDocumentFilter : IDocumentFilter
{
    public void Apply(OpenApiDocument swaggerDoc, DocumentFilterContext context)
    {
        foreach (var route in RouteConfig.HiddenRoutes)
        {
            swaggerDoc.Paths.Remove(route);
        }
    }
}
The above code simply removes the routes from the swagger UI.
Next, go to Program.cs and modify the AddSwaggerGen service and add the document filter we created as below.
builder.Services.AddSwaggerGen(options =>
{
options.DocumentFilter<SwaggerDocumentFilter>();
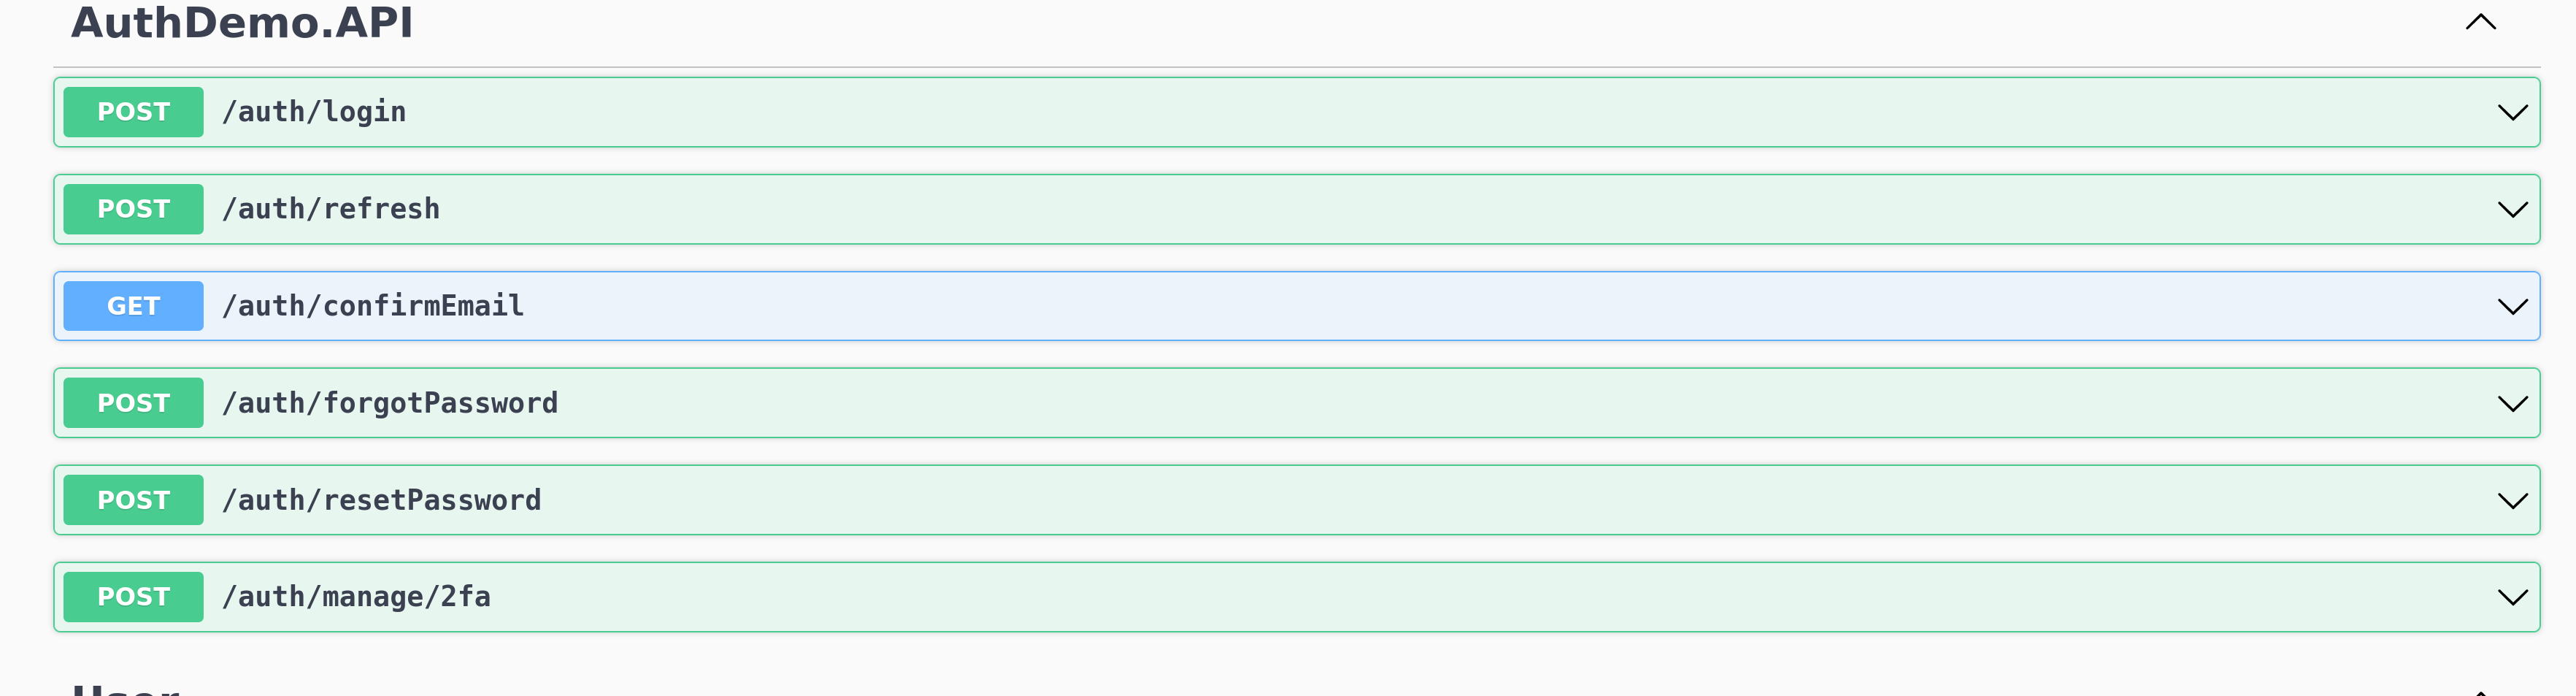
});And you can see the routes are gone from swagger just like they never existed.
 .
.
2. Adding roles
Normally, in a role based authorization system our register methods adds user to the role but in this new way of adding identity api the register methods has not been configured for role yet maybe in the future version we might get there. But, for now I already disabled the register route above so what we will do is to create our custom register API, for that I create a IUserManager interface where I have single function for now called CreateAsync(UserVM user).
public interface IUserManager
{
    Task<IdentityResult> CreateAsync(UserVM user);
}
Now create a class UserManager which inherits the above interface.
public class UserManager : IUserManager
{
    private readonly UserManager<ApplicationUser> _userManager;

    public UserManager(UserManager<ApplicationUser> userManager)
    {
        _userManager = userManager;
    }

    public async Task<IdentityResult> CreateAsync(UserVM user)
    {
        ApplicationUser newUser = new()
        {
            Name = user.Name,
            Email = user.Email,
            UserName = user.UserName,
            PhoneNumber = user.Phone
        };

        var result = await _userManager.CreateAsync(newUser, user.Password);
        if(!result.Succeeded) {
            return result;
        }

        await _userManager.AddToRoleAsync(newUser, RoleConstants.ADMIN);

        return result;
    }
}
We inject a UserManager service into our UserManager class and use it for creating our user. And it adds user to the Role where RoleConstants is a class as below:
public class RoleConstants
{
    public const string ADMIN = "admin";
    public const string USER = "user";
}
Now, add IUserManager and UserManager to the services collection in Program.cs file.
builder.Services.AddScoped<IUserManager, UserManager>();Finally, create a UserController with an action CreateAsync which called the above function.
namespace Demo.Controllers
{
    [ApiController]
    [Route("api/user")]
    public class UserController : ControllerBase
    {
        private readonly IUserManager _userManager;
        public UserController(IUserManager userManager)
        {
            _userManager = userManager;
        }

        [HttpPost]
        public async Task<IActionResult> Create(UserVM user)
        {
            await _userManager.CreateAsync(user);
            return Ok();
        }
    }
}
We inject the IUserManager service into the constructor of the UserController and then create the action which will create the user.
Conclusion
I hope this is helpful, I know this might not be the best way to customize the IdentityAuth but as there is no official way of doing this so maybe it is a good start. You can go deeper into these concepts and maybe comeup with a better solution.
So, that is it. Thanks 😊.