
.Net core web API Login and Registration using Identity
Introduction
Creating a login and registration system in a .NET Core 7 web API involves several steps. In this article, we will cover the necessary steps to create a basic login and registration system using Identity, the built-in authentication and authorization framework for .NET Core.
Basic setup
Create a new .NET Core web API project. You can do this by opening a command prompt and running the command dotnet new webapi -n [project name] or you can create new webapi project in Visual studio by clicking on the file menu then click on new and select project. Then you can find template ASP.NET core web API:
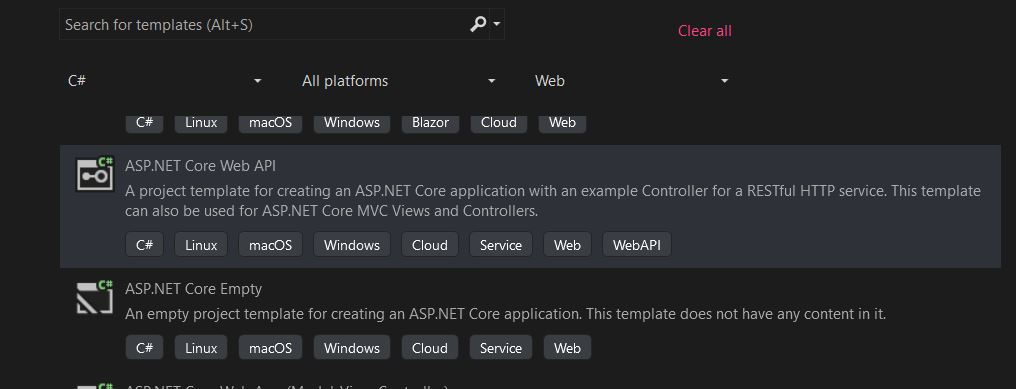
select ASP.NET Core Web API and click next.
Now in the next window type the name of your application and click next: 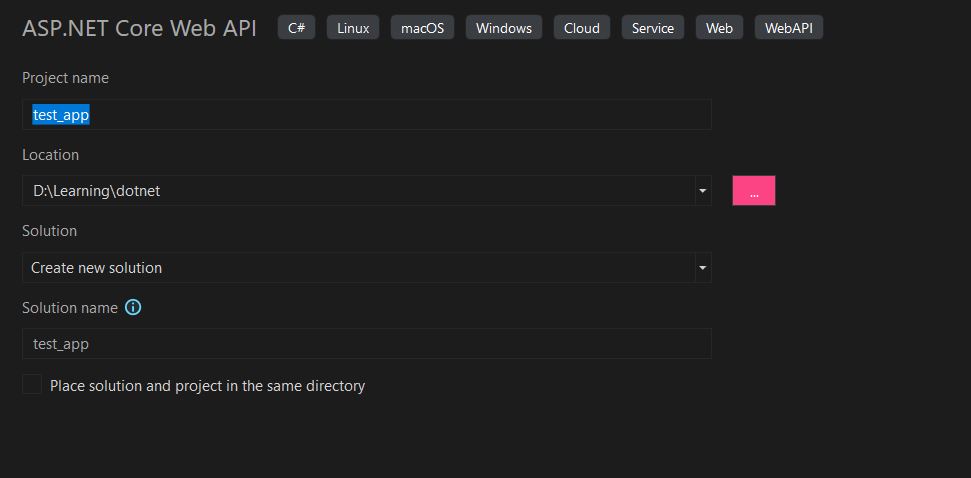
Then select .NET core version and click Create: 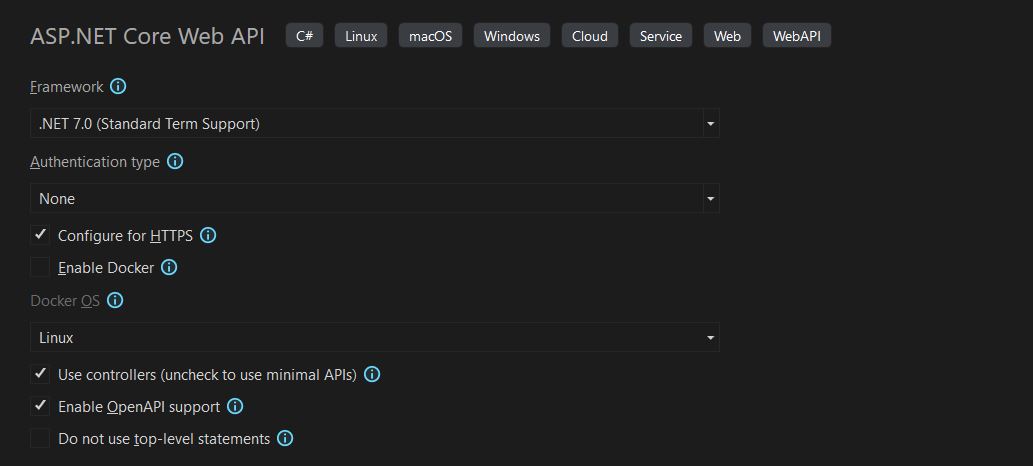
Now the application is ready it can be tested with running it from the visual studio.
Installing dependencies
Next, we need to add some nuget packages that are listed as:
Microsoft.AspNetCore.IdentityMicrosoft.AspNetCore.Identity.EntityFrameworkCoreMicrosoft.EntityFrameworkCore.SqlServerMicrosoft.EntityFrameworkCore.Tools
the packages can be added by running the commands dotnet add package [package_name] or if you are using visual studio you can add using Nuget package manager.
If an error occurs during installation of the packages check the nuget gallery for the right version that has to be installed.
Database connectivity
Next, create a database in the MsSQL with the following query:
create database test_app;Now define a section for ConnectionStrings in appsettings.json file:
"ConnectionStrings": {
    "DefaultConnection": "Data Source=your_server_name;Initial Catalog=your_database_name;Encrypt=False;Persist Security Info=True;User ID=your_server_user_name;Password=your_sqlserver_password;"
  },
change the your_server_name, your_database_name, your_server_user_name, and your_sqlserver_password to the credentials of your own.
Defining models
After the nuget packages are installed successfully, we can now define models for Users and UserRoles. This step is only needed if you want customized user details, but if you want to use only the properties that are already defined in the Identity then no need to write these models:
In this case we want to use both the properties of our own and the properties that are inbuild in identity, for that we need to inherit from the IdentityUser, SystemRole, and SystemUserRole:
e.g:
Create a class for the User and UserRoles:
public class SystemUser : IdentityUser {
   public string Name { get; set; }
   public string Phone { get; set; }
   public string Address { get ; set }
}
Define DbContext
Create a class for the Database context as:
public class DbContext : IdentityDbContext<SystemUser, IdentityRole, string,
   IdentityUserClaim<string>, IdentityUserLogin<string>,
   IdentityUserToken<string>> {

    public DbContext(DbContextOptions<DbContext> dbOptions):base(dbOptions) {}

    protected override void OnModelCreating(ModelBuilder modelBuilder) {
        base.OnModelCreating(modelBuilder);
    }
}
Instead of passing IdentityUser I have passed our own model SystemUser and the other models come from Identity like, IdentityUserClaim, IdentityRoleClaim, etc.
Configure database connectivity in Services
To configure database with DbContext that we just created.
In the Program.cs add the database to builder.Services:
builder.Services.AddDbContext<DbContext>(
    options =>
options.UseSqlServer(configuration.GetConnectionString("DefaultConnection")));
Now lets create Login and Register functionality by creating 2 folders for Interfaces and their corresponding classes. I name them as IServices and Services but name them as you want.
Inside the IService, create an file IAuthService.cs for IAuthService interface as:
public interface IAuthService {
    Task<Response<IdentityResult>> RegisterSystemUser(SystemRegisterUserDTO user);
    Task<Response<LoginResponseDTO>> LoginSystemUser(SystemSignInUserDTO credentials);
}
Now create an AuthService.cs file for AuthService class that will implement IAuthService interface.
public class AuthService : IAuthService {
    private readonly SignInManager<SystemUser> _signInManager;
    private readonly UserManager<SystemUser> _userManager;

    public AuthService(SignInManager<SystemUser> signInManager,
        UserManager<SystemUser> userManager) {
        _signInManager = signInManager;
        _userManager = userManager;
    }
    public async Task<Response<LoginResponseDTO>> LoginSystemUser(SystemSignInUserDTO credentials) {
        var user = await _userManager.FindByEmailAsync(credentials.Email);
        if (user == null) {
            return new() {
                Success = false,
                Data = new LoginResponseDTO() { },
                Message = "Email or password is incorrect",
            };
        }
        var result = await _signInManager.PasswordSignInAsync(user.UserName, credentials.Password, false, true);
        if(!result.Succeeded) {
            return new() {
                Success = false,
                Data = new LoginResponseDTO() { },
                Message = "Email or password is incorrect",
            };
        }
        return new Response<LoginResponseDTO>() {
            Message = "Login Successfull!",
            Data = new() {
                Id=user.Id,
                Username = user.UserName,
                Name = user.Name,
                Email = user.Email,
                Phone = user.Phone,
                Address = user.Address,
            },
        };
    }

    public async Task<Response<IdentityResult>> RegisterSystemUser(SystemRegisterUserDTO user) {
        SystemUser _user = new() {
            UserName = user.Username,
            Email = user.Email,
            Name= user.Name,
        };
        var result = await _userManager.CreateAsync(_user, user.Password);
        return new Response<IdentityResult>() {
            Success = true,
            Data = result,
            Message = result.Succeeded ? "User Registration Successfull!" : "User Registration Failed!"
        };
    }
}
Jwt Authentication
The article jwt authentication with C# contains a complete description about Configuring JWT with .NET core 7 we can use that same concept here if we want to use JWT authentication with this login function. You will find the function in that mentioned article:
public string GenerateJWTToken(SystemUser user) {
    var claims = new List<Claim> {
        new Claim(ClaimTypes.NameIdentifier, user.Id.ToString()),
        new Claim(ClaimTypes.Name, user.Name),
    };
    var jwtToken = new JwtSecurityToken(
        claims: claims,
        notBefore: DateTime.UtcNow,
        expires: DateTime.UtcNow.AddDays(30),
        signingCredentials: new SigningCredentials(
            new SymmetricSecurityKey(
               Encoding.UTF8.GetBytes(configuration["ApplicationSettings:JWT_Secret"])
                ),
            SecurityAlgorithms.HmacSha256Signature)
        );
    return new JwtSecurityTokenHandler().WriteToken(jwtToken);
}
If you want to use JWT token then the Login function will look like this.
public async Task<Response<LoginResponseDTO>> LoginSystemUser(SystemSignInUserDTO credentials) {
    var user = await _userManager.FindByEmailAsync(credentials.Email);
    if (user == null) {
        return new() {
            Success = false,
            Data = new LoginResponseDTO() { },
            Message = "Email or password is incorrect",
        };
    }
    var result = await _signInManager.PasswordSignInAsync(user.UserName, credentials.Password, false, true);
    if(!result.Succeeded) {
        return new() {
            Success = false,
            Data = new LoginResponseDTO() { },
            Message = "Email or password is incorrect",
        };
    }
    var token = _authUtils.GenerateJWTToken(user);
    return new Response<LoginResponseDTO>() {
        Message = "Login Successfull!",
        Data = new() {
            Id=user.Id,
            Username = user.UserName,
            Name = user.Name,
            Email = user.Email,
            Phone = user.Phone,
            Address = user.Address,
            Token = token
        },
    };
}
Configure Auth Dependency
Next add IAuthService and AuthService to service container in Program.cs
builder.Services.AddTransient<IAuthService, AuthService>();Now, inside the controllers folder create a new file AuthController.cs for Login and Register APIs:
Create a Login API as below:
[HttpPost, Route("system-login")]
public async Task<IActionResult> SignIn(SystemSignInUserDTO credentials) =>
   Ok(await _authService.LoginSystemUser(credentials));
Create a Register API as below:
[HttpPost, Route("system-register")]
public async Task<IActionResult> SignUp(SystemRegisterUserDTO userDetails) =>
   Ok(await _authService.RegisterSystemUser(userDetails));
Here is the full AuthController:
[Route("api/v1/auth")]
[ApiController]
public class AuthController : ControllerBase {
  private readonly IAuthenticationService _authService;
  public AuthController(IAuthenticationService authService) {
      _authService = authService;
  }

  [HttpPost, Route("system-login")]
  public async Task<IActionResult> SignIn(SystemSignInUserDTO credentials) =>
      Ok(await _authService.LoginSystemUser(credentials));

  [HttpPost, Route("system-register")]
  public async Task<IActionResult> SignUp(SystemRegisterUserDTO userDetails) =>
      Ok(await _authService.RegisterSystemUser(userDetails));
}
Finally, run the app and test the APIs using swagger.
Conclusion
This is a basic example of how to create a login and registration system using Identity in .NET Core 7 web API, read another article jwt authentication with C# that gives a complete description of how to configure JWT Authentication and you can configure this login and the JWT auth in that article together as described in - jwt-authentication section.