
Setting up linux for .NET development
Introduction
As a software developer I have always wanted to work on linux as it is the “greatest OS” for coding but for me it was always a difficult choice as I am a “.NET developer”. Most of my work is on C# .net technologies, and you might also know that Visual Studio is really good for .net development only if you want to work on Windows and have got 20-30 GBs of space and yeah it is a different question that it takes 10 minutes to load up. I have used linux many times but couldn’t continue with it because I had to use visual studio most of my time, that kept me taking back to windows again and again. But around 6 months ago I thought ok this time I am going to permanently switch to linux (except for gaming). I started setting up my perfect coding environment for C#, .NET in linux. I am using PopOS which most of you might be familiar with. So lets get started.
IDE (Code Editor) - Integrated Development environment
The first thing that most people look out for is where am I gonna write my code, is it notepad, notepad++, nvim, Jetbrains or vscode. Everyone has their own choice but for .net on linux I would suggest vscode as it is closer to Visual Studio except it loads faster. In order to install vscode, we will need to download it first. So, just head to this website visual studion download page. You will get the below screen:
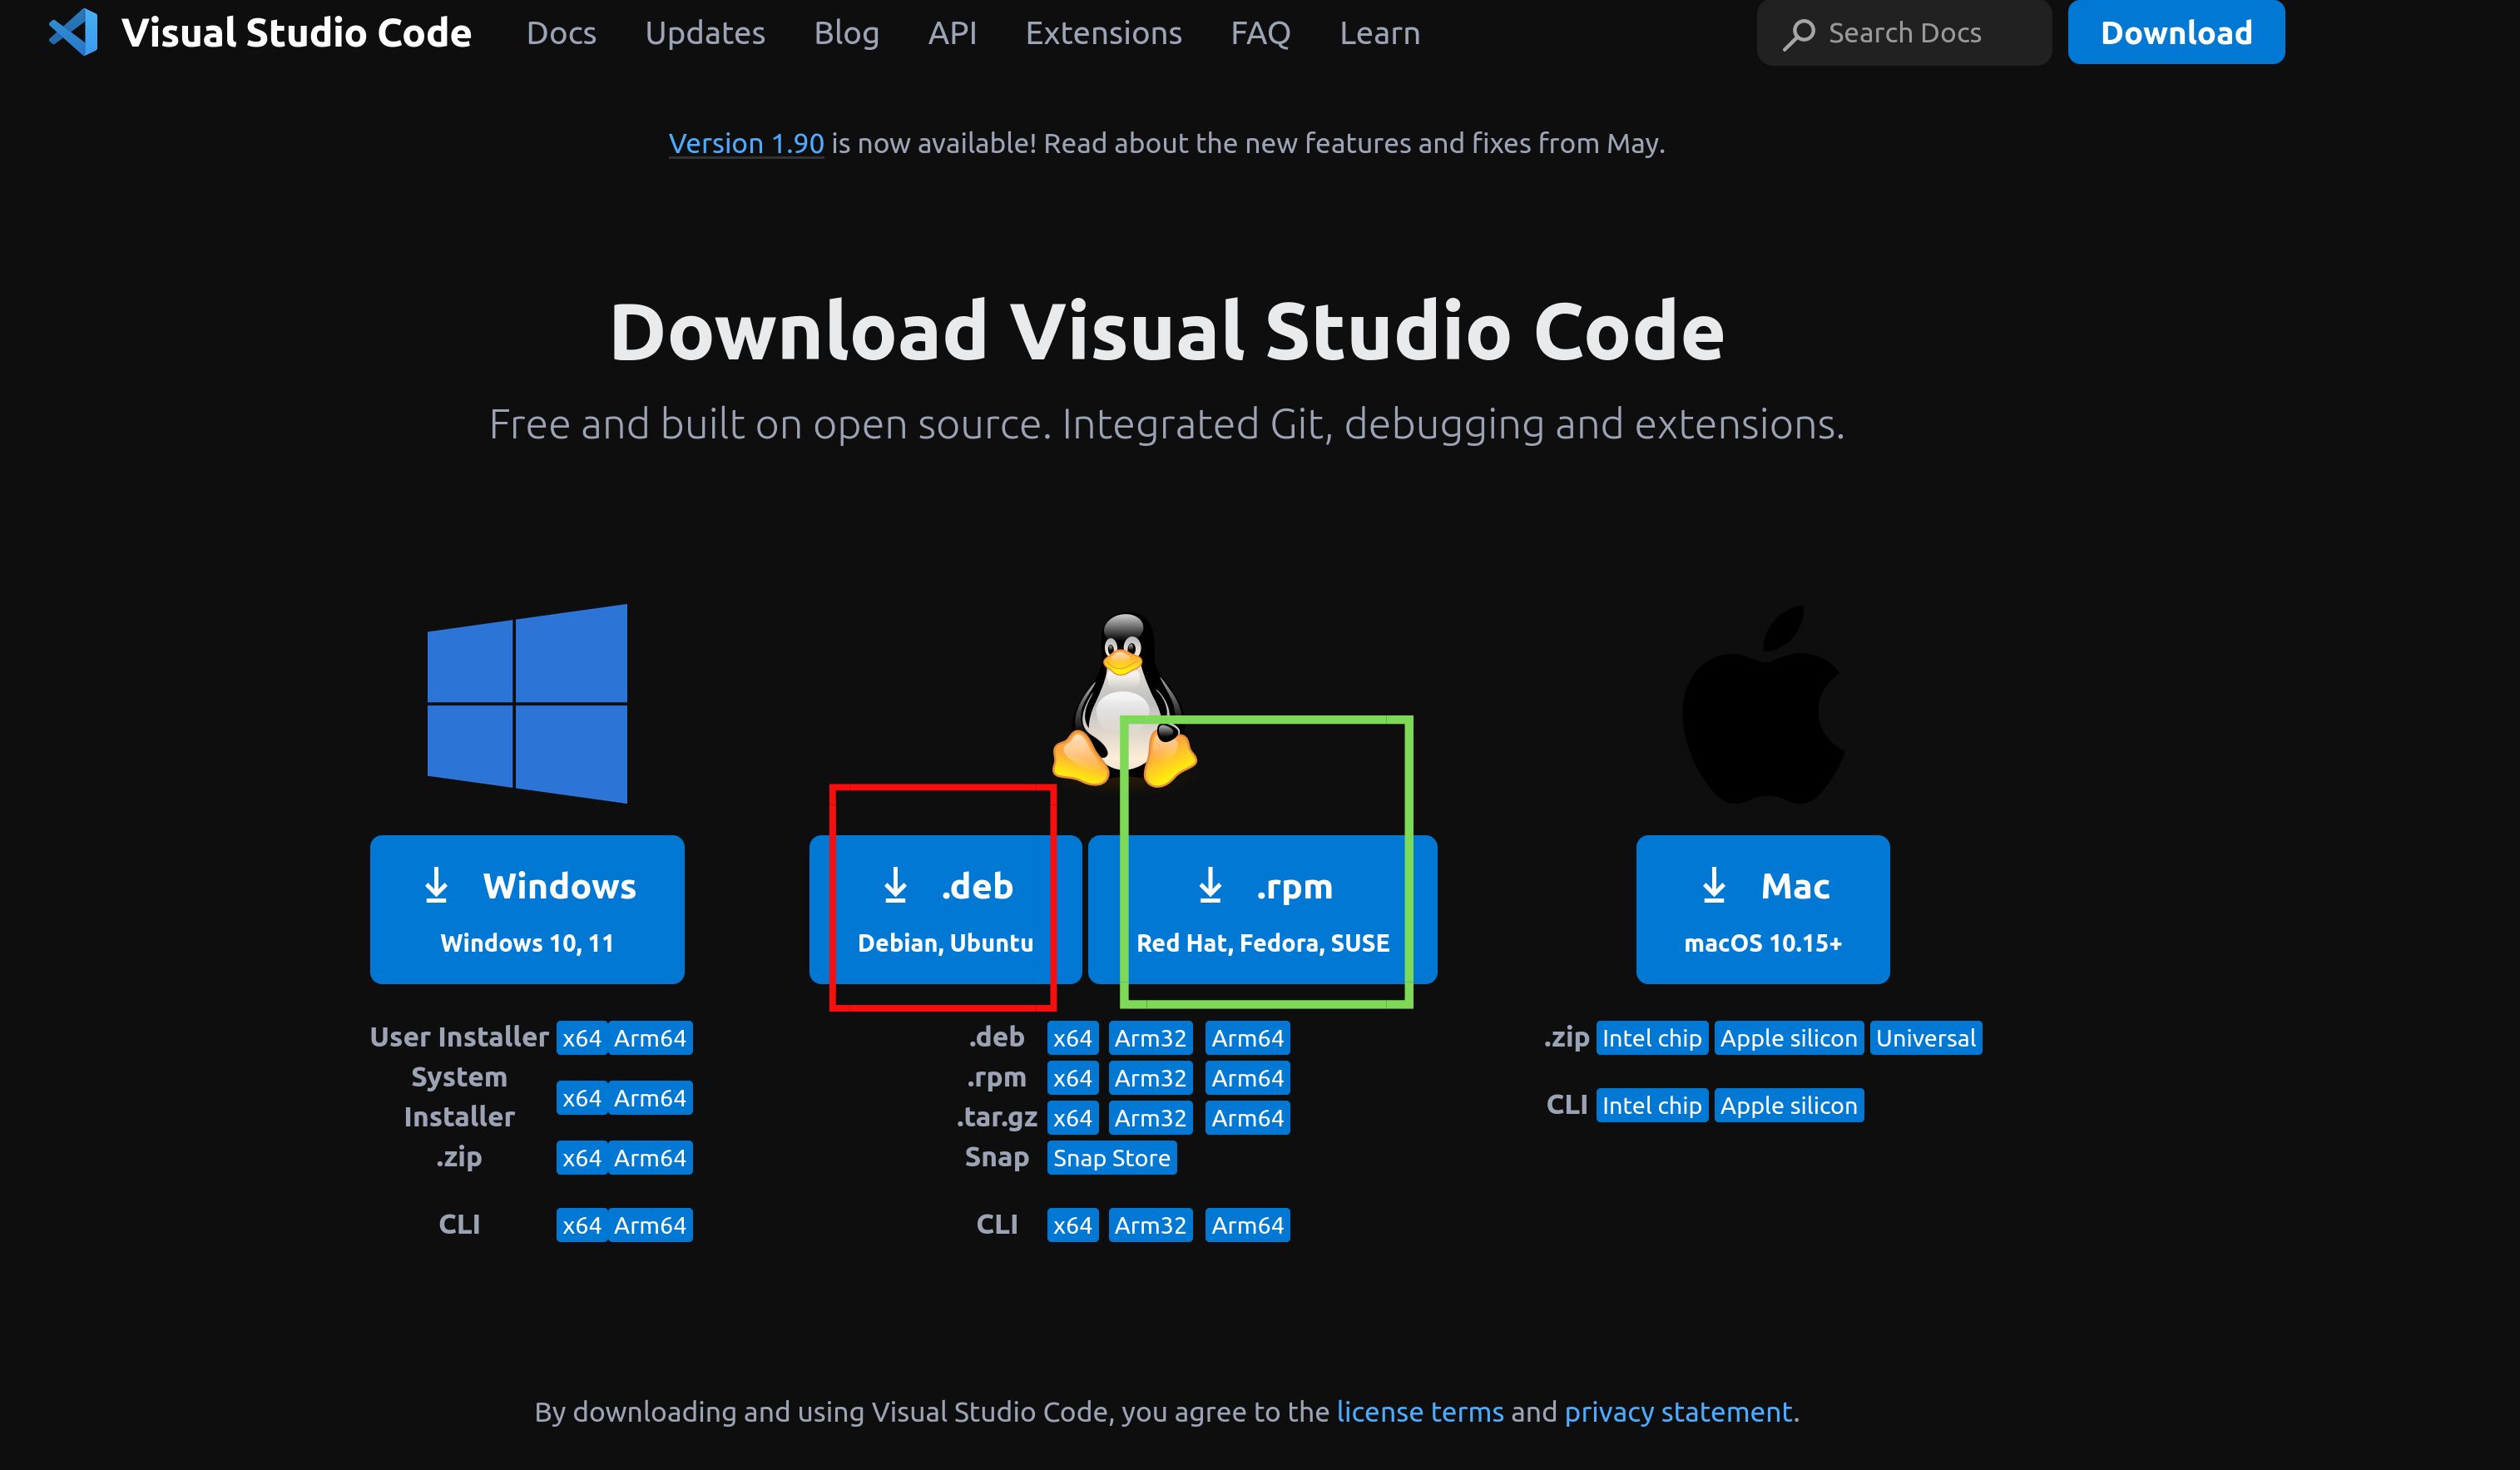
In this image there are two squares red and green.And they are supported by different linux distributions. In the red box it says “.deb” and in other it says “.rpm”. If you are using Debian, or any debian based linux distribution (PopOS, ubuntu, etc) then you will need deb file. And, if you are on a Redhat based distro you will need .rpm (Red-hat Package Manager) file.
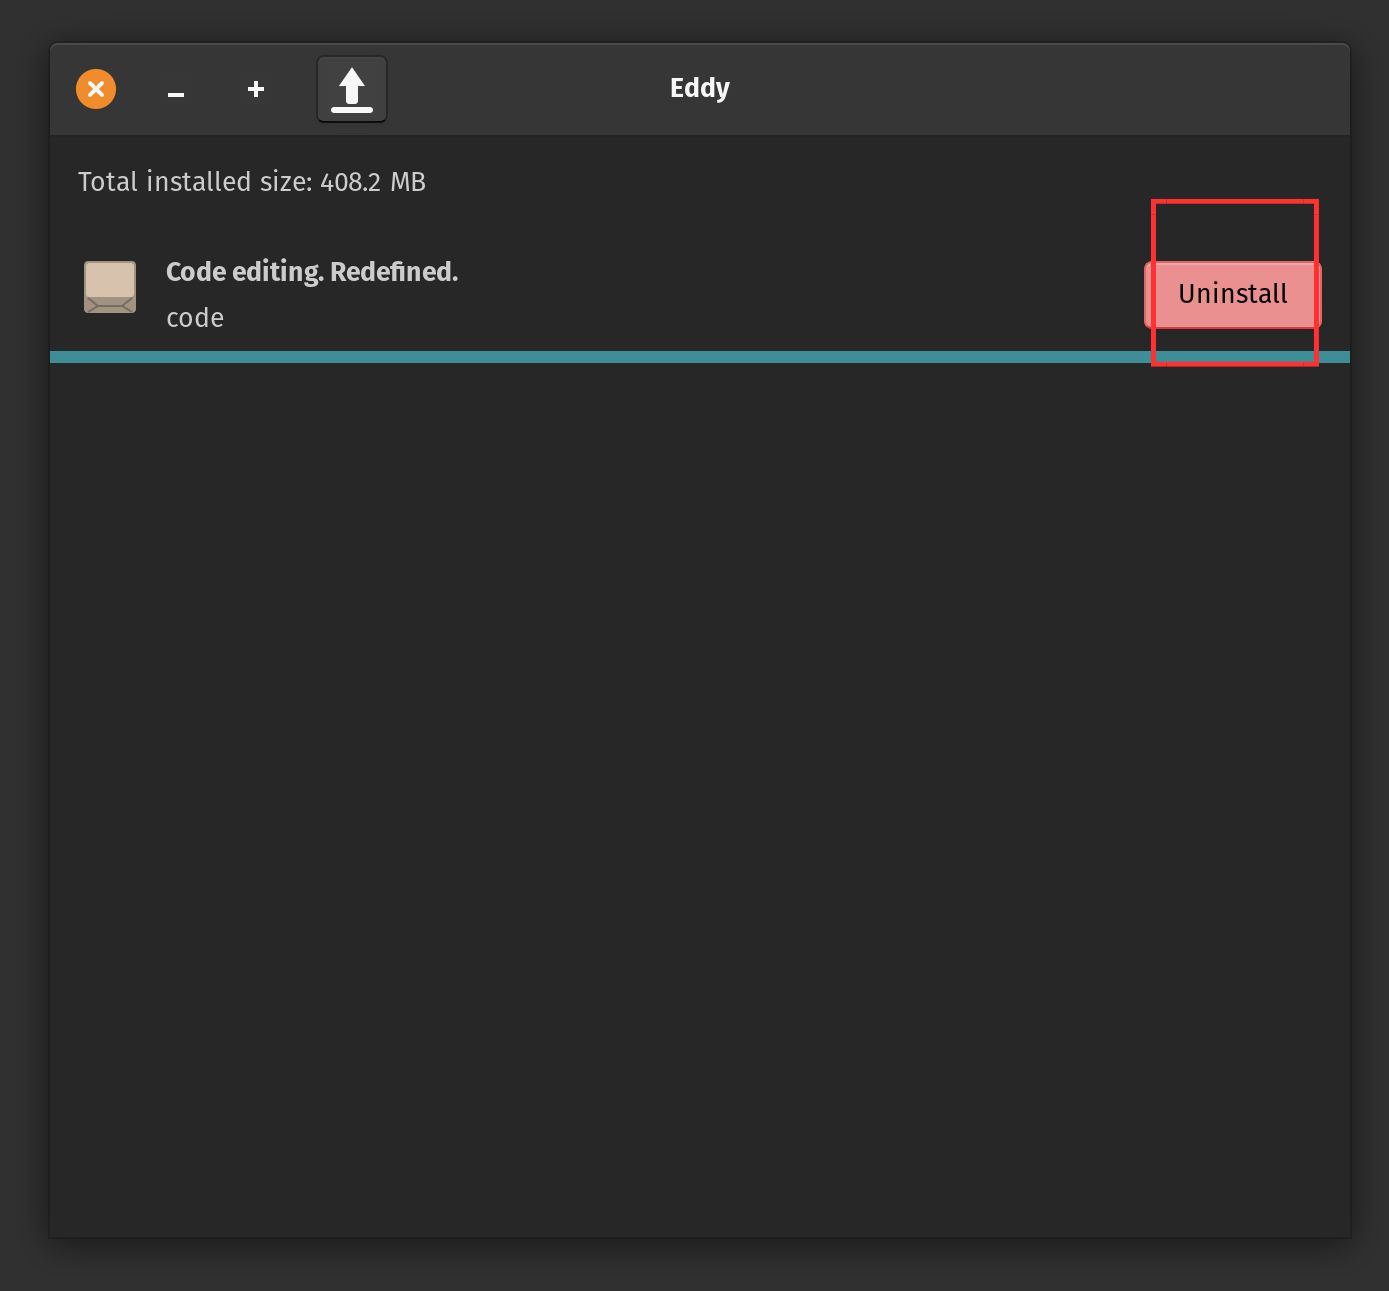
After downloading the file just double click it and it will open in package manager which will show an install option. In the below image you can see in the red square the uninstall option, it is because I had already installed the vsode deb file but if the vscode is not installed the it will show the option “Install”:
Vs Code Extensions for .net development
For writing code we have already installed vscode, lets turn that into a fully functional IDE. For that we will need couple of extensions that will help us to write .NET code better and we will get some intellisense. You can download extensions from web and also within the vscode extension manager. Here is the list of extensions we will be installing to vscode.
C# - This extension will get us C# intellisense, show syntax errors, and also can help us run and debug .NET projects.
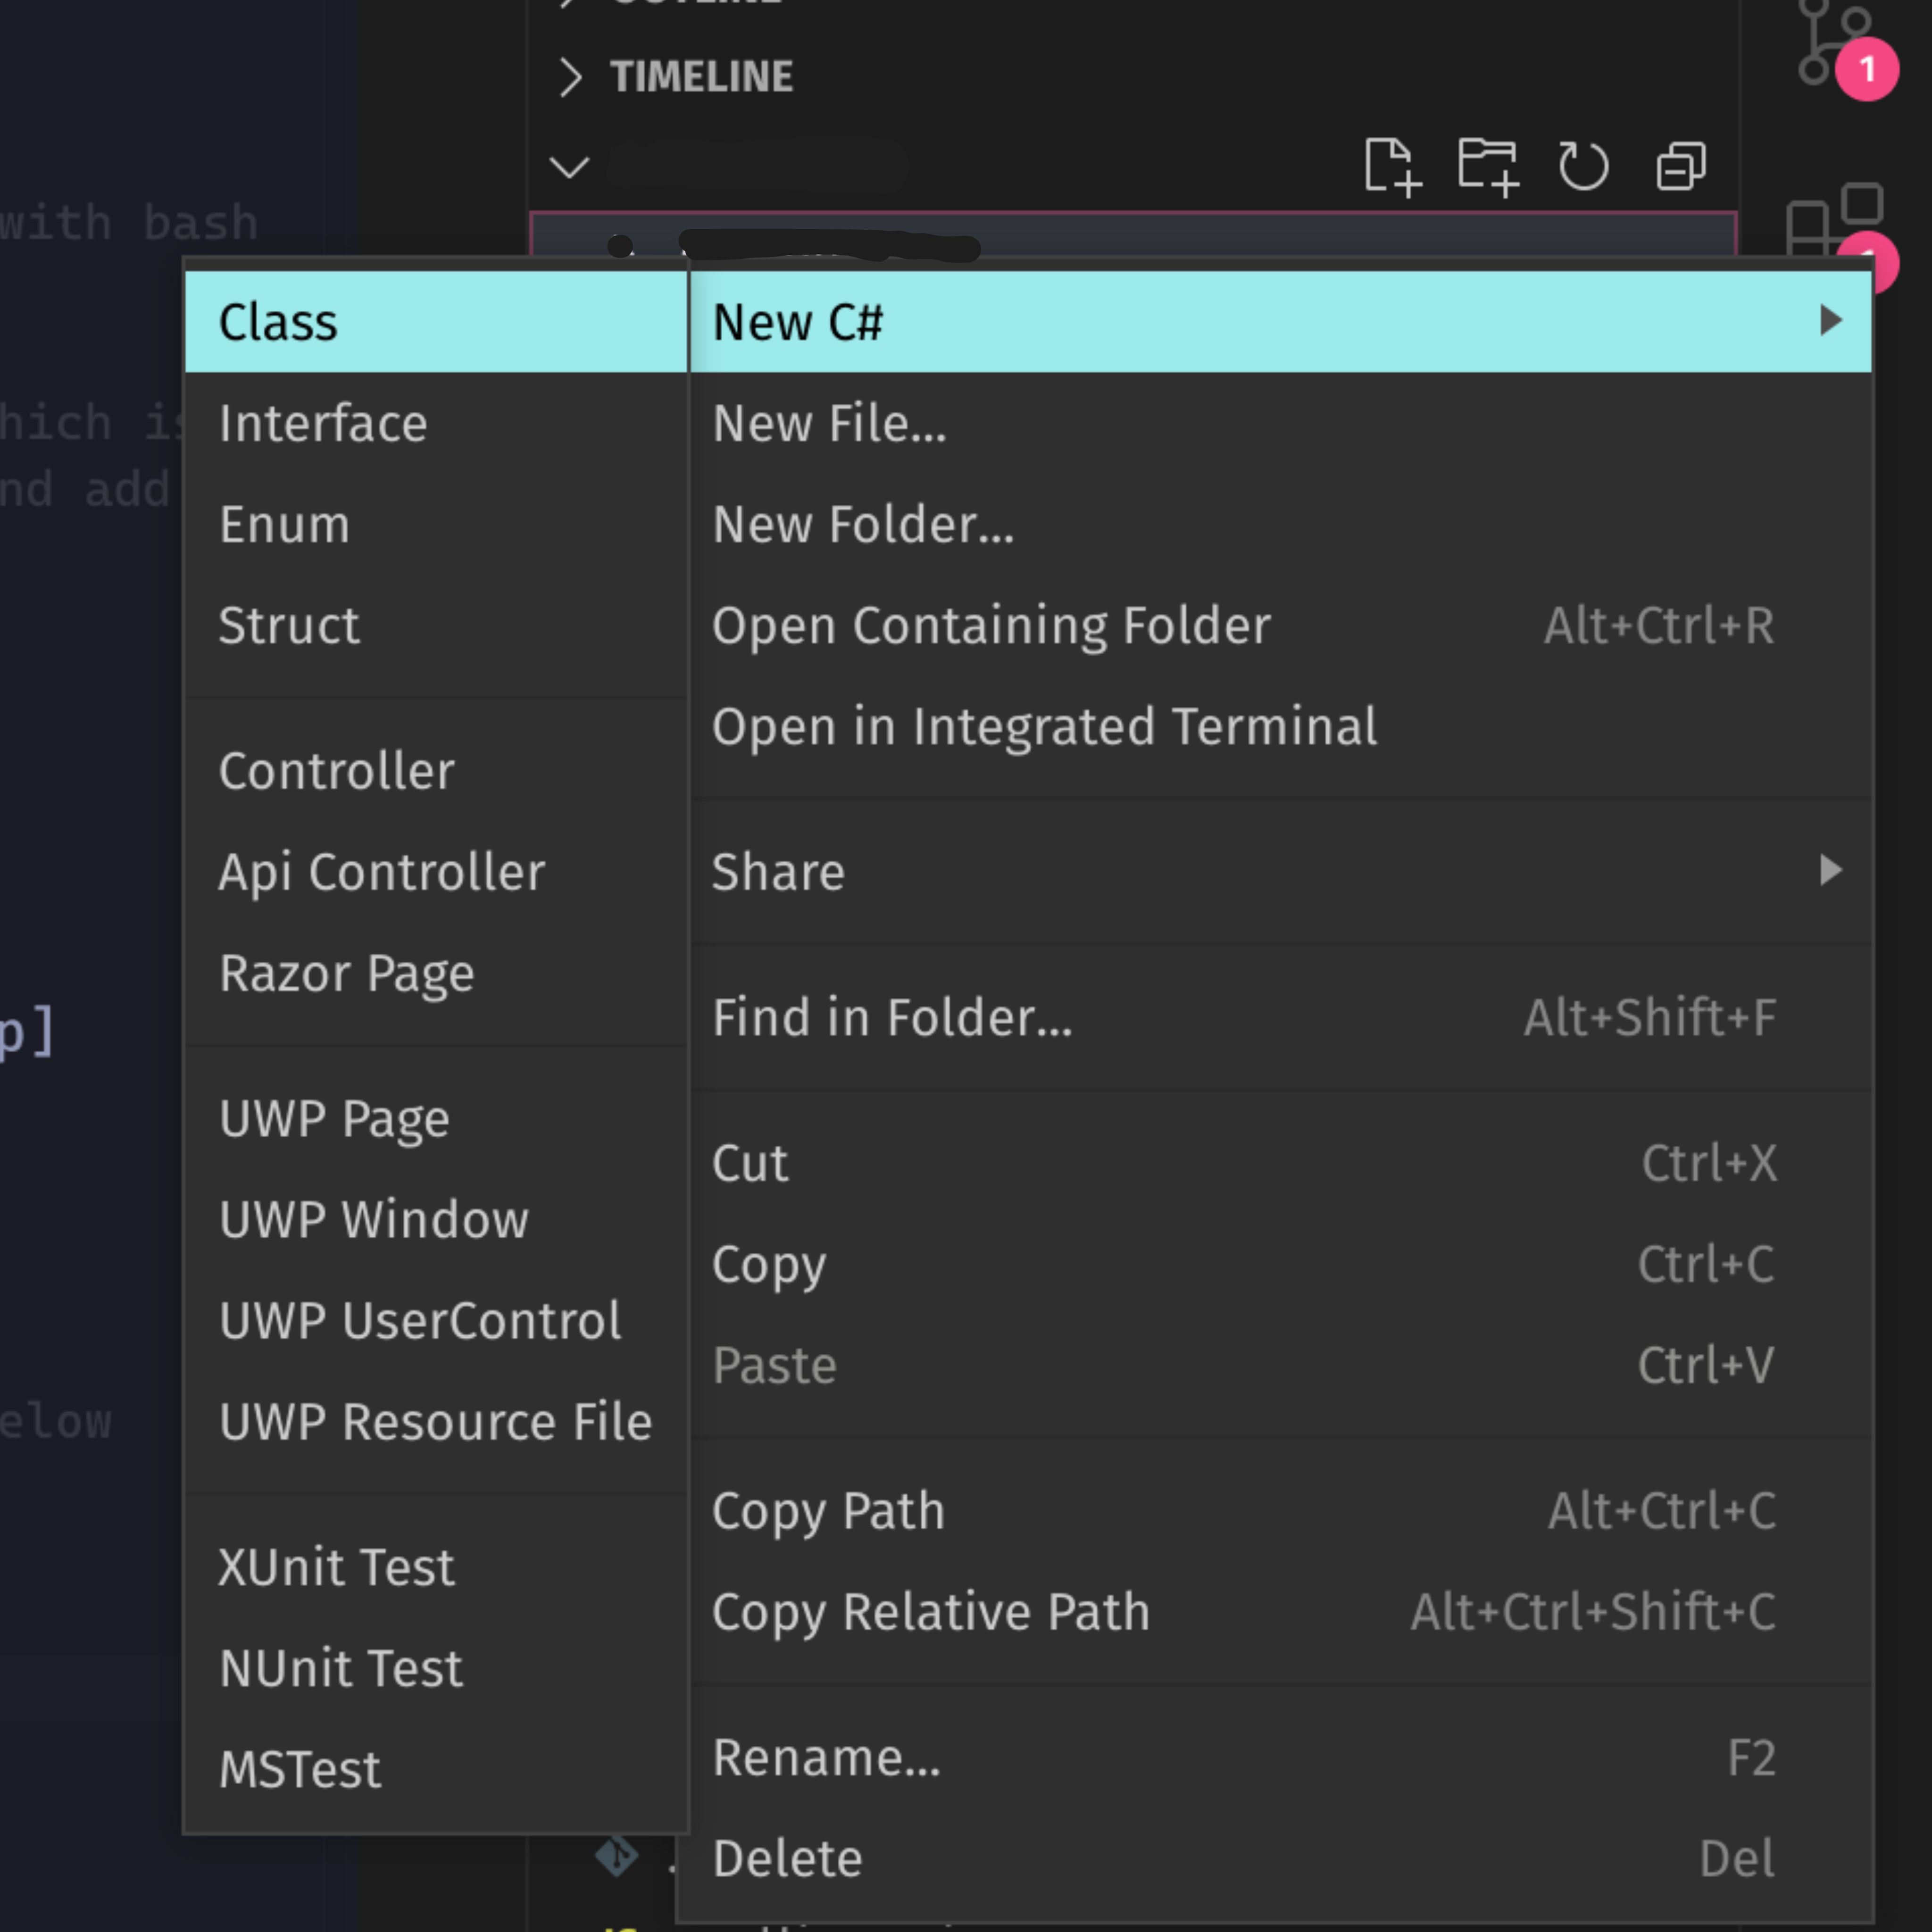
C# Extensions - I have found this extension very useful even though it is not necessary. It gives you an easy options to create C# classes, interfaces, enums, structs, Controllers, etc. When you right click on a folder it gives a context menu
new C#and then you can select the type of file you want to create.
- C# Snippets - And the last one which will give you some shortcuts. If you know in Visual studio when we write
propit write that whole propertypublic int Id { get; set; }. That is where this extension comes in. It gives you a lots of shortcuts which can help you write code a little faster.
These are the 3 extension I use for .net development you can install more there are hundreds of plugins, but I suggest to install less plugins as it will keep vscode smooth. The more plugins you install the less performant vscode will become.
After we have installed vscode and extensions, the next thing to install is dotnet sdk.
.NET SDK installation
Vscode will be used to write code but for creating, building, and running .net projects we will need .NET sdk. Lets open .NET Install page where you will see a screen similar to below one:
There are 3 main options:
- Packages
- Snap
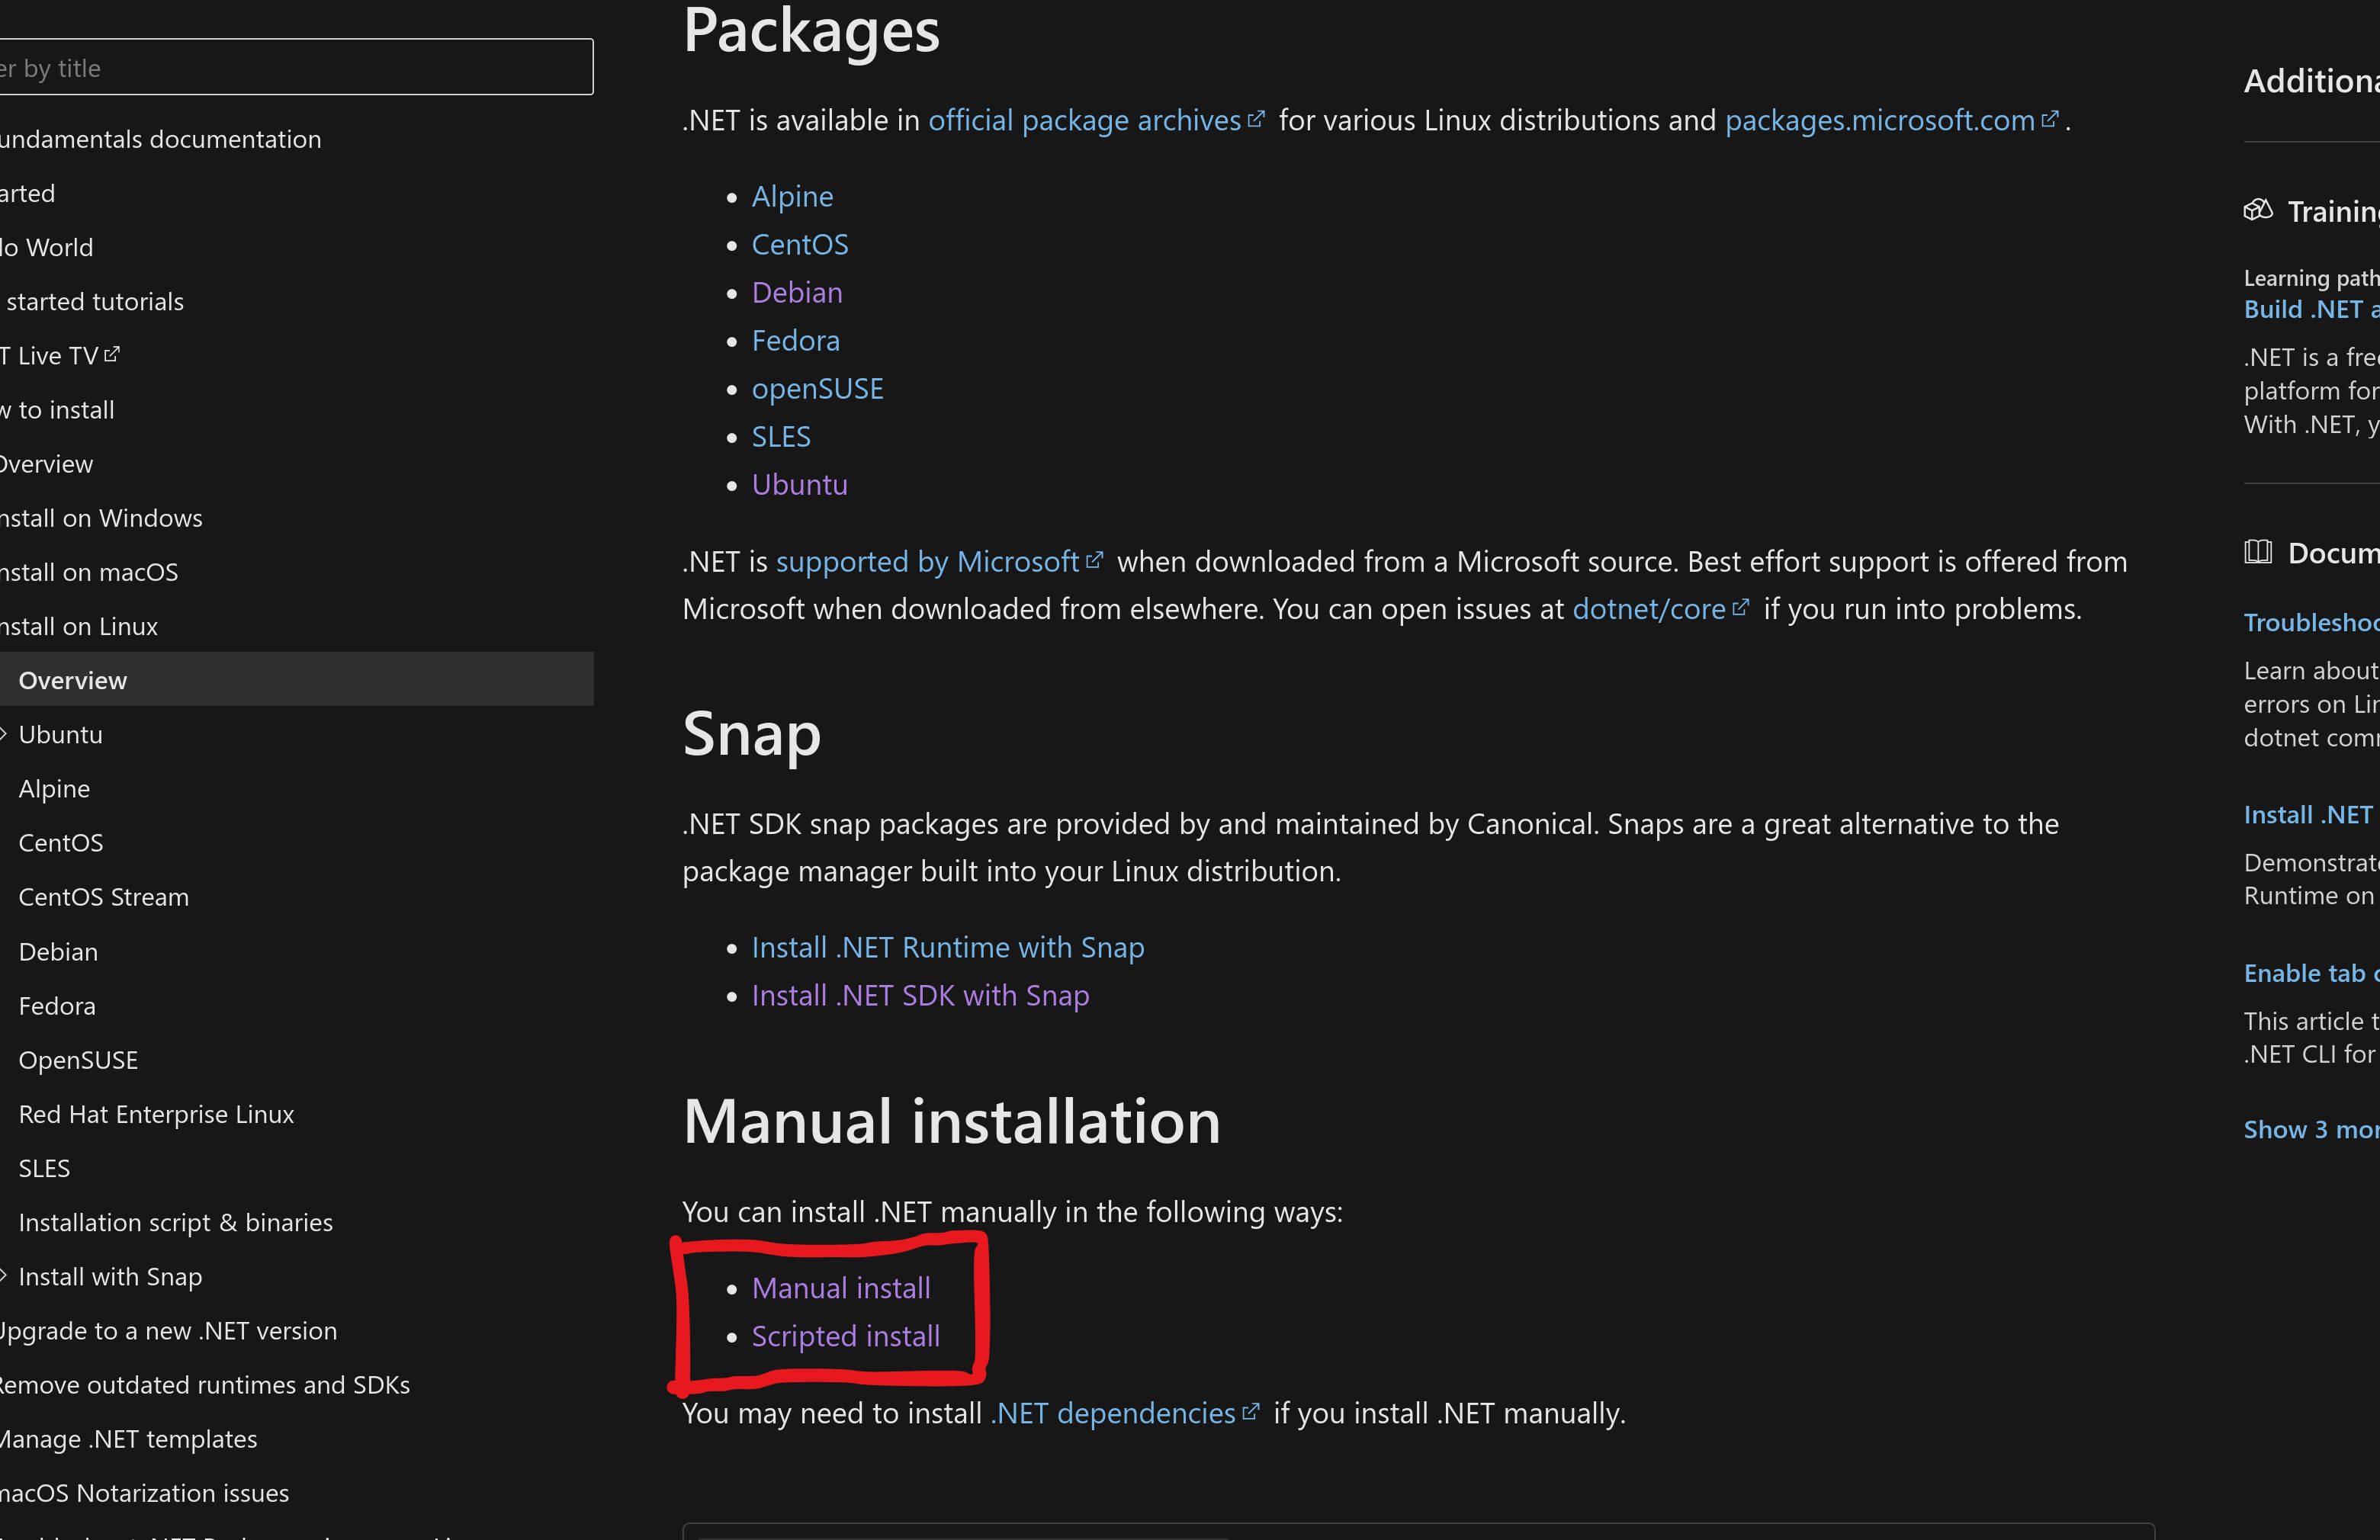
- Manual installation
If you open any page in Packages, you will possibly find it little lengthy and complex. And if you open a Snap page like that Install .NET SDK with snap. You will see a warning like below:
WARNING: Snap installations of .NET may have problems running .NET tools. If you wish to use .NET tools, we recommend that you install .NET using the dotnet-install script or the package manager for the particular Linux distribution.
And finally we are left with Manual installation. There are two options inside the Manual Installation, Manual Install & Scripted Install. The easiest way I have found is Scripted Installation and that is what I will be doing.
First we download a script using the below command that will help to install the dotnet sdk.
wget https://dot.net/v1/dotnet-install.sh -O dotnet-install.shNOTE:: If you terminal shows an error saying wget is not a command, that means you will need to install wget package first in you linux. It comes bundled with most of the distributions but still if you don’t have it then run the below command to install wget.
apt-get install wgetThen run the above command again to download dotnet-install.sh file.
Next, we need to make the script executable using the below command:
chmod +x ./dotnet-install.shThen, finally you can install dotnet using the below command:
./dotnet-install.sh --version latestlatest in the command defines the version that is to be installed - current version is - .NET 8. So, it will download same. If you want a different version maybe because you are working on a project that was created 2 years ago and was not updated to latest .NET version. For that run the below command that defines the version along with install command:
./dotnet-install.sh --channel 7.0This will install .NET 7.
Once the installation is complete, we must set the path. In linux there is something called SHELL in terminal. If you run the below command in terminal:
echo $SHELLMost of the people will get something like /usr/bin/bash. If you are one of those with bash shell then you are done. You can skip the next zshrc part and directly restart system and test dotnet --info command and see the output.
But if you see something like /usr/bin/zsh, then you are using ZSH shell and you must be familiar with .zshrc which is in the /home/{username} folder. Open up the .zshrc file in your favorite text editor and add the below code in the end:
export DOTNET_ROOT=$HOME/.dotnet
export PATH=$PATH:$DOTNET_ROOT:$DOTNET_ROOT/tools
After that, run the command:
source .zshrcFinally you can now restart your terminal and check if the dotnet is working using the below command:
dotnet --infoIf you see the below result, then we are done with dotnet now:
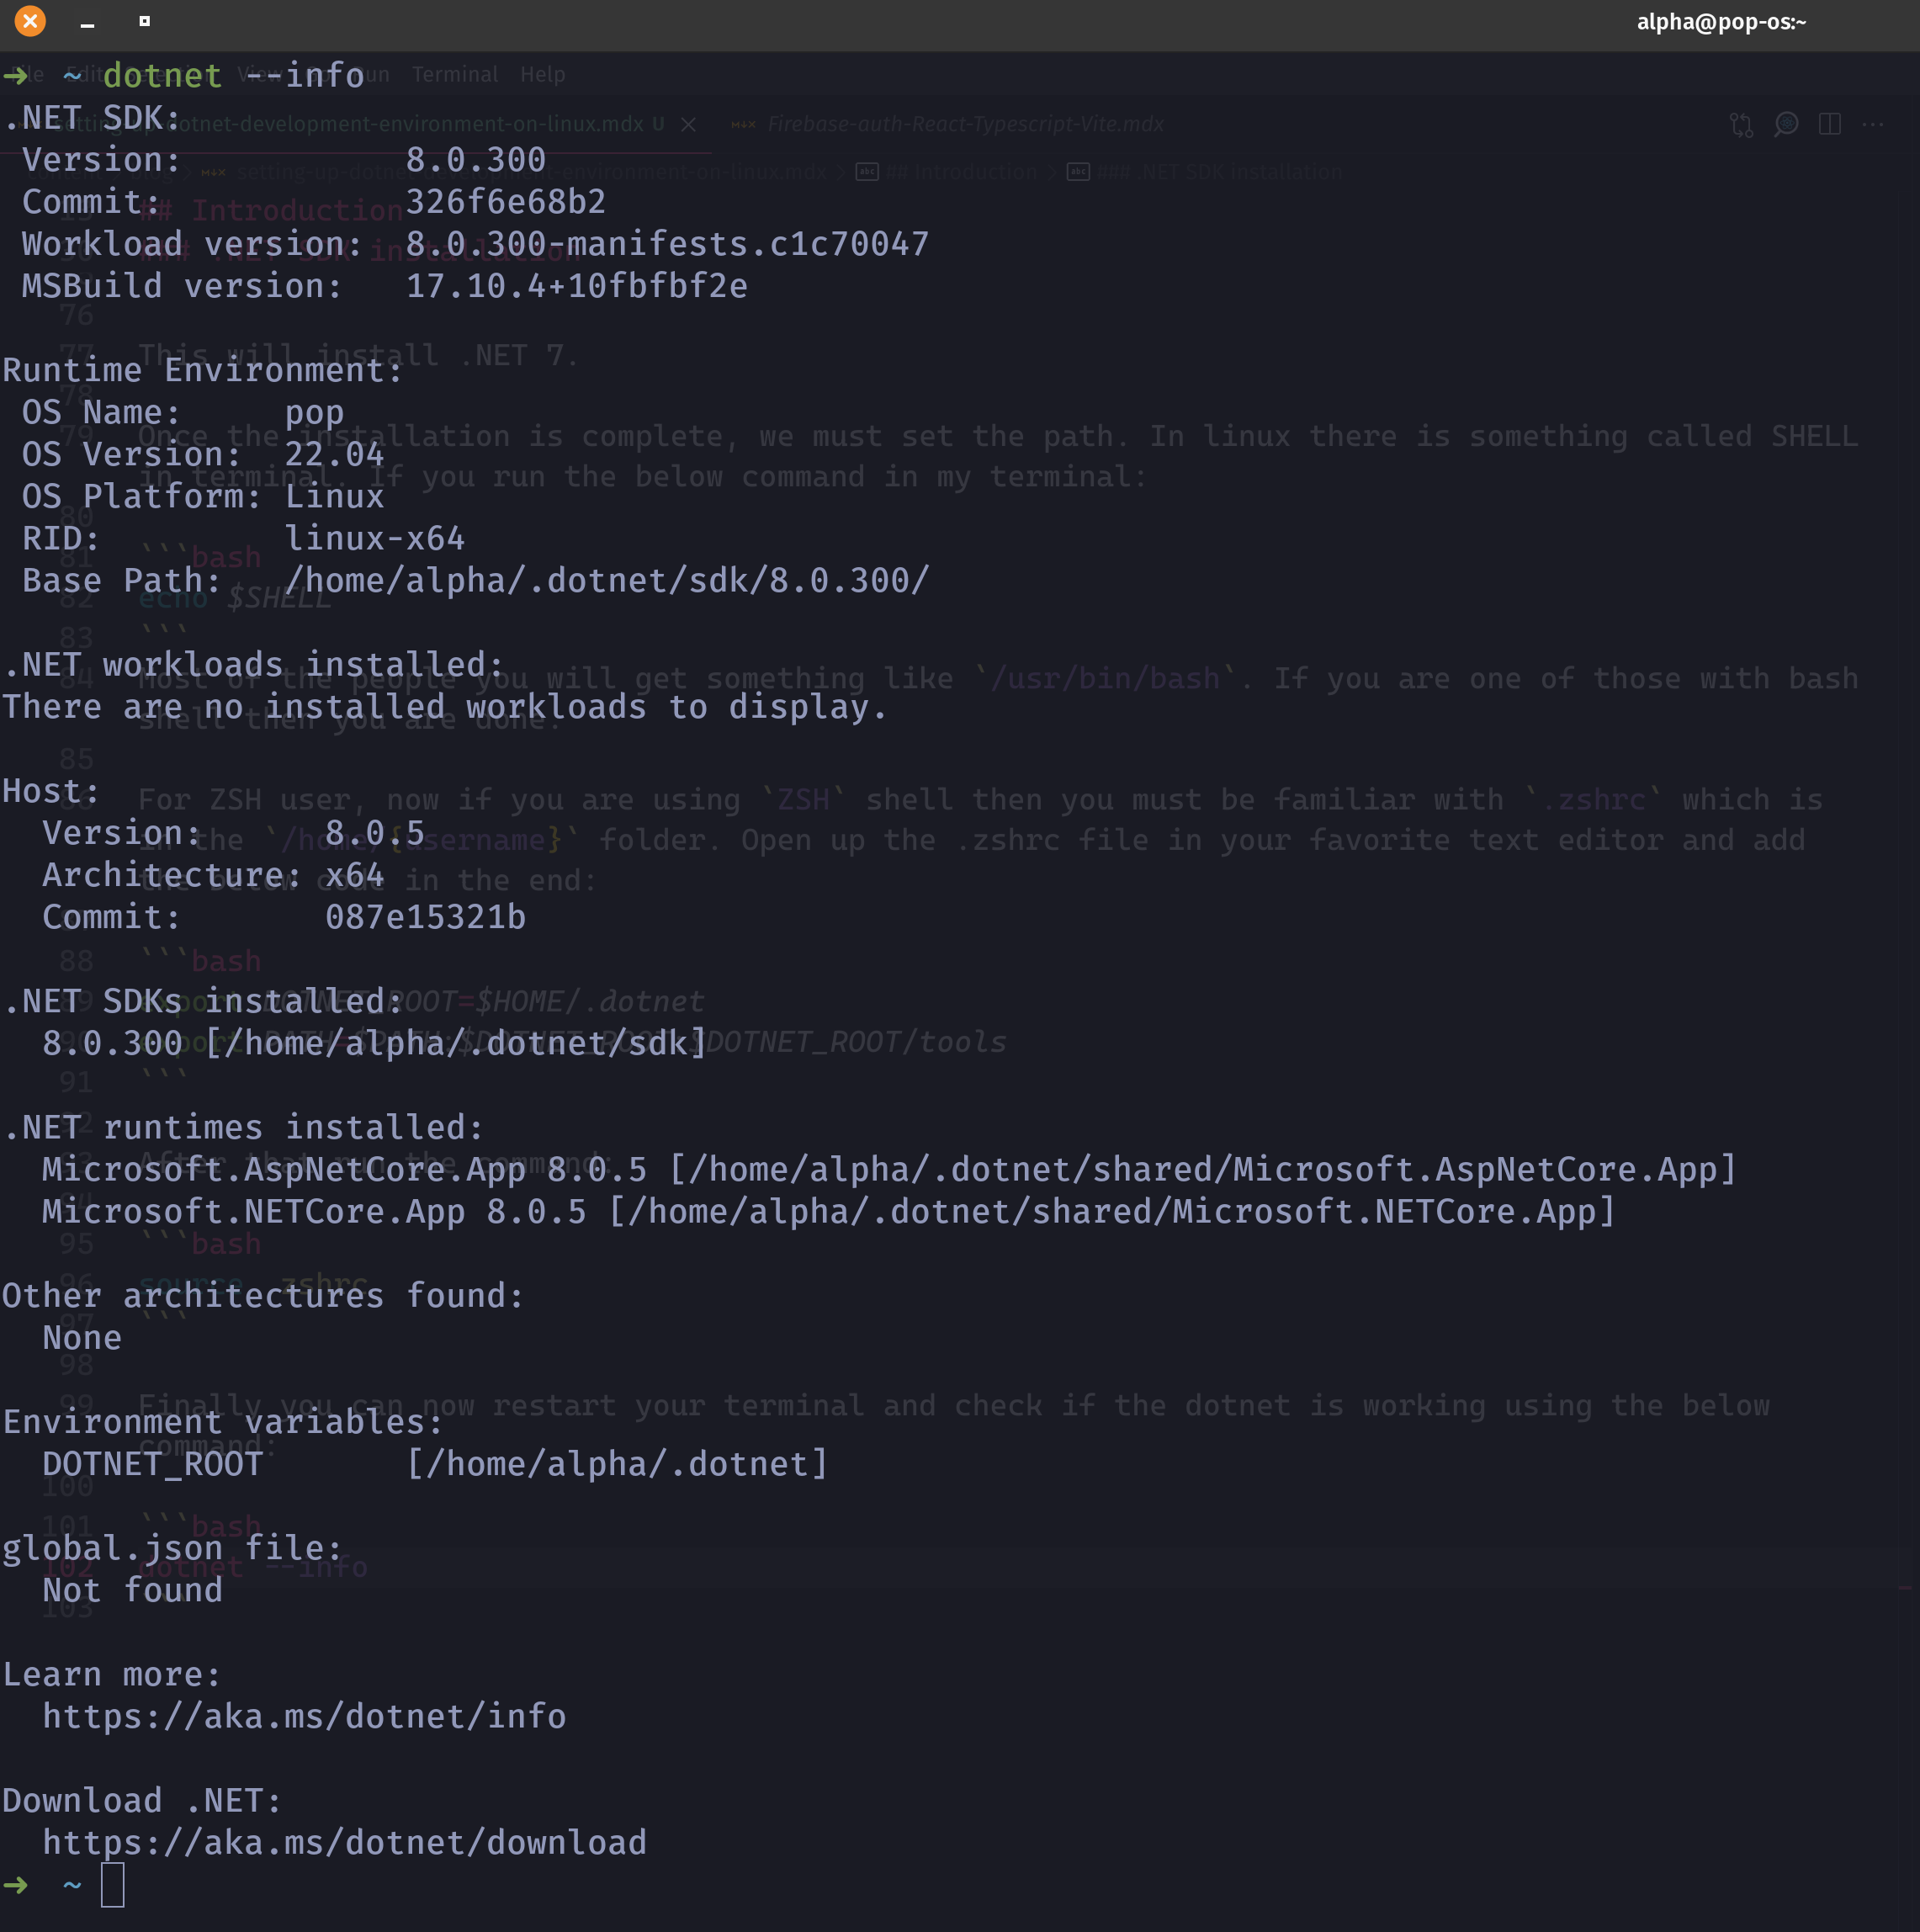
But, if you don’t see this and might see and error like dotnet command was not found. Then you should see the installation process again especially setting up path section in .NET SDK installation section.
Database Management
For creating and managing database we will install mssql server and azure data studio.
MsSQL server
To manage databases we need a server and I will be using MsSQL server. First we download a public key by running the below command:
curl -fsSL https://packages.microsoft.com/keys/microsoft.asc | sudo gpg --dearmor -o /usr/share/keyrings/microsoft-prod.gpgIf the above command shows warning that the public key is not available then run the below command:
curl https://packages.microsoft.com/keys/microsoft.asc | sudo tee /etc/apt/trusted.gpg.d/microsoft.ascThen, we will need to add mssql server respository to our PopOS or Ubuntu repository using the below command.
curl -fsSL https://packages.microsoft.com/config/ubuntu/22.04/mssql-server-2022.list | sudo tee /etc/apt/sources.list.d/mssql-server-2022.listNext, run the update command:
sudo apt-get updateThen, to install mssql-server just run the command:
sudo apt-get install -y mssql-serverIt will automatically install the mssql-server in you system. Once that process is done we will need to configure it. The below command will run the configure wizard:
sudo /opt/mssql/bin/mssql-conf setupWhen you run the command you will get something like:
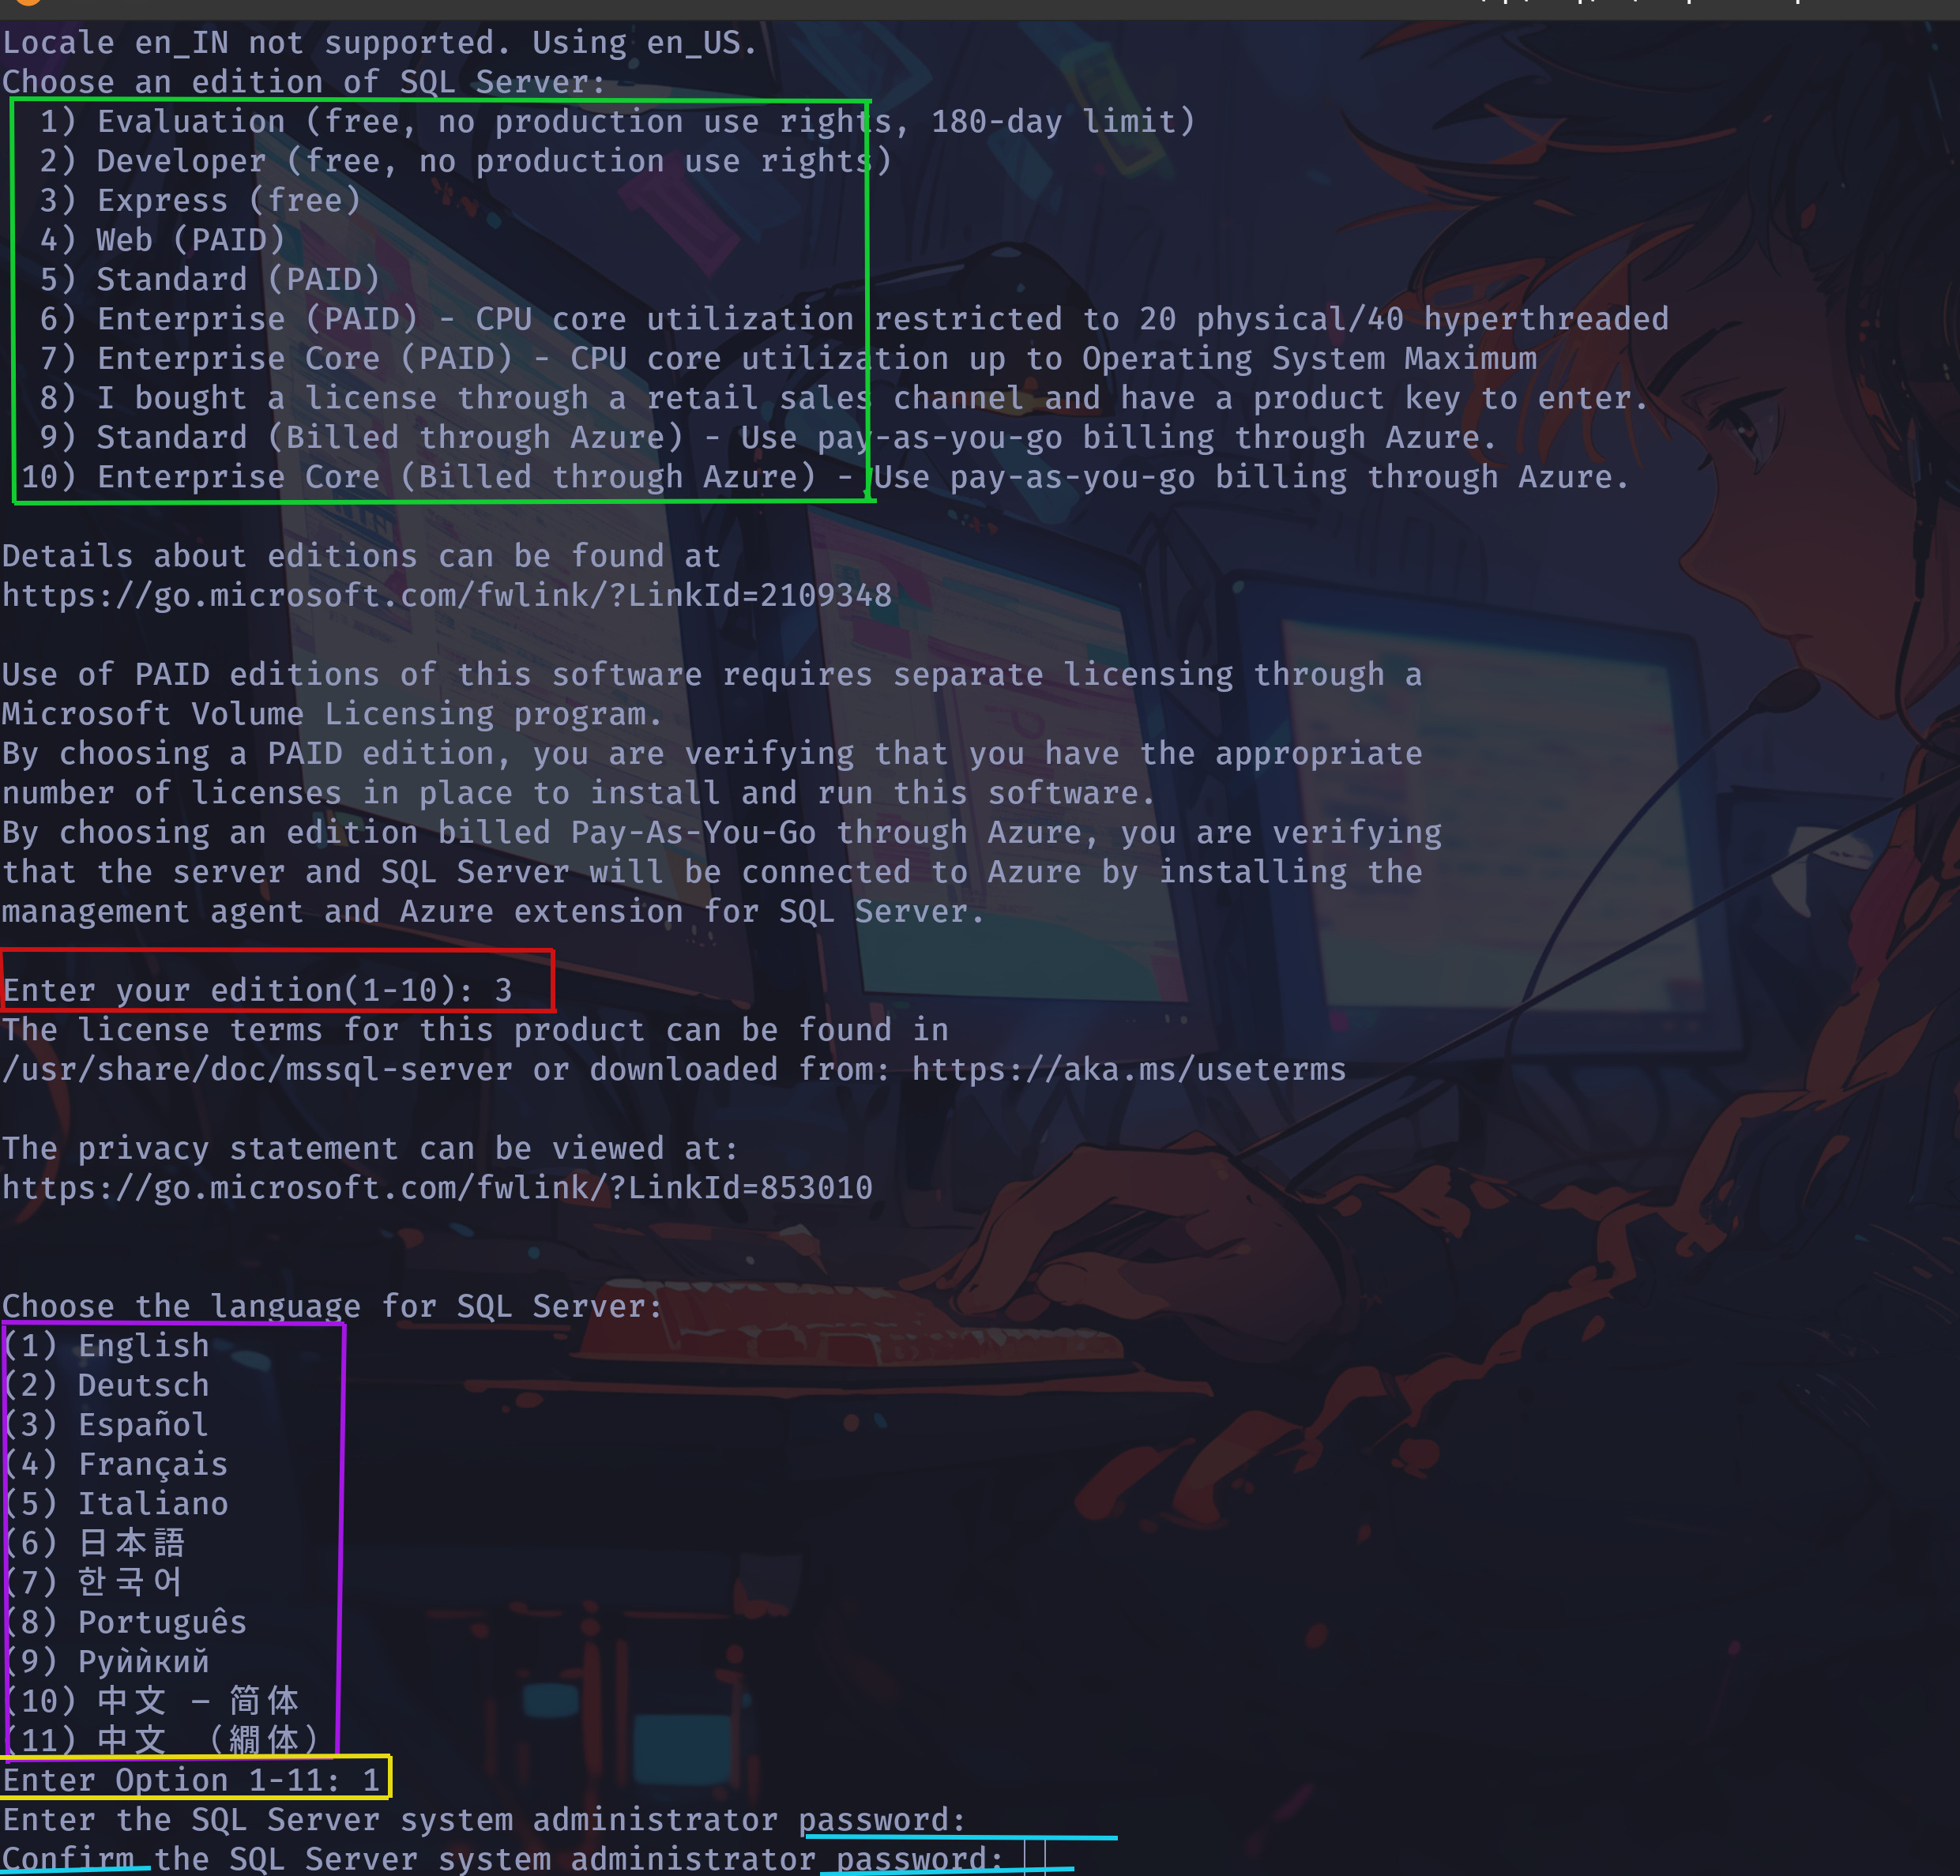
In the above screenshot it will ask 3 things:
Edition: I usually use Express Edition as it is free and can also be used commercially. In the green box you will see different editions that can be installed as you can see some of them are free and some paid. It will ask to enter the edition which is in the red box.
Language: I select English but you can select the language whichever you want. In the purple box you will see different options for language and in yellow box you will be asked to enter you language.
System Admin Password: The password for the system administrator (sa) user. It is highly recommended to disable the sa login and create some users with limited access but as this is just the installation guide we won’t be creating new users.
And, with that our sql server is installed. See, not that hard.
Azure data studio
MsSQL server is a server where the databases are, but to write queries and see those interact with those databases we will need some kinda sql editor. Now, we could have turned Vscode into that as well by installing some extra sql plugins that would have helped us to connect with sql server but like I said more plugins means less performance. So, in this we will install Azure Data Studio which is really good, lightweight, cross-platform data management and development tool. On windows most people use Sql Server Management Studio but that doesn’t work on linux.
To install Azure data studio we will go back to how we installed vscode. The “deb” file. Just head over to the Download Azure Data Studio page. After scrolling a little bit you will see something like this:
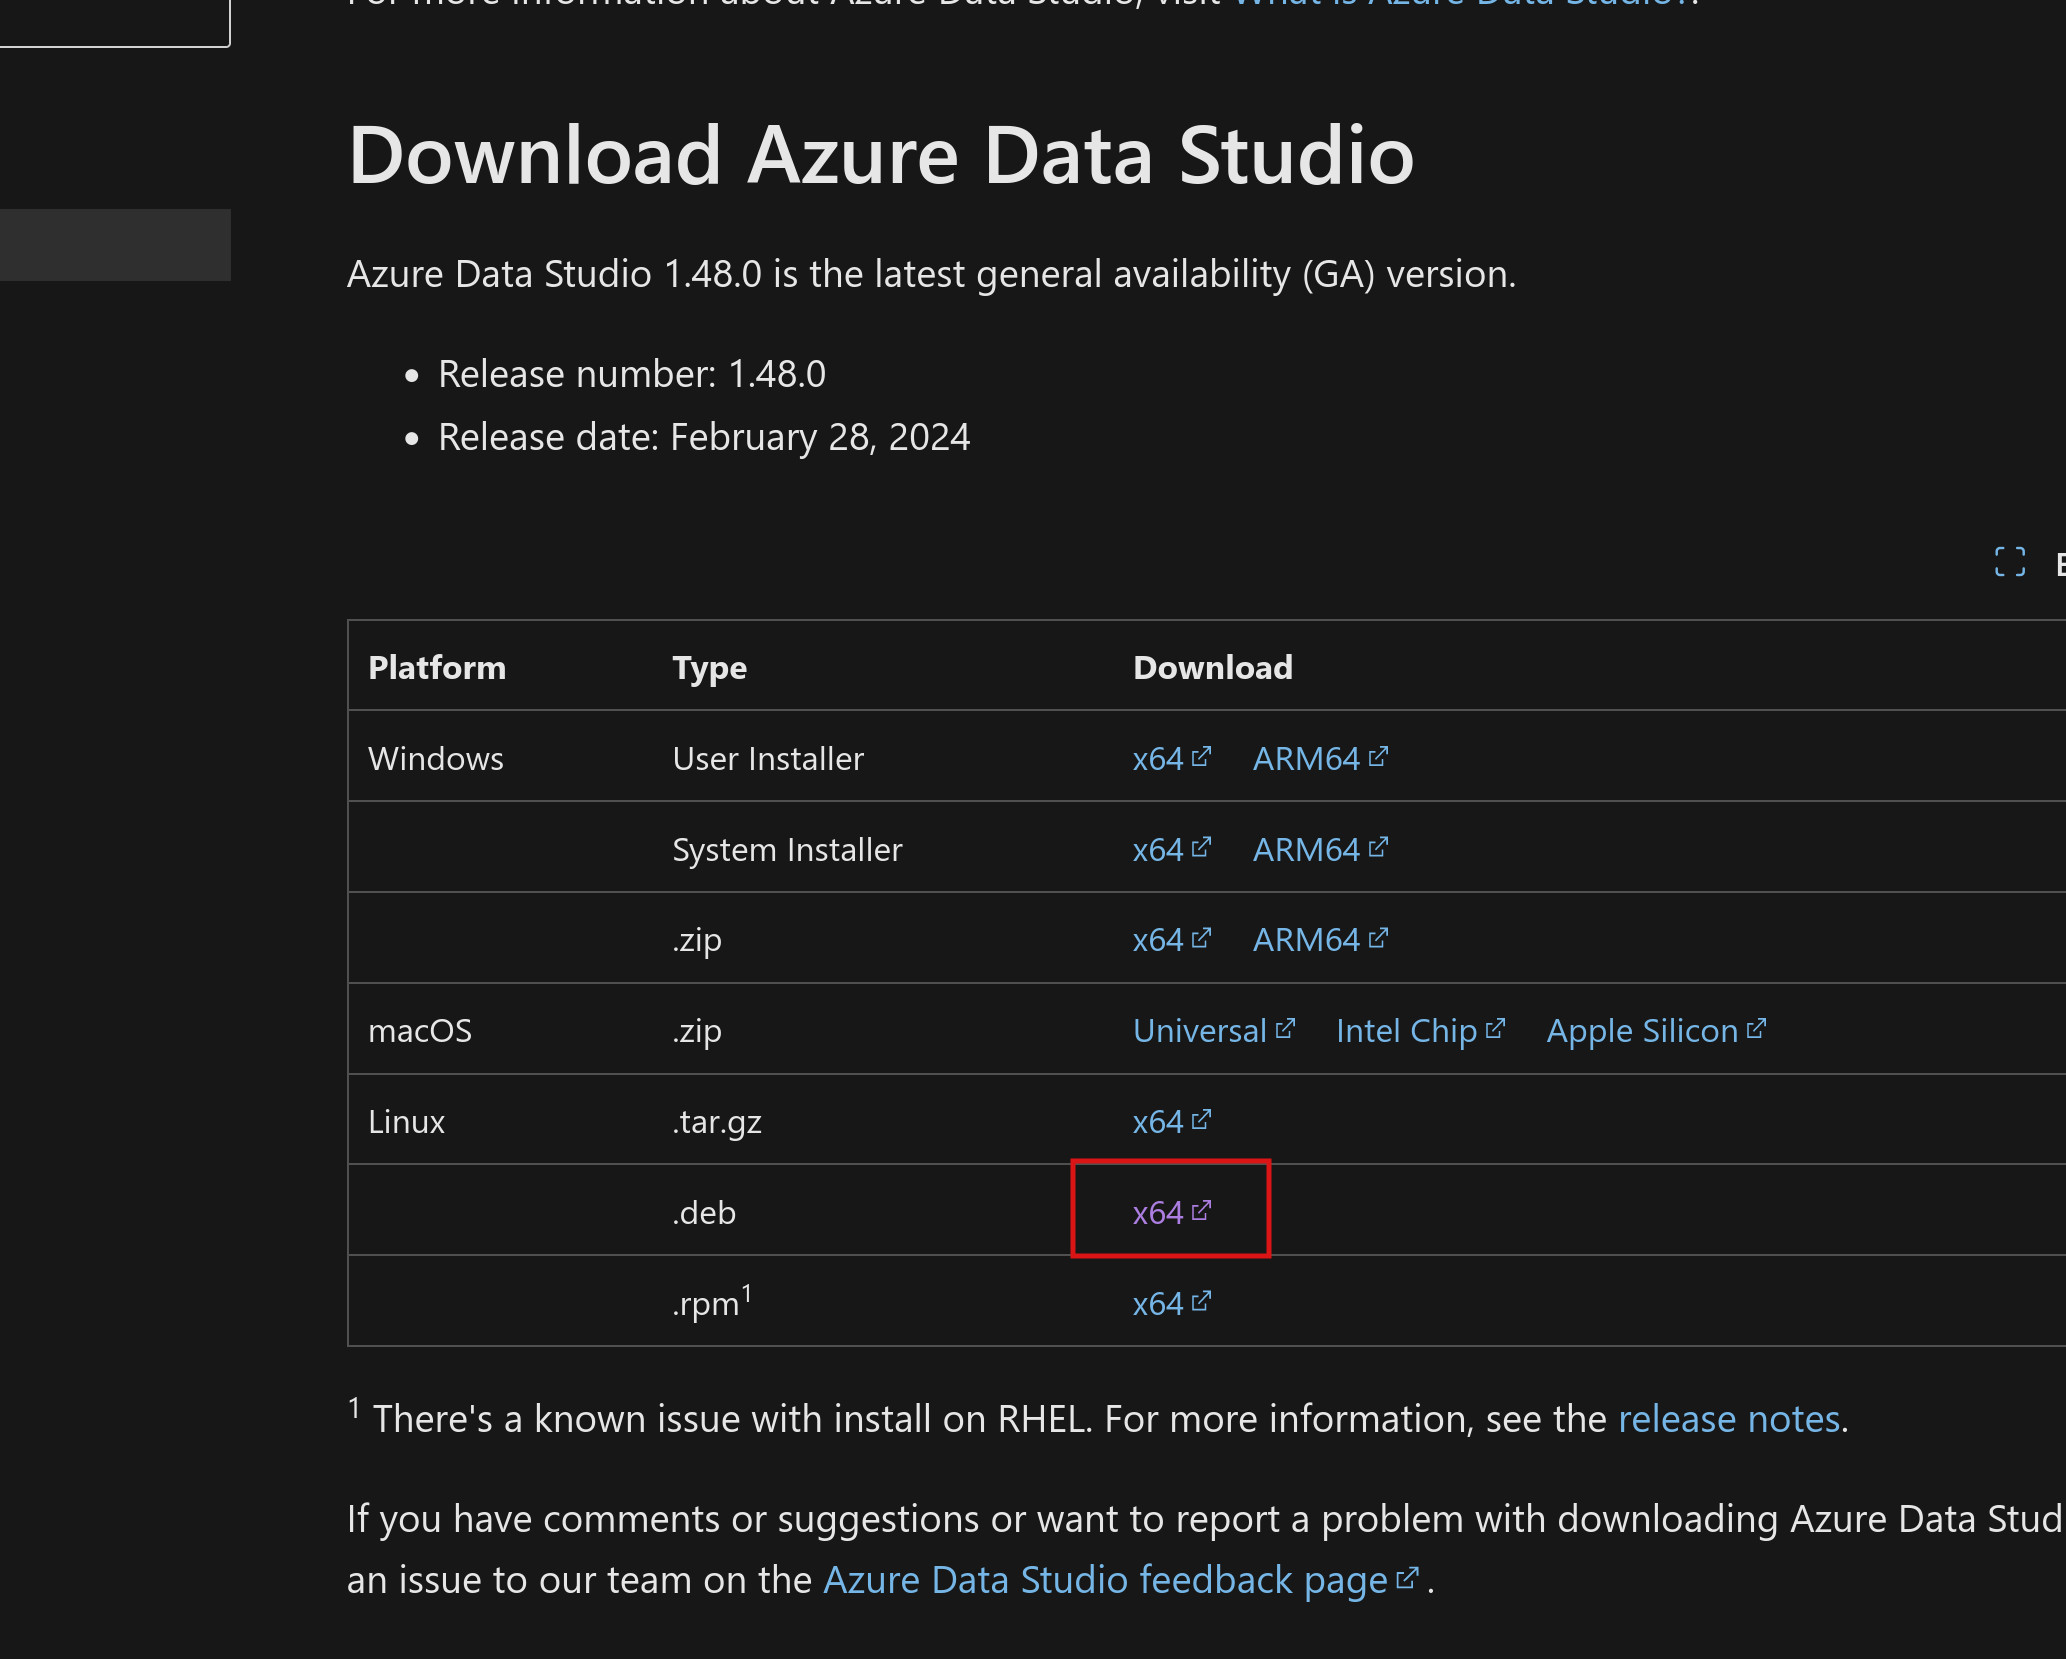
There is option for Windows, Mac and Linux, and if you also see that there are 3 options inside the linux as well - “.deb”, “.rpm”, “.zip”, We will download deb file here as well as it is easy to install. To download deb file click on the x64 on the right side of the deb option and it will start downloading the azure data studio deb file. Next, you already know how to install deb file just double click and again click install button.
There it is azure data studio installed. Lets connect the sql server to our azure data studio.
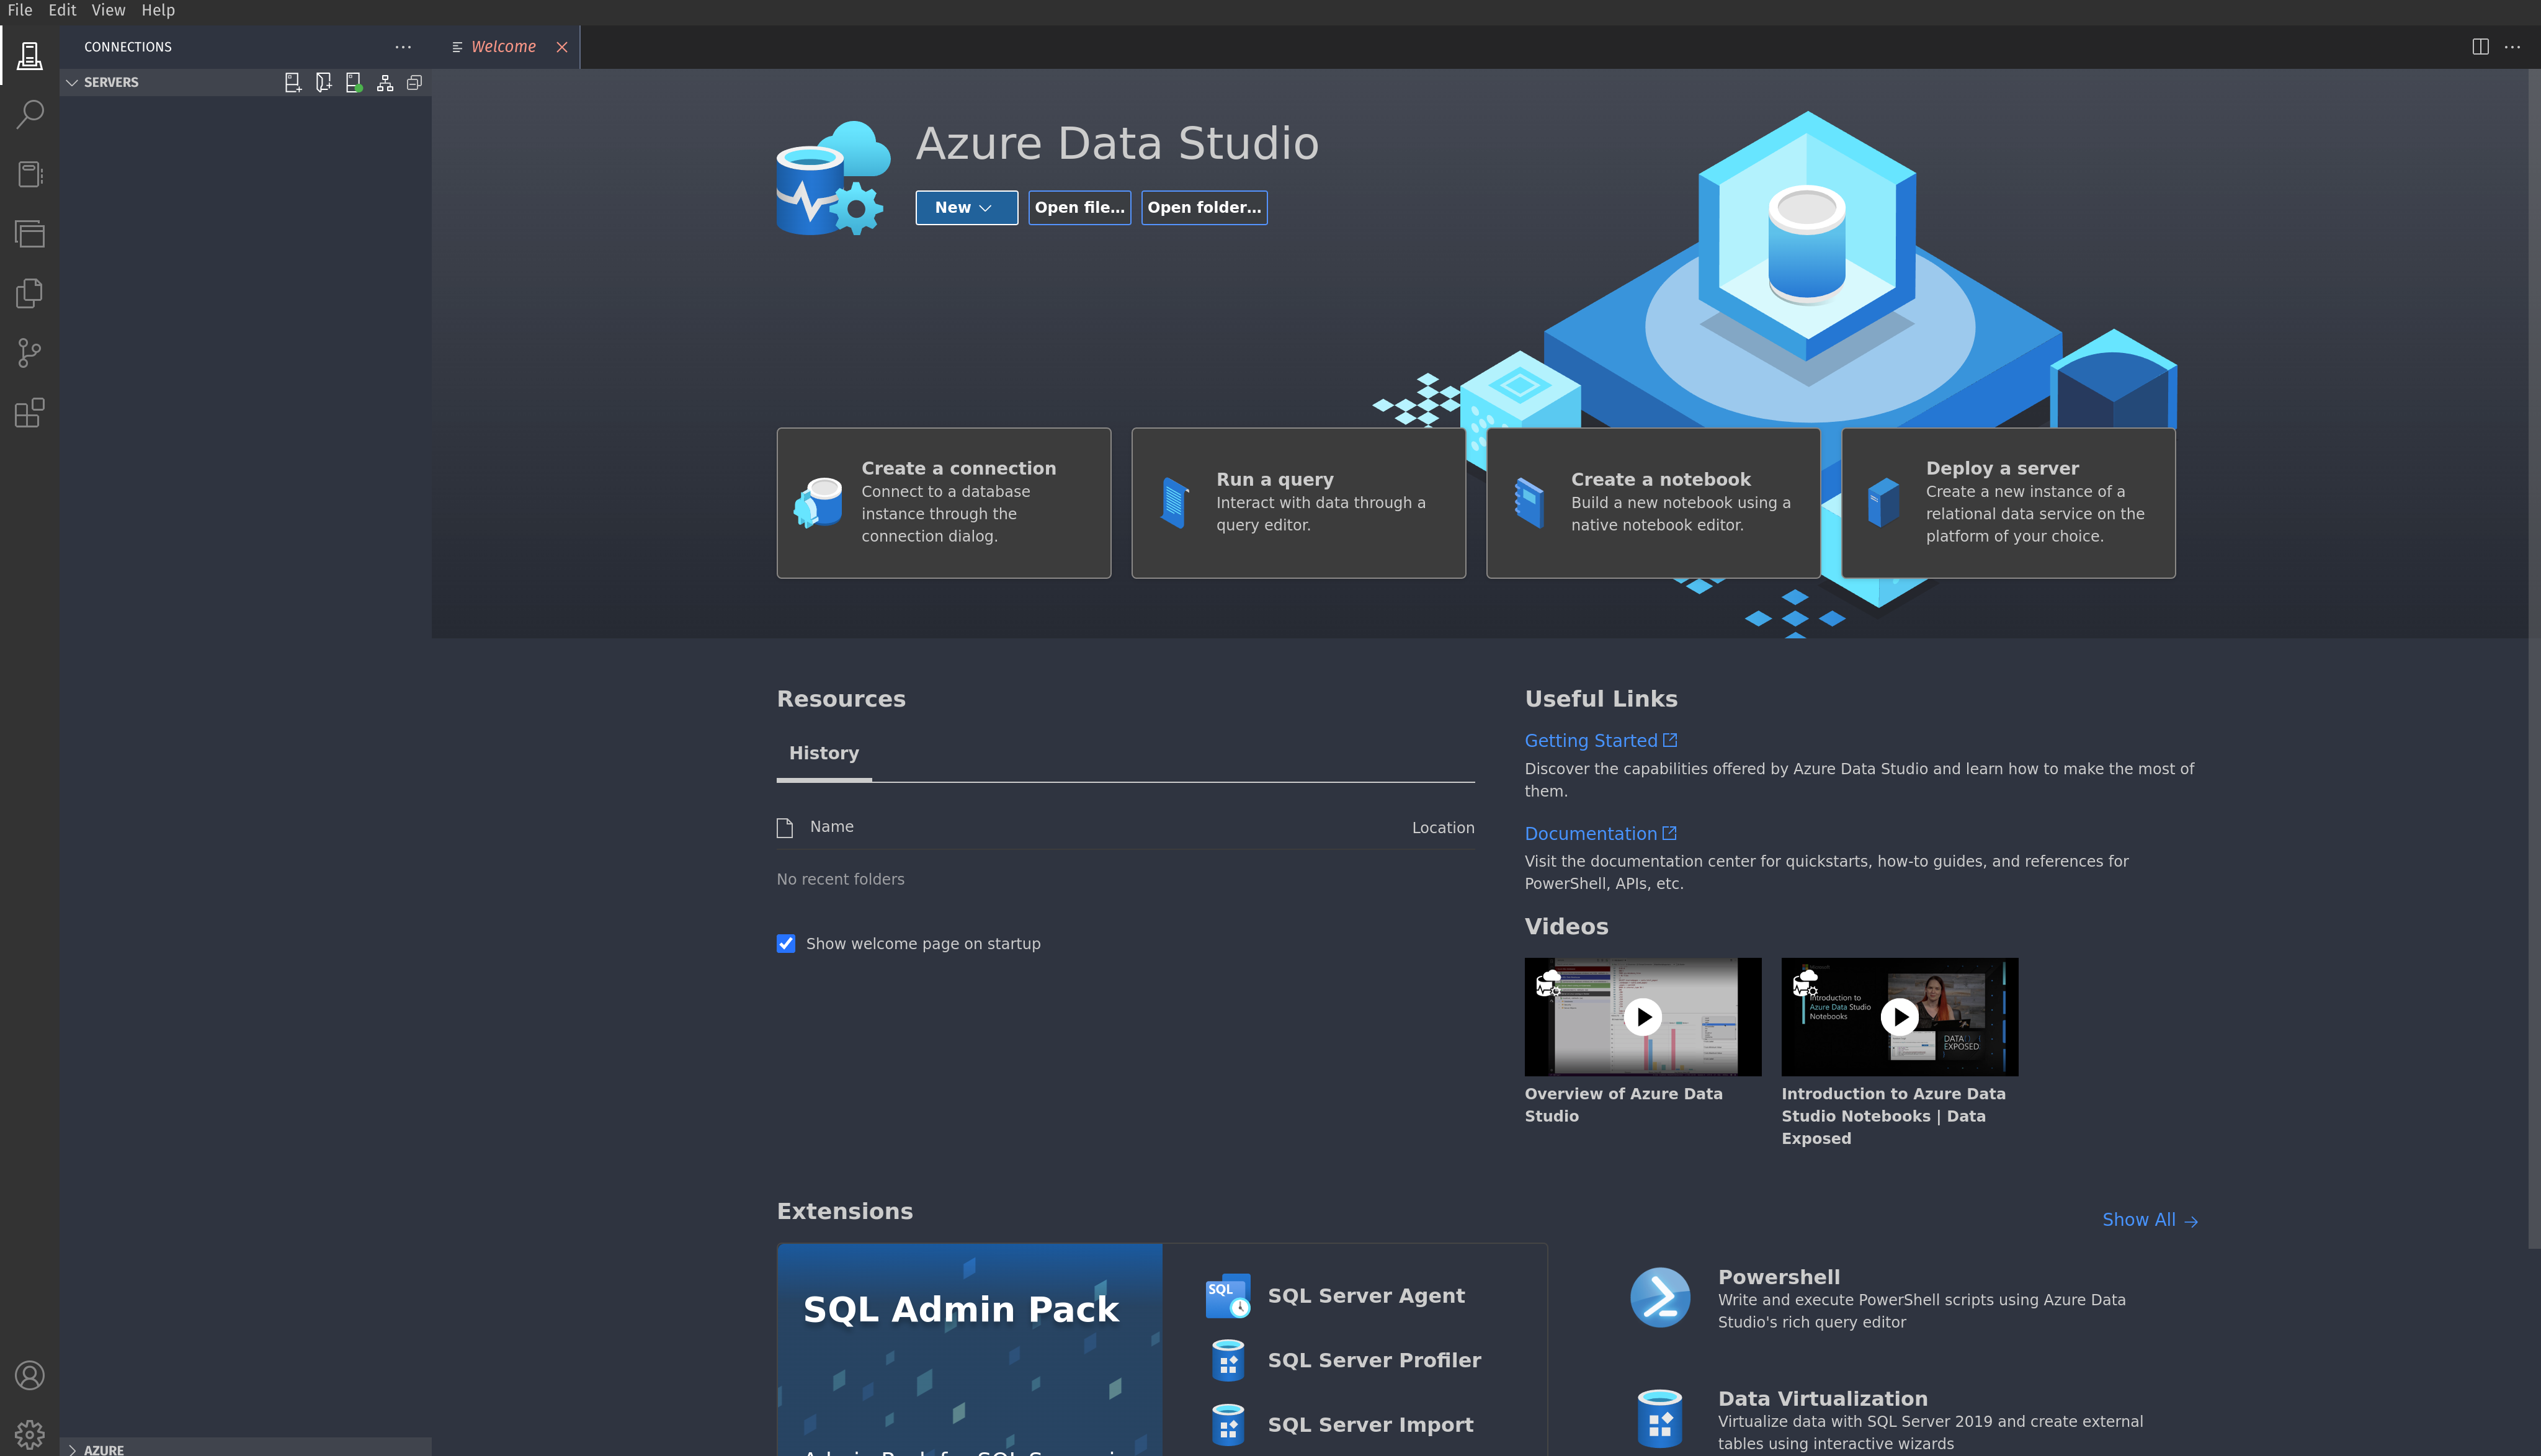
After installing azure data studio just search in application and launch it. On opening it shows screen like below:
Connecting to server
In order to connect it to sql server click on the below icon which is in the red box or click on the dropdown new which will show an option new connection.
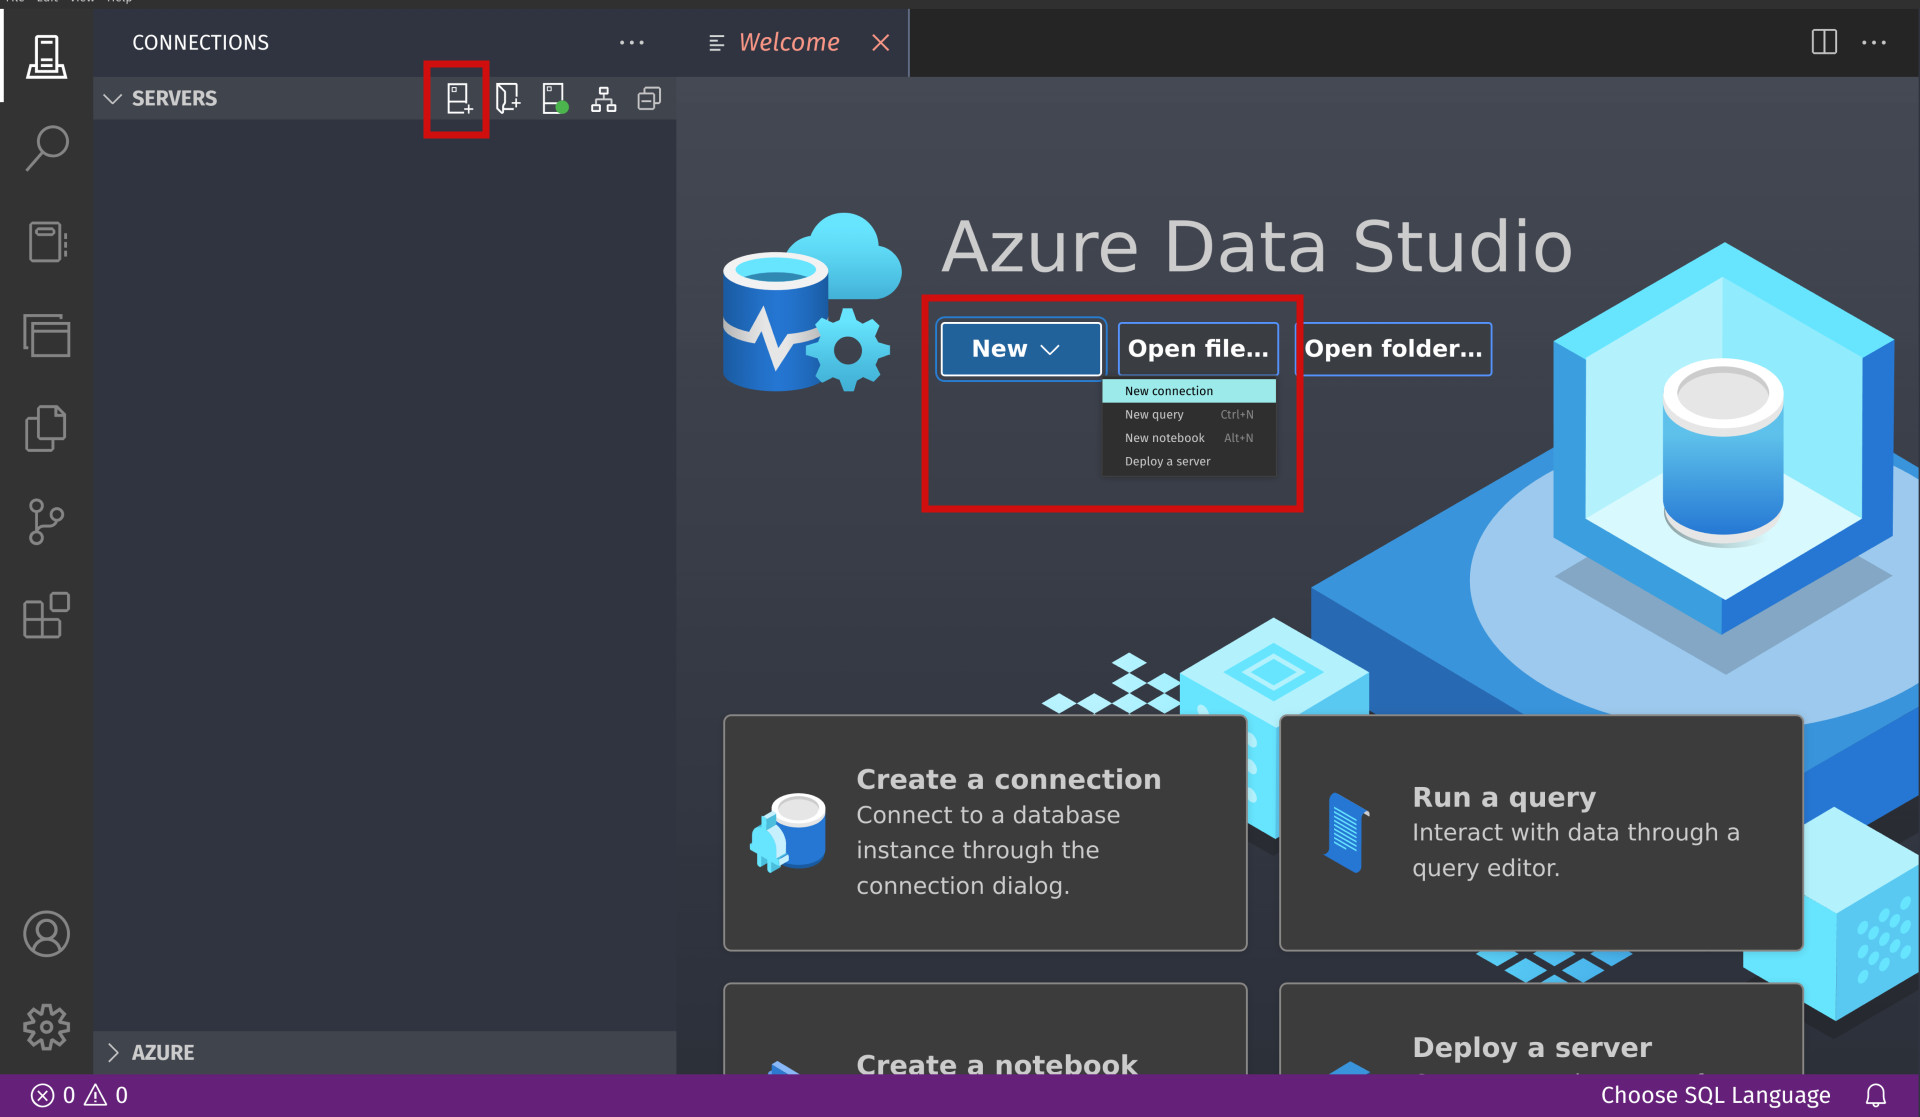
Now it will show a sidebar for connecting to the server just like in the below image:
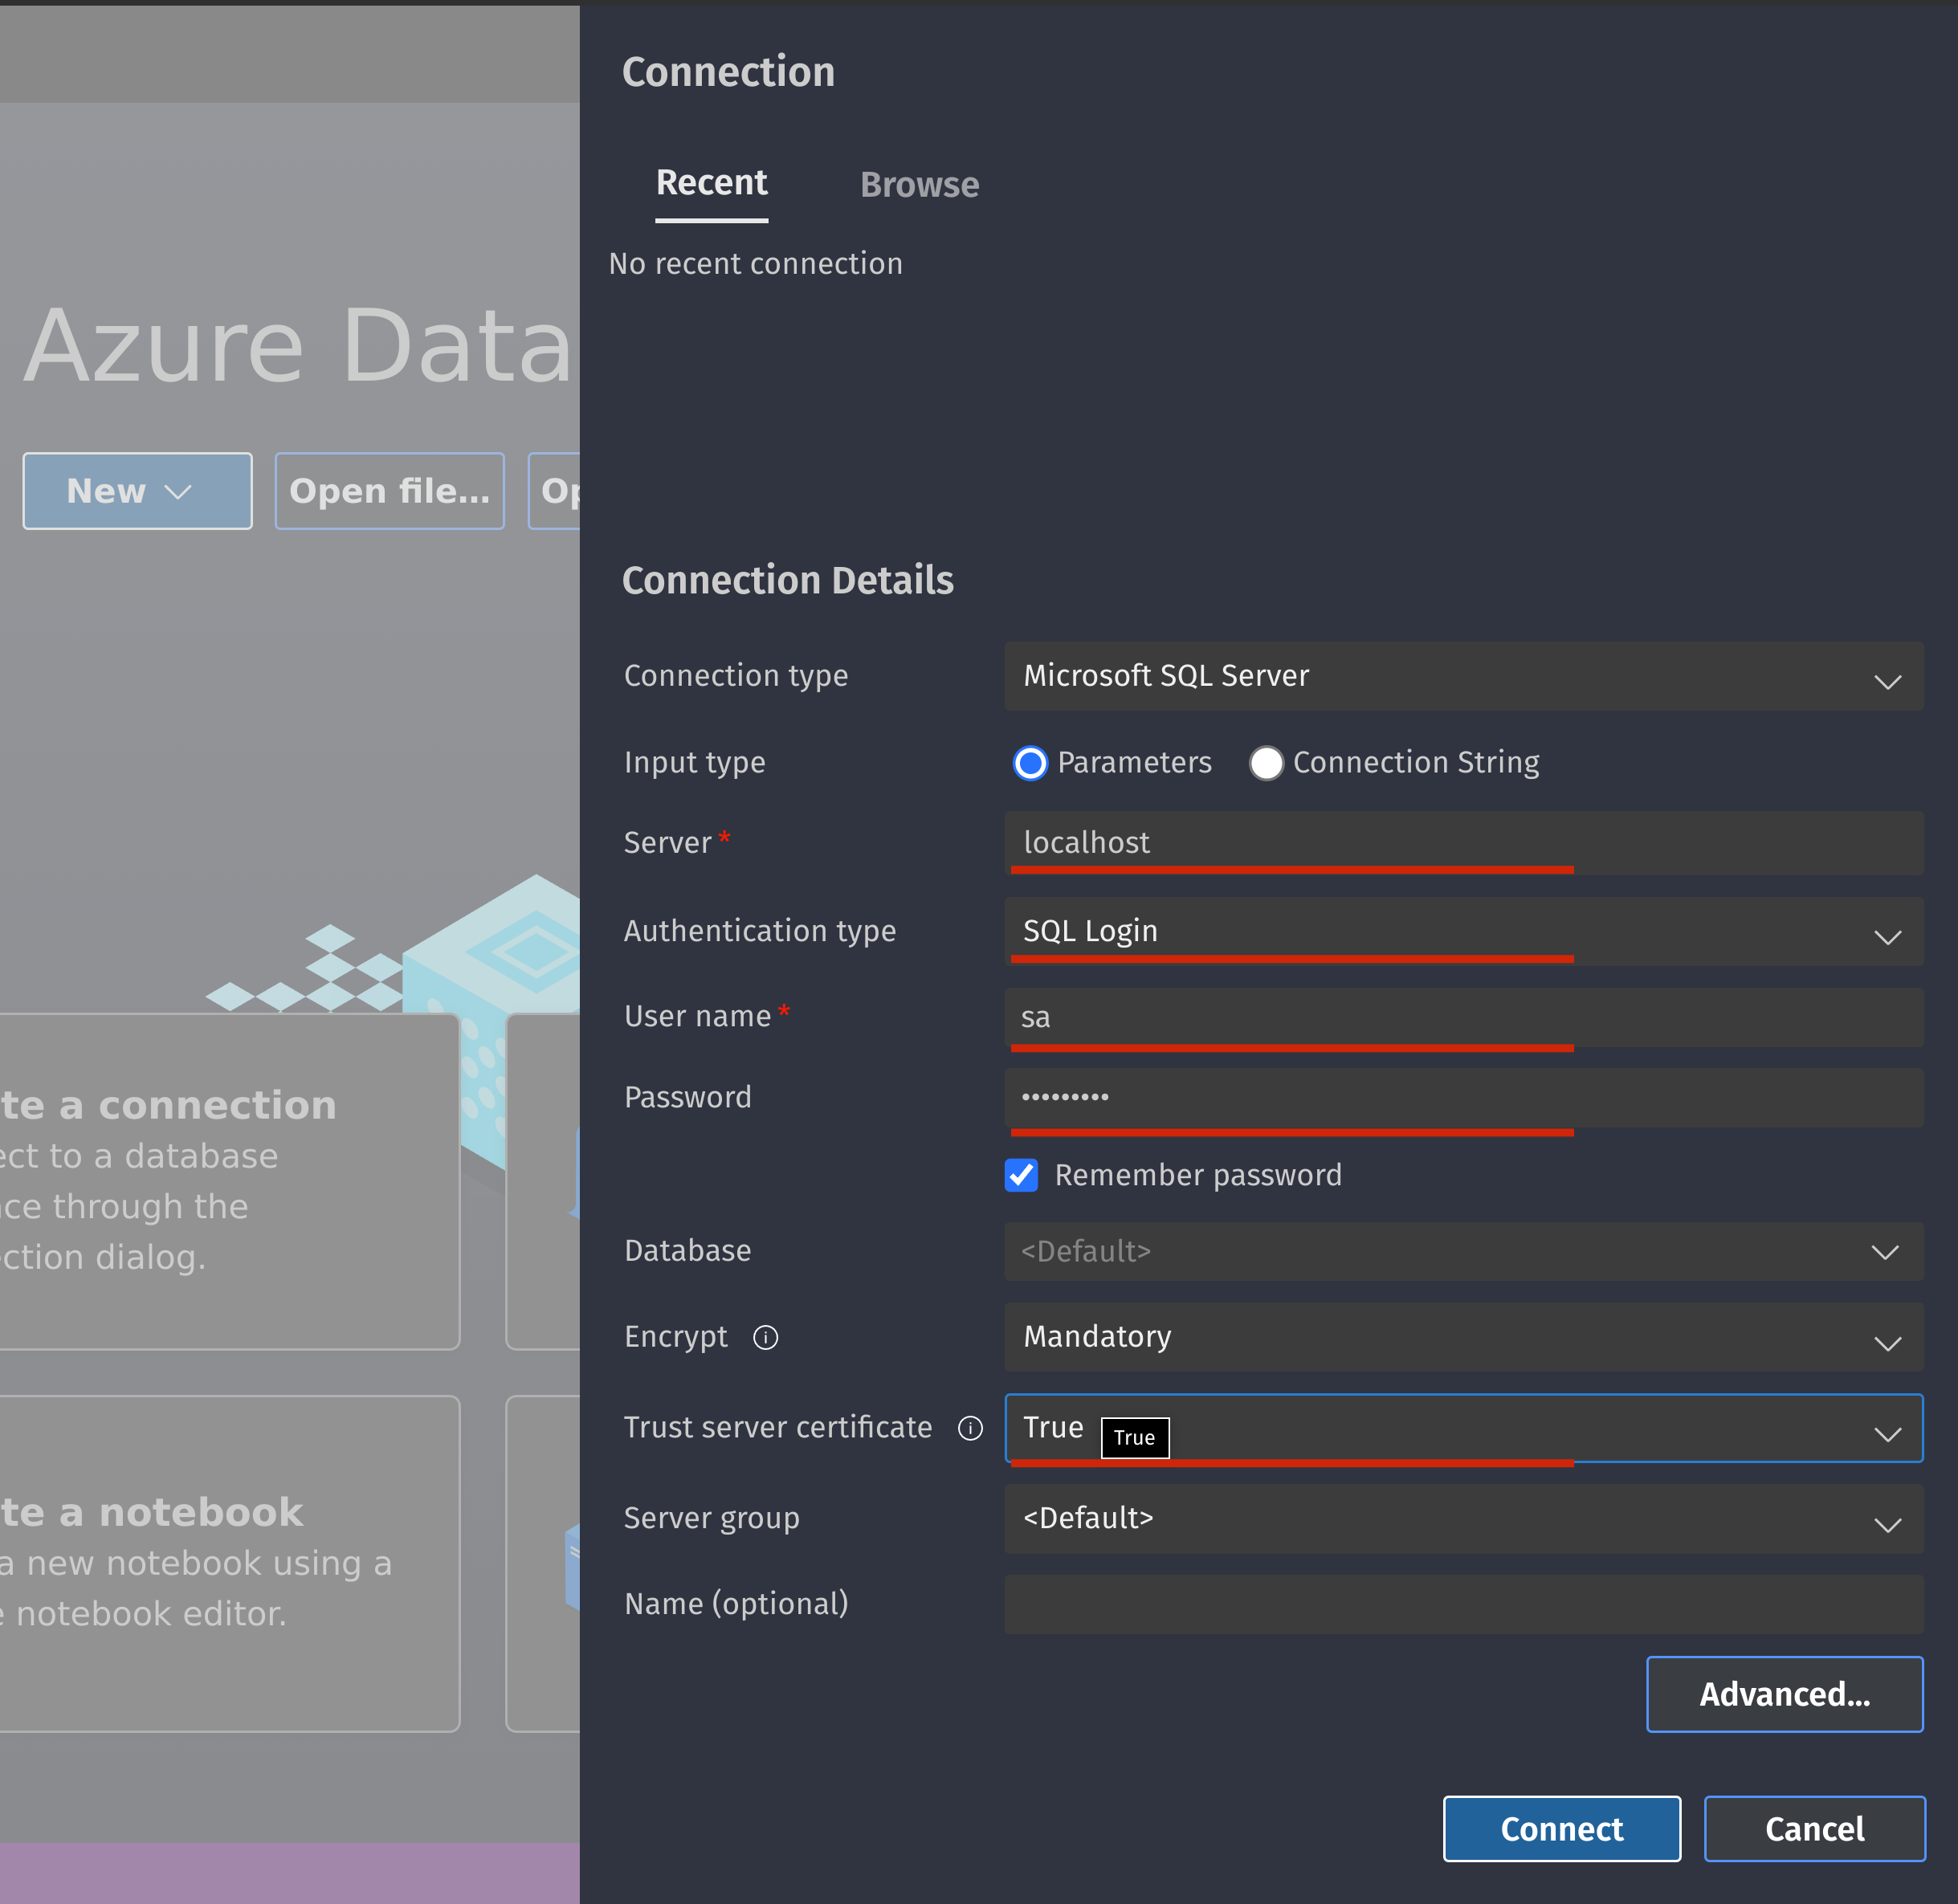
Now, make sure your Connection Type is set to Microsoft SQL Server. We will be focusing on 5 options there:
Server - On a local computer when we install any server like a webserver or a sql server it is by default accessed on the url
localhost.Authentication Type - It has 3 options but 2 are mainly used when working locally.
SQL Loginwhere you can login using the system admin (sa) account and the password that you set when running the configuration file for sqlserver or if you have created a new user then his credentials can be used. InWindows Authenticationthere is no need for User Name and Password because on localhost the windows gives direct access to server.User name - System admin (sa) if you want to use this but as I have already said it is not recommended. In case of adding a new user then add his username.
Password - Password for the user that is logging in (sa) or any other user (if created any).
Trust server certificate - This should be set to
truemeans we are trusting this server and it is safe to connect.
After adding all these details click on connect and it will connect to the server. You are not only limited to Microsoft SQL server here you can connect to any mysql server as well.
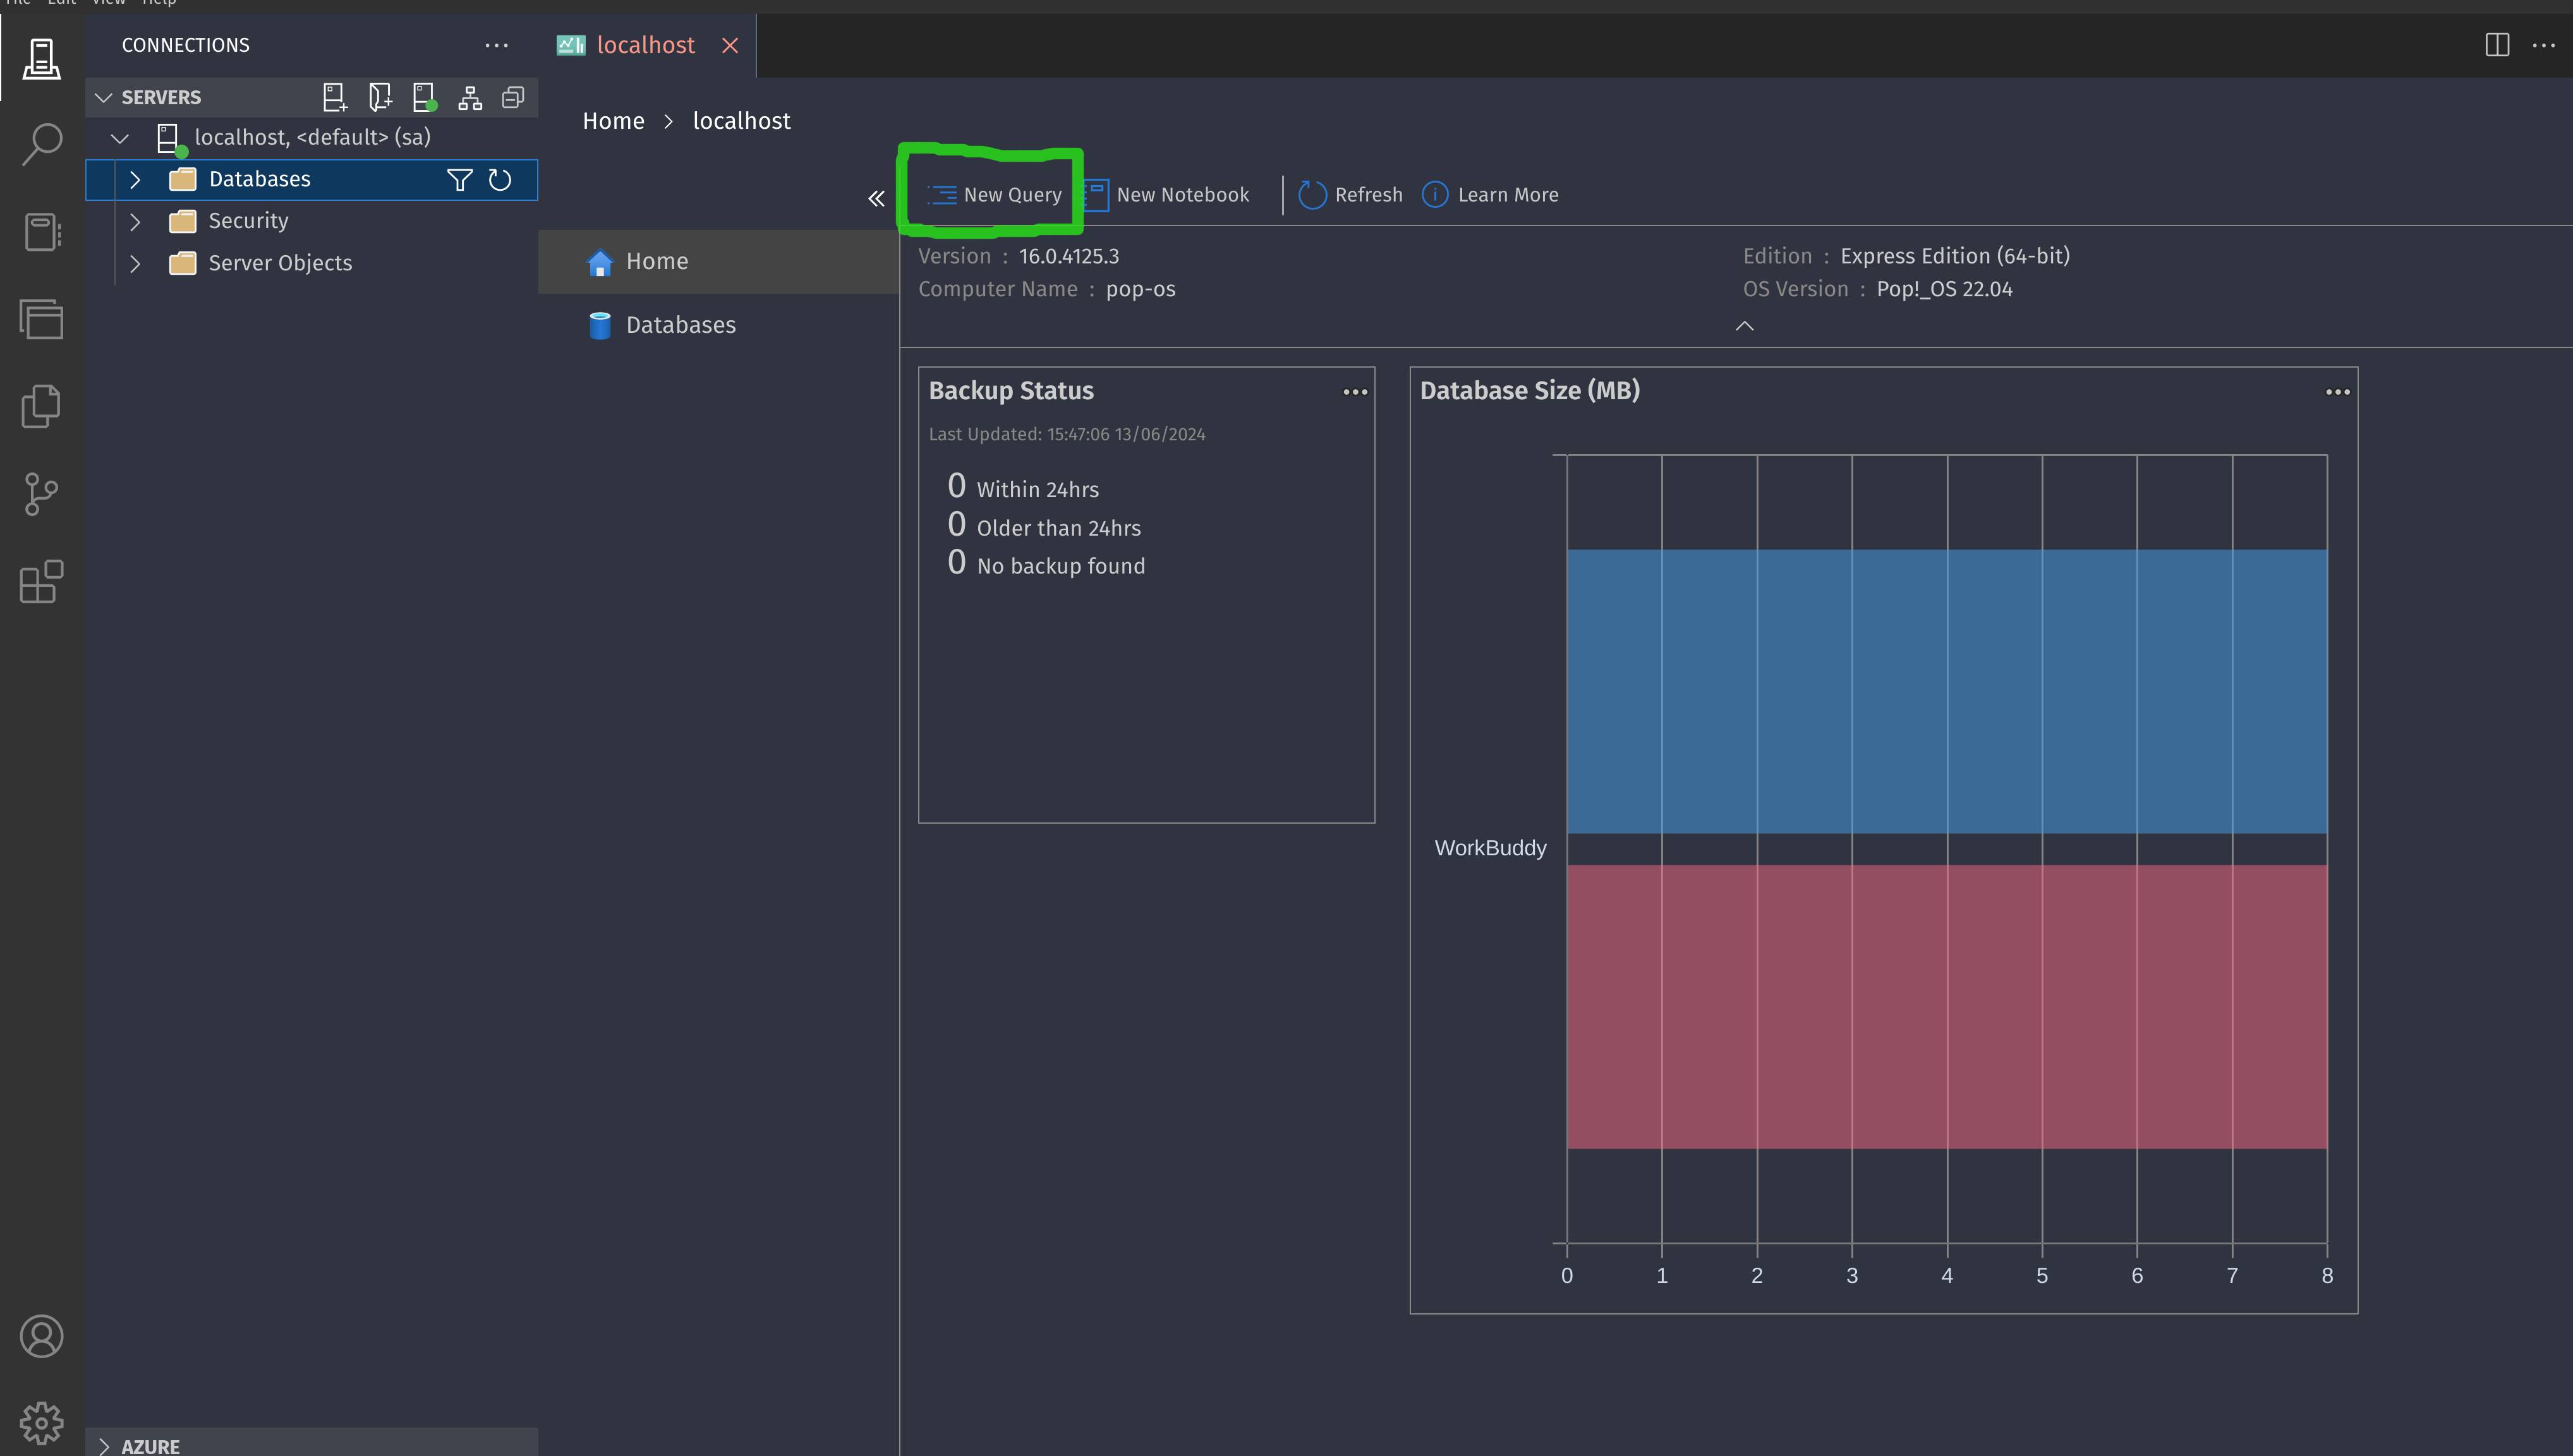
Once a connection is created you will see a screen like below:
Writing you first query
To write a sql query just click the New Query option as you can see in the above image inside green box. Once you click the new query the you will get the editor window as below where you can write your query.
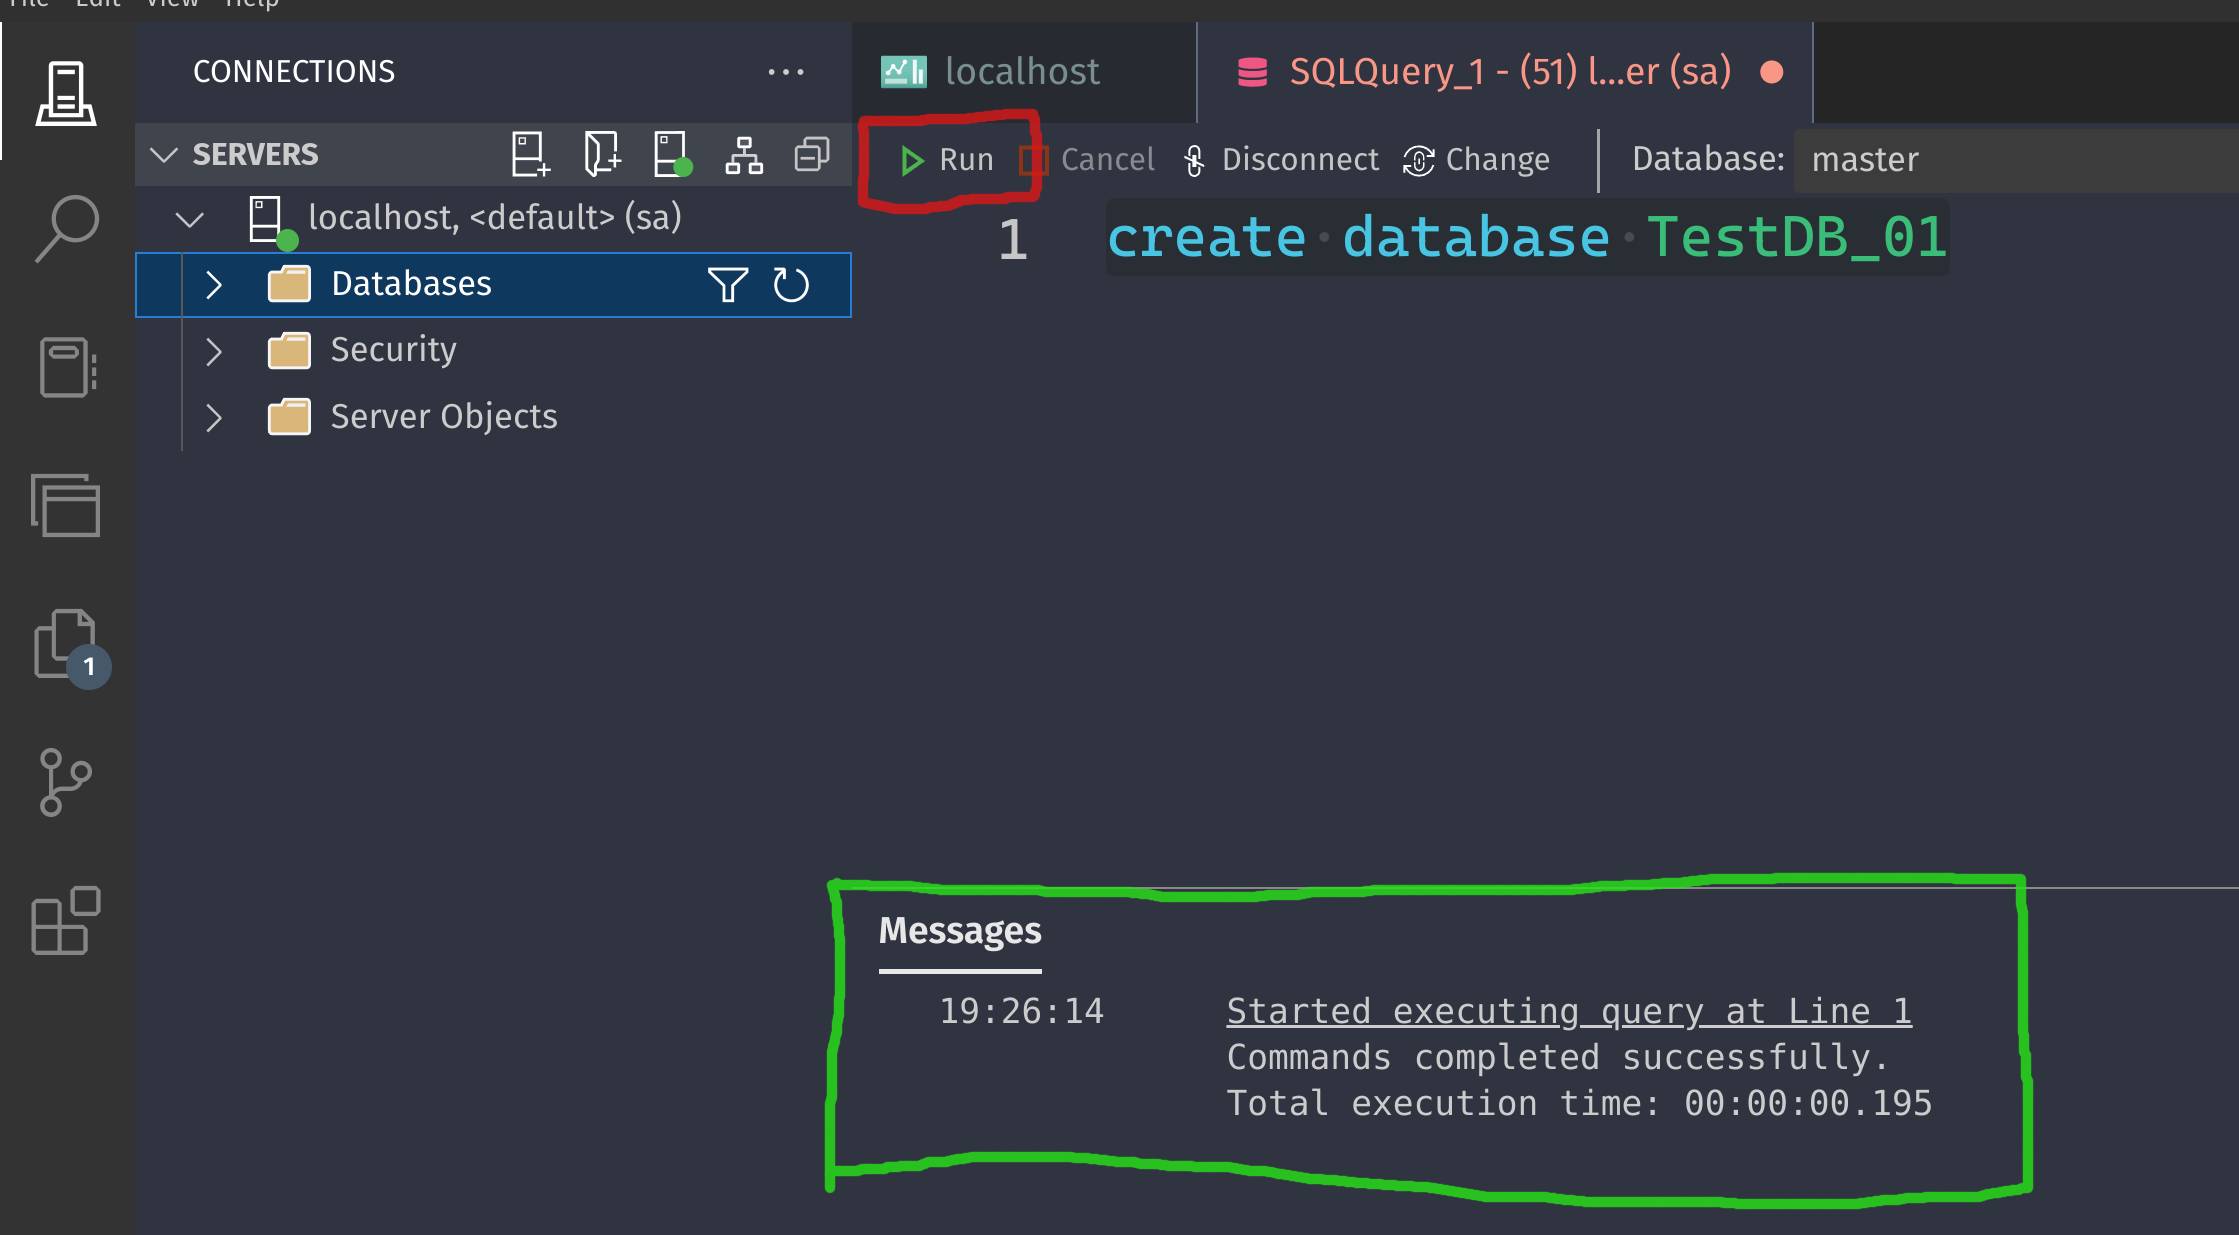
For this I have created a dummy database named TestDB_01 using the sql query:
create database TestDB_01In the red box the Run icon will execute the query. And in the green box the result of the query as we can see the query was executed successfully. In the below screen you can see the database was created successfully.

Conclusion
Well, there it is you perfect .net development environment on linux. Now I hope it will be helpful and you like it. You can continue to improve it but remember one thing don’t make your vscode bulky with hundreds of extensions then it will be slower than Visual Studio.
Thank you.